Thursday, December 31, 2009

Ten Years Ago Today!

Ten years ago today I was in the hospital having our oldest child on New Year's Eve while worrying about Y2K and power outages. Can you believe the Y2K scare was 10 years ago?! I can't believe my baby is TEN! Anyway, this is his birthday card. If you recognize it it's because I made it and posted it back in August! Well, last night I fixed up the inside so wanted to share that with you.

I made this little pop-up with chipboard numbers so he has a fun surprise worthy of a 10th birthday! We're at an indoor waterpark today to celebrate!
Happy New Year's to all! Can't wait to see what 2010 brings!
~Kristin

Wednesday, December 30, 2009

Vintage Friends

Good morning! I've got a card for you today, can you believe it?!? This one is for yesterday's color challenge on SCS (CC251) as well as this week's Mojo Monday sketch! Haven't done one of those in a while... I'm so excited about how this turned out. I am not a fan of Dusty Durango so I tried to use it minimally here- and I just love it now! The smaller two flowers are stamped off once for a lighter shade but the big one is not stamped off.

Not sure if you can tell but the background is wheeled in Going Gray with the coordinating wheel to Vintage Vogue called Very Vintage. It is such a pretty wheel! The "F" for friends is embossed in black craft ink and clear embossing powder.

I had a few flowers left that I'd cut so I couldn't let them go to waste... I actually stamped on the inside! Can't wait to order my acryllic blocks from SU on the 5th... I've been stamping without any blocks-which is NOT GOOD!
Anyway, I hope you like it! Stop by tomorrow to see the birthday card I made for our son.
~Kristin
SUO Supplies
Stamps: Vintage Vogue, Very Vintage wheel
Colors: Basic Gray, Going Gray, Barely Banana, Dusty Durango, Basic Black
Accessories: Scallop Trim punch, Scallop Trim corner punch, black striped grosgrain ribbon, Big Shot, Dotted Impressions Folder, distressing tool, Playground buttons, clear EP, corner rounder


Monday, December 28, 2009

Pink & sweet and worn around the edges


That's my take on this week's Clean & Simple challenge to find something in the Winnie the Pooh section of the Disney.com site. Now I probably should admit that I'm not a big cartoon/Disney/cutesy-kidsy fan but with that said, I do have a sort of soft spot for Piglet. Those little pink stripes can grow on ya! So Piglet it is for my inspiration today!

To make this I pulled out a long-ago retired background called Simple Stripes (circa 2004) to do my horizontal stripe thing. Added a pink Daisy from the Daisies #2 die and the Big Shot, and a birthday sentiment with some dots of pink glitter- trying to keep it sweet and simple just like Piglet. I decided to scruff up the edges for a worn feel just like a favorite old stuffed animal would have. Yes I know my dots of glitter are not uniform- maybe I was going for the "my kid did it" look!

So what do you think?? Simple enough?

Thanks for stopping by!
~Kristin

SUO Supplies
Stamps: Well-Scripted, Simple Stripes
Colors: Pink Passion, Pink Pirouette, Whisper White
Accessories: Daisies #2 die, Big Shot, 1 3/4" circle punch, distressing tool, sponge, Super fine glitter

Thursday, December 24, 2009

Merry Christmas!

Thought I'd stop in once more before Christmas. I'm sure you've not missed me since we're all a little extra busy this time of year. But I've missed my blogging time! My daughter and I have spent the last few days making some gifts for her friends and a few stocking stuffers for relatives so I thought I'd share those today.
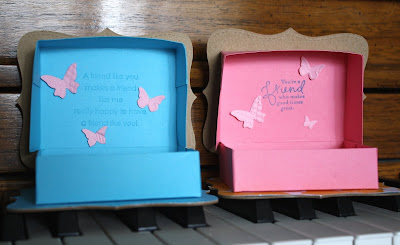
These are some chipboard ornaments we made with their school pictures on them. We used the Country Living Holiday Collection Kit that I had left over from last year. It was a great way to make some fast and fun gifts. My kids' wrote their name, age and grade on the back in their own handwriting.My daughter wanted to make some gifts for a few of her friends so I suggested more of the chipboard Top Note boxes that we made for teachers. I let her pick out the paper and embellishments and she even put them together.
Here is the one she made for herself to match her pink and brown bedroom. Inside we put some embossed butterflies cut with the new Beautiful Butterflies Embosslit and Big Shot. The wings stand out so it is almost like a little surprise shadow box inside. She absolutely loved making these!
I took pictures of the insides too, but the photos aren't great. That's what you get when you rush!

I hope you enjoy these because it might be all I have for ya for awhile.
I hope you each have a safe and happy holiday! Merry Christmas and thanks for stopping by to visit me!
~Kristin

Sunday, December 20, 2009

Love Bandit! {CAS46}

Today's Clean & Simple challenge on Splitcoast is a sketch challenge based on THIS adorable card by Lori Tecler! I've used it in two totally different ways. First up is using Love Bandit and I {Heart} Hearts which are both being released (in both wood and clear mount) in the Occasions Mini catalog from SU on January 5th!
Isn't that little raccoon cute? For this card I used the heart from the Movers & Shapers die to make a window in the front of the card. The "friend" heart showing through from the front was stamped with I {Heart} Hearts and punched with the full heart punch then raised with Stampin' Dimensionals. Just added some piercing around the heart opening and the racoon and called it done.

Here's my second take using Lori's card as inspiration. I was actually in a big hurry doing this one and the embossed scallop and snowflake were already in my unused stash from previous projects. I just added some Rose Red snowflakes to the chocolate card base, stamped the sentiment then added some ribbon.
Thanks for looking and have a great day! Come join us for the CAS challenge today if you'd like- we'd love to have you!
~Kristin


Saturday, December 19, 2009

Lattice Ornaments

I've got a few more gift ideas for you today. Both of these ornaments put the Lattice Die and the Big Shot to use. This first one is just two Lattice pieces staggered together. I used the Brushed Gold and Copper cardstock for these along with some gold cord and a copper brad. Tied a little bell to the bottom for fun!
This one actually uses 5 Lattice pieces folded in half and glued together. I used the Brushed Silver cardstock for this one, plus some silver elastic cord. There are also some dew drops and silver ribbon tails, neither of which are Stampin' Up! products.
Yesterday I said I might have a recipe for this tasty easy treat we like to make. Last night was our weekly Family Game Night so we started out making these treats to add to teacher gifts today. I don't have pictures so use your imagination.

These directions are tough so pay attention:
1- Lay out a layer of either small knot or waffle pretzels on a baking sheet.
2- Place an unwrapped Rolo on each pretzel.
3- Put tray in oven at 250 degrees for about 4 minutes.
4- Remove from oven and shove a whole pecan on top of the melted Rolo.
5- This is important: EAT!
Seriously, that easy and so good. We love them either warm right off the tray, or we like to freeze them and eat them frozen!

One week until Christmas! Hope you are getting everything done. My shopping is officially 100% complete so I'm off to the couch to work on Christmas cards... then wrapping this weekend. Sounds like some sledding might be in order tomorrow if the snow comes tonight that is predicted.

Thanks for visiting!
~Kristin

Friday, December 18, 2009

Top Note Chipboard Boxes

Have you seen these done before? I've done one back in February maybe, but don't think I posted many details about it or even an individual picture. There is a tutorial on Splitcoast to make these- they are fun and fairly easy! This time I made the Top Note pieces out of chipboard sheets that I had laying around. TIP: save all chipboard packaging from 12x12 paper packs and other products for using in your Big Shot! So cool! Especially with these bigger dies.
I made these boxes while coming up with teacher gift ideas. I like to make things for a number of reasons... because that's what I do first of all. But it also saves money and I hope to only give gifts that can be used or eventually discarded without causing any guilt. I know teachers get a ton of crap they don't really need. I hope you don't feel that these fall into that category.

I think tonight me and the kiddos will make some yummy chocolate treats to go inside. Maybe I'll even take some pictures and post a recipe tomorrow... we'll see, lots to do this time of year!

So what do you think? I made them non-holiday colors so they could be used on a desk or throughout the year if preferred.
Do you own a Big Shot? Make sure to check out the 12 days of Christmas sale at SU! Lots of good deals on Big Shot dies and accessories!
Have a great day and thanks for stopping by!
~Kristin
SUO Supplies:
Big Shot, Top Note die, Daisies #2 die, print pattern papers from old retired 6x6 hostess packs, corduroy buttons (Basic Gray and Summer Sun)
ETA: Tutorial linked HERE... sorry I forgot that the first time.

Thursday, December 17, 2009

Lattice Votive

I am so excited to share this with you today! Yesterday while trying to come up with some teacher type gifts I made this. The lattice is cut with chipboard sheets that come in paper packs etc. It went through the Big Shot with this die just fine- although to make punching them out easiest I did go back and forth 2-3 times through the machine. Worked like a charm! I used three Lattice pieces for each votive holder- tying them together at the corners with the Riding Hood Red Taffeta ribbon. Rolled up a piece of vellum cardstock (about 3.25x6 inches I believe it was- will have to double check), taped it shut on one end and slid it in. Put one of those little battery powered tea lights inside and voila! Oh boy, I love it when I can make things that are pretty and useful.


Here is a picture of the three I've made so far. They are actually very fast to make too. You could make this with various shades of cardstock too and change up the ribbon to any color. Can you imagine these in black? I think they'd look like wrought iron. Ooh, I'm gonna try that next!

Anyway, I've made a few ornaments and some little boxes too. I'll post those in the coming days.

Hope your holiday preparations are going smoothly!
Stampin' Hugs,
~Kristin

SUO Supplies
Lattice Die, Big Shot, Chipboard remnants, Riding Hood Red Taffeta ribbon, Vellum Carstock

Wednesday, December 16, 2009

Last Diva Challenge of 2009!

That's right, this is the last challenge of 2009 for the Diva Coffee Break Design Team! I hope you enjoy this beautiful color challenge- I sure did. I used my new extra-large punch the Two-Step Bird for this. I wanted to push the envelope for me with the branches by punching them in chocolate and olive then piecing them together- not once but three times. I know there are many stampers that wouldn't think twice about this, but I usually wouldn't go to the trouble.

This one was fun! I did use some old Print Patterns in Close to Cocoa- long ago retired. Isn't the font on this new stamp set, Well Scripted, so pretty? I just love it!

My two little flowers were made with three layers of one of the flowers from the Boho Blossoms punch. I kind of wish I'd done a third, but ran out of patience and time.

Anyway, gotta get to bed. Thanks for visiting today!
~Kristin

PS- Forgot to mention that this sketch is from the CAS blog challenge FTL72!

SUO Supplies
Stamps: Well Scripted
Colors: Old Olive, Rose Red, Chocolate Chip, Rich Razzleberry, Close to Cocoa, Whisper White
Accessories: Extra large Two-Step bird punch, Boho Blossom punch, Big Shot, Polka Dots embossing folder

Monday, December 14, 2009

Clean & Simple Challenge: Curves!

That's right, curves are the challenge for today's CAS challenge CAS45. I've never tried using curves like this for grass or snow so I did one for each... one cut with a craft knife and one torn. What fun! I had no idea what I was missing out on. Of course using my brand new set Love Bandit made it fun too! This DSP is once again from the retired Simply Scrappin' Kit that I used a few days ago called Pina Colada. Doesn't it look awesome with the Rich Razzleberry ribbon?! I just love these colors together.

The sentiment is from Short & Sweet and guess what... so is that tiny flower I added at the last minute. I don't think I've ever used it, and it seemed the perfect proportion for these trees. Finished them off with a touch from the white gel pen. Tree trunks are watercolored with a touch of Close to Cocoa ink and an aquapainter.
Here's my second version- using vellum cardstock for snowy hills. Does it work? It is tough adhering vellum so that the adhesive won't show. This is the best I could do with a bit of Tombo Mono Multi that I rubbed around with my finger to spread as thin as possible. Can you tell there aretrees from Lovely as a Tree in the background? I haven't used that set in ages- in fact, was considering putting it in my storage bin for a while. They are stamped in White craft ink while Dasher is stamped with black craft ink. The circle sentiment is from Punch Pals.

Neither of these is totally clean & simple in the sense that they have a lot of "white space" but they use minimal layers and embellishments so I think they qualify- at least by my definition.

So thanks for stopping by today! We'd love to have you join us for the CAS45 challenge.
~Kristin

SUO Supplies
(card 1)
Stamps: Love Bandit, Short & Sweet
Colors: Kraft, Old Olive, Rich Razzleberry, Close to Cocoa
Accessories: Modern Label punch, Rich Razzleberry dotted grosgrain.
(card 2)
Stamps: Lovely As a Tree, Dasher, Punch Pals
Colors: Ballet Blue, Whisper White, Bashful Blue
Accessories: White vellum cardstock, circle punches, White organza ribbon

Saturday, December 12, 2009

Love Birds!

Having fun playing with my new goodies after a brief break from stamping. I've gotten to the point of feeling stressed about holidays and shopping and preparation which usually causes me to stop enjoying my hobby for a bit. Mostly because of the constant little voice in my head telling me I should be doing other things. Well, I ignored the little voice today and made FIVE cards! I won't show them all to you today because two are for Monday's CAS challenge, one is my Diva card for Wednesday and one I just don't like yet. I'll tweak it until I do then I'll show it as well.

Anyway, for this card I enjoyed playing with the new punch from the upcoming Occasions Mini catalog called the Extra Large Two Step Bird. Not only do you get a bird a separate wing and a branch in one punch, but it is the sleek new slim design guaranteed to save you space! I love this clever punch design and wish all my punches were this slim style- they'd all actually fit in the same drawer.

I had in mind a sympathy card that I need when I set out to make this, but eventually it evolved into this anniversary card. To get the wings in the same design as the heart I just stamped them with the heart after they were punched out. By the way, the heart is from the new stamp set called I {Heart} Hearts also in the Occasions Mini Catalog available January 5th.

Did you notice the texture in the background? I used one of SU's texturz plates with the Big Shot. It is subtle beacause I tried to only do the bottom edge by using a piece of scrap paper between the texture plate and the top part of the cardstock... no such luck. Yes I could've used just the bottom edge of the texture plate, but I liked the pattern/design better at the inside edge. Now I'm glad it didn't work!

In hindsight I wish I would've used the new Scallop Trim punch for the bottom border also, but actually forgot about it. Wouldn't it have been lovely?!!

Thanks for stopping by today. Hope you are having a great weekend!
~Kristin

SUO Supplies
Stamps: I {Heart} Hearts, Teeny Tiny Wishes
Colors: Soft Suede, Very Vanilla
Accessories: Big Shot, Texturz Plates, Modern Label punch, Extra Large Two-Step Bird punch, Vanilla Satin ribbon, Eyelet border punch

Wednesday, December 9, 2009

Follow Your Heart!

I put this together yesterday for the sketch & color challenges on Splitcoast this week. It is so exciting to be stamping with new stuff! This set is called Vintage Vogue which also has a matching wheel that I have but didn't use this time. What do you think of the new satin ribbon? This is the only black ribbon I have- I always thought black was just not a good color for ribbon, but I've learned that I was wrong. It can be very striking and appropriate.

I also used the new Polka Dot embossing folder as well as the new scallop trim corner and edge punches. The corner punch takes some practice but it is a beautiful look when it comes together. I will play with it more then post any tips that I come up with. The main one I have right now is to practice on scrap paper before your final project!

The one thing on this card that is long since retired is the rub-on from Eastern Elegance. I love rubons but often forget to use them. I wanted a more formal script here and thought this was perfect.

Thanks for stopping by! I'm hoping to get started on my Christmas cards today... although I don't know why I bother- they never go out before New Year's Day! Some people try to get their's our first- well I pride myself on being the LAST Christmas card anyone gets. LOL!

Stay warm! We've got a wind chill below zero today- brrrr!
~Kristin

SUO Supplies
Stamps: Vintage Vogue
Colors: Basic Gray, Barely Banana, Always Artichoke, Rich Razzleberry, Basic Black
Accessories: Scallop trim edge & corner punches, Polka Dot embossing folder, Big Shot, Latte Button, Eastern Elegance Rub-ons (retired)

Oh My! Oh My!

I got my preorder today from the Stampin' Up! Occasions Mini catalog which debuts on January 4th! Oh my, have I got some neat new goodies to play with! Here is a sampling, and believe me I've got more to share.

First up, this sketch is for today's Diva Coffee Break Designs sketch seen here. We'd love to have you play along- just go visit the Diva blog and post your creation using this sketch to Mr. Linky.
So, these luscious embossed butterflies... they are from the new embosslit called Beautiful Wings. There are a total of 5 that get cut out and embossed at the same time. That's what an embosslit is all about!

Did you notice any other new products that I will be tempting you with until they are available in January?!? The punch is the new Scallop Trim Border which matches the Scallop Trim corner punch which will be available as a FREE choice during Sell-a-Bration in January! Notice the stamp behind the butterflies? That is called Fine Flourish and it is a single stamp. The sentiment is from the new set (which will be available in the new unmounted option, for use with our new clear acrylic blocks) called Well Scripted. Finally, the adorable1/4" Chocolate epoxy brad called Sending Love and the scrumptious new satin ribbon in Vanilla!!

How's that for getting as much new stuff as possible on one card??
Thanks for visiting me today! Stop back again soon.
~Kristin
SUO Supplies
Stamps: Well Scripted, Fine Flourish
Colors: Pale Plum, Perfect Plum, Very Vanilla
Accessories: Wide oval punch, Sending Love 1/4" chocolate chip brad, Beautiful Wings Embosslit, Big Shot, Scallop Trim border punch, Satin vanilla ribbon

Tuesday, December 8, 2009

Live Like You Mean It!

Are you ready for a break from holiday stuff and needing something funky? How 'bout this card? I used this week's Mojo Monday sketch- look at those fun circles! So many possibilities. Hadn't used my surfer dude in a while and he fits just right. Notice how he looks kind of smeared? Well, my ink pad was having issues with tiny fibers showing up so I got frustrated and just swiped him across the pad. Wow- look how that turned out?! I might have just invented a new technique... OK, that may be stretching it a bit but you can humor me.

Are you wondering where on earth these awesome papers came from?? Well, SU of course, but they are part of the (retired- so sorry!) Simply Scrappin' Kit called Pina Colada! The strips across the bottom are from it as well- they are adhesive cardstock stickers. If you haven't ever tried our of SU's Simply Scrappin' Kits I highly recommend them. I am guilty of having LOTS (like probably over 30 of these kits!) but I never think to use them on cards... until now. Actually, the truth is I like to save them for my scrapbooks but guess what- they come with 3 sheets of each patterned paper so I've got at least one to spare, right?!

Well, that's about it. I did stamp this inside to this card but it is kind of boring so I didn't show it. Just says Live Like You Mean It- which I totally love that sentiment, but I didn't spend much time "prettifying" the inside so...

Thanks for visiting! Be sure to stop back tomorrow for the next Diva challenge- it is an awesome sketch that is sure to inspire you!

~Kristin


SUO Supplies
Stamps: Extreme Surfboard, Extreme Elements, Live Like You Mean It (retired)
Colors: Old Olive, Whisper White, So Saffron, Tangerine Tango (retired In Color)
Accessories: Pina Colado SS kit, Paper Piercing tool (now you can purchase this separately for only $3.50!)

Monday, December 7, 2009

So I lied!

LOL! Yesterday I mentioned all the possibilities I saw with this color combination that weren't Christmas... well, obviously this one is for Christmas. I fully meant to make that sentiment a "thank you" then just forgot. Well, this card could easily be a thank you or even a winter birthday, or I think even a sympathy card so you'll have to use your imagination. ;)

Have I mentioned yet that this set as well as the others on the Dormant list will be retired as of January 4th?? If you haven't gotten this set yet, you should! I'll try to figure out how to link or post this list of retiring stamps next, but in the mean time this set and the Polka Dot background stamp- you simply must have them! To see the Polka Dot background stamp just scroll down a few posts to the all white card with the glittery snowflake and the red accents.

So NOW will you go play along with the Clean & Simple challenge today??

Glad you stopped by!
~Kristin
PS- Here is an updated version of the same card with some added snow with my white gel pen. What do you think? I love this tiny touch and am so glad I decided to add it at the last minute.


SUO Supplies

Stamps: Branch Out, Medallion background, Teeny Tiny Wishes

Colors: Soft Suede, Kraft, Real Red, Very Vanilla

Accessories: Soft Suede dotted grosgrain, Modern Label punch

Sunday, December 6, 2009

Suede & Shimmer Noel {CAS44}

Well, here it is... my first try for the Clean & Simple Design Team on Splitcoast! I was so excited to see a PM from Jen saying I'd been chosen! I think I had made this card within about 2 hours of hearing from her.

The challenge this week is a luscious color combination of brown, red and white/vanilla. As I said on SCS, there are so many ways to use this color combo. I plan to try it again tomorrow after I get the kids off to school (or maybe yet tonight if I can keep my eyes open long enough).

Can you tell that the sentiment (as well as the snowflakes below) were stamped with not ink but Shimmer Paint?! Yep, this is my new favorite way to use Shimmer Paint. The Champagne Mist looks especially nice with the sheen in this Designer Series Paper, Christmas Cocoa.

Here's the inside. I had cut this Top Note thinking I'd use it for the front, but when I decided against it it was still laying here and perfect for the inside.

Well, if you haven't already why don't you go play along with the CAS challenge for today?! I'd love to see what you come up with!

Thanks for stopping by again!
~Kristin

SUO Supplies
Stamps: Many Merry Messages, Serene Snowflakes
Colors: Soft Suede, Real Red, Christmas Cocoa DSP
Accessories: Champagne Mist Shimmer Paint, Felt Flurries, Scallop Edge punch, Top Note Die, Big Shot

Saturday, December 5, 2009

Procrastinating!

Yes, I'm procrastinating! I should be shopping or doing a number of other things, but instead spent time today participating in not one but two different challenges. The Color Throwdown #71 and the Fall-to-Layout #71 from Clean & Simple blog.

So the colors I chose to use are Old Olive, Close to Cocoa, Ruby Red and Cameo Coral. Isn't this sketch nice?! I love the idea of something hanging from the ribbon. Initially I didn't think I'd do a Christmas card but decided to afterall.

That's all I've got- not much chatter tonight. Hope you like it.

~Kristin

SUO Supplies
Stamps: Woodgrain background, Forest Friends
Colors: Old Olive, Ruby Red, Close to Cocoa, Very Vanilla
Accessories: Sleigh Bells ribbon, Chipboard, circle punches, scallop edge punch

Sparkling Flamingo Lattice

As promised: glitter for the THIRD day in a row! I don't know what got into me- I almost never use glitter. I put the Glitter Window technique to use again today- which means I layered clear packing tape on the back of this Lattice Die then sprinkled it with Supernova Fine glitter in turquoise. Of course before I sprinkled it I had to cut the excess packing tape away from the edges of the Lattice piece. That's why there is a thin layer of glitter on the outer edge as well- purely accidental!

This layout is from this week's sketch challenge on Splitcoast. And that's all I'm gonna say about that (are you hearing Forest Gump??).

Thanks for stopping by! Be sure to come back Monday for my first attempt as a Clean & Simple Design Team member. Hopefully I won't blow it!

~Kristin
SUO Supplies
Stamps: Teeny Tiny Wishes
Colors: Tempting Turquoise, Basic Black, Whisper White
Accessories: Big Shot, Lattice Die, Supernova Fine glitter, Word Window punch, Modern Label punch, Large black grommet, playground button

Friday, December 4, 2009

Dazzling White Christmas

If it has to be cold out it might as well be white outside as well, at least that's my theory! And it works for today's Limited Supplies Challenge as well. Today's challenge is to use only white cardstock and one color ink, plus only white accessories. It was a struggle, let me tell ya, but you're probably getting used to hearing that from me.

Anyway, this turned out way better than I had hoped, so I'm pleased. The main panel is shimmer white cardstock that was sent through my Big Shot not once, not twice but THREE times! Once with the Snowflake Sizzlit, once with the Texturz Plate and once with the Top Note die. I don't think I've ever BS'd the same paper 3 times before. LOL!

I chose the red dots as the background hoping more of them would show up behind the glittery snowflake but it would've had to be off center and tilted to get more to show up so I just left it centered. Speaking of the snowflake, I used the Glitter Window technique for it which is extremely laborous and intensive: place packing tape behind the cut out then sprinkle with glitter. Phew! (did you catch my sarcasm?) If you've been a customer of mine you're probably familiar with this technique. I haven't done it in a while which is why I've been wanting to try it with this snowflake die!

Well, I don't know what's gotten into me but this is the second day in a row to show you glitter on a card and I've got yet another tomorrow! Each time I use it I get bolder and bolder so you won't want to miss tomorrow's card. It is a little bit out of the ordinary for my style too (if I even have a style).

OK, that's enough chatter I'd say. Thanks so much for stopping by. OH WAIT! I almost forgot! Today I found out that I have been selected as one of the three members of the Winter Design Team for the Clean & Simple challenges on Splitcoast! Seriously- they chose me! I'm so excited about it and hope I don't totally hit a mental mojo block come Sunday night.

See ya tomorrow!
~Kristin

SUO Supplies
Stamps: Home for Christmas, Polka Dot background
Colors: Whisper White, Real Red
Accessories: Dazzling Diamonds, Big Shot, Snowflake Sizzlet, Texturz Plates, Top Note die, White organdza ribbon, packing tape
ETA: To answer a question that has been asked, I believe I remember actually stamping after I had run this through the Big Shot several times... my plan was to just cover it if it didn't work. How's that for planning ahead?! LOL!

Thursday, December 3, 2009

A Little Early??

OK, so it might be a little early for Valentine's cards... but just like always I started out with one idea and it progressed to this. I wanted to use the new sets I {heart} Hearts as well as the hostess set Holiday Best. A few other things to point out are the sparkly heart- I made this by punching a heart in a scrap of the sticky sheets. Just add it to your project, peel off the label then pour chunky glitter over it. I also used the Movers & Shapers to cut the large heart out then used the punch which is a slightly smaller size and layers perfectly. The smallest heart is from the I {Heart} Heart stamp set.

Can you see the texture on the black layer? I used the Texturz Plate and Big Shot to do that. It adds a neat look in person. Well, it's taken me ALL DAY to get this made and then posted so I'm off to bed now. Hopefully I'll do some stamping tomorrow before the on-line shopping! ;)

Thanks for visiting,
~Kristin

ETA: A much better picture.
SUO Supplies
Stamps: Holiday Best, I {Heart} Hearts
Colors: Basic Black, Real Red, Whisper White
Accessories: Real Red Dotted grosgrain, tag corner punch, scallop edge punch, Large heart punch, Heart to Heart punch, Movers & Shapers with Heart die, Big Shot, Textured Plate, Chunky red glitter, Horizontal slot punch, black embroidery floss, crimper, My Way punch

Wednesday, December 2, 2009

Sentiment Struggles

Good Wednesday morning! How is everyone today? I am waking up very slowly this morning (not unusual for me) and considered going back to my warm cozy bed once my kiddos were off to school, but that NEVER happens. Once I'm up, I'm up for good.

Well, this card is for today's Diva Coffee Break Designs color challenge! I also used the Mojo Monday sketch for this week but boy did I struggle with my sentiment piece! It probably was because I was rushing- Tuesday's are busy for me with volunteering for 4th grade then gymnastics after school for my daughter and my volleyball night. Once I leave the house at 4:30 I don't get home until after 11 pm. So if my card isn't done and posted by noon on Tuesday then I don't get it done.

I bet I made at least 7 different sentiment labels with different punches and layers... just couldn't get the look I wanted with the ribbon on there. I'm still not sure, but I had to decide on something so this is what I ended up with. Anyway, I think this might be the first time I've used the snowflakes with this Branch Out stamp set, and I'm almost positive this is the first time I've done the masked moon on a card. I love the look, even though it is a bit subtle.

Well, thanks for visiting today and be sure to go play along with the Divas! We're trying to beat last week's number of participants and you can help! You have all week to come up with a creation of your own to add with Mr. Linky. Don't forget, one of our Featured Stampers will be drawn for a prize this month!

~kristin
SUO Supplies
Stamps: Branch Out, Short & Sweet
Colors: Melon Mambo, Basic Gray, Whisper White, Bermuda Bay
Accessories: Large Scallop circle die, Big Shot, Modern Label punch, Bermuda Bay dotted grosgrain, Felt Flurries, sponge
ETA: I just found out today that this stamp set is retiring (currently on the dormant list) as of January 4th, 2010! Just thought you'd like to know.