Saturday, October 31, 2009

Your Friendship

Sorry I've been a bit irregular with my posting this week- it's been a busy one! Between a sick kid (again!), volunteering at school, Trick-or-Treating and the normal stuff I just haven't done much stamping. We also had our last regular season high school football game last night (my DH coaches) and their team went undefeated in the league! They are ready to head to the playoffs which could extend the season another 5 weeks potentially.

Anyway, on to the card... I used some of my new stuff for the first time including the stamp set Wings of Friendship which is a level 2 hostess set, the Texturz Plates Kit #4 (has the definition of Friend in it) and this beautiful vanilla taffeta ribbon. It is always a thrill to use new goodies for the first time! I am just loving the look of texturing the vanilla cardstock!


I also used the Fall-to-Layout #65 from the Clean & Simple challenge blog for the sketch. The color combo I just came up with myself. It is Rich Razzleberry, Apricot Appeal, Old Olive and a tiny touch of Pumpkin Pie on the bird's wing and chest. Speaking of the bird, in order to follow the sketch I first stamped the entire image including the bird, then trimmed it to a long narrow piece. Then restamped the bird and cut it out to pop up with dimensionals so it kind of stands off the card.

I hope you like it and am happy that you stopped by today! Have a great Saturday!
~Kristin

SUO Supplies
Stamps: Wings of Friendship
Colors: Very Vanilla, Rich Razzleberry, Apricot Appeal, Old Olive, Pumpkin Pie.
Accessories: Stampin' Up! Markers, Scallop Edve punch, Vanilla Taffeta ribbon, Big Shot, Texturz Plates #4

Thursday, October 29, 2009

Go with all your heart!


Bordering Blue, Elegant Eggplant and Rich Razzleberry... so what do you think of this color combo? I really like it and think it could be done in so many ways that would be even better than this. This color challenge came from the Color Throwdown this week, #66. Great choice LeAnne! The flowers are colored with a combination of watercolor crayons and ink from the Rich Razzleberry lid with and aquapainter to blend them all. I didn't intend to cut them out at first, due to such detail, but the white paper I stamped on had some random rust colored smudge and I just couldn't trim it off. The sketch I used here is from this week's Sketch Challenge on Splitcoast - SC252.

Did you notice the Medallion stamped in Versamark on the top and bottom of the card? My pictures seem to upload darker than they appear on my photo editing software, so it might not be visible. Try clicking on the picture if you really want to see this detail.

Anyway, thanks for looking today. If you are stuck in a stamping rut, why don't you check out one of these challenges I've linked... or better yet, look at the very bottom of my sidebar on the right and click on "The Daily Dare" button for an entire list of challenges on any given day. It is a wonderful resource to get you going!

Have a great day!
~Kristin


SUO Supplies
Stamps: Asian Artistry, Medallion
Colors: Bordering Blue, Rich Razzleberry, Elegant Eggplant, Whisper White with some touches of Old Olive and Always Artichoke on the leaves, and black craft ink for embossing the flower image.
Accessories: White organza ribbon, clear embossing powder (EP), 3/4" circle punch, stampin' dimensionals.

Wednesday, October 28, 2009

Diva Coffee Break Design Sketch Challenge- DCBD151

Are you ready for another Diva Coffee Break Designs Wednesday?!? This week we've got a sketch for you and we'd love to have you play along! If you haven't noticed we've started showcasing a "Featured Artist" each week and that artist is chosen from those of YOU that play along with our challenge and link to the DCBD blog! There is a VERY good chance of being chosen... in other words get on over there and check it out. We'd love to drive a little traffic your way and let you bask in the warm compliments you'll surely receive!

Here's our sketch this week... I've taken some liberties with it, but I think you'll still see a resemblance! I do have three panels even though the center one is larger and overlaps the smaller two. Speaking of the smaller two, they each have been stamped with the grass stamp from Inspired by Nature in Vanilla ink- I'm pointing this out because it was tough to capture in a photo. I love this stamp set and had neglected it lately with all my new rubber- so it gets a chance to shine today. This is a perfect stamp for using those markers on! Here I used Rich Razzleberry, Sahara Sand and Basic Black.

Did you notice the ribbon treatment? Both the top and the bottom ribbon are threaded through a slot punched through the main flower panel. The black strip at the bottom I found in my scraps- already punched with the Curly Label punch! Let's see what you can do- go visit the DCBD blog and get inspired by even more great designs!

So glad you decided to visit today! Thanks for your sweet comments, as always!
~Kristin

SUO Supplies
Stamps: Inspired by Nature
Colors: Rich Razzleberry, Sahara Sand, Basic Black
Accessories: Rich Razzleberry Ribbon, Horizontal Slot punch, Modern Label punch, Curly Label punch

Tuesday, October 27, 2009

Thank Ewe!

Was finally able to enjoy some stamping today! This is for this week's Mojo Monday sketch as well as the Color challenge over on Splitcoast today! I love them both and am so happy I decided to combine them. What a fabulous color combo!

I hope you like it, but I gotta run. I finally get to volunteer in my son's 4th grade class today! I've been scheduled to for the last 3 or 4 weeks but have had a kid home sick every Tuesday!

Have a great day and be sure to stop back tomorrow for our weekly Diva challenge- it is a sketch and a good one!
~Kristin

PS- Ooh, in my haste I forgot to mention that the black piece is textured with SU's large dotted Texturz Plates.
SUO Supplies
Stamps: Pun Fun
Colors: Kraft, Basic Black, Melon Mambo
Accessories: Mambo dotted grosgrain, Liquid Applique, Heart to Heart punch, scallop edge punch, Latte button, black embroidery floss, and and the DSP is from Razzleberry Lemonade!

Monday, October 26, 2009

Stamped and stamped and stamped and stamped and stamped....

That's what I've done all evening last night and all day today so far and guess what I have to show you?! Zip, zilch, nada, big fat zero! Why, you ask? Well, this weekend I suddenly became overwhelmed by my stamps. I don't know how it happened- it came out of nowhere, but I had an overwhelming urge to purge!

No I'm not selling them (the hoarder complex ingrained in me will not allow that) but I had to get them out of here. At some point over the last year I realized that (a) I no longer know everything I have, (b)I found myself recalling particular phrases or images that I knew I had, but couldn't recall in what set and (c) became unable to come up with a name for a set when necessary.

So, on Friday night while listening to the football game on the radio I grabbed one of those large storage tubs from the garage and completely filled it... I mean overflowed it with retired stamps that I'm sick of (for now). I still have probably 100 retired sets left plus my current stuff, but now my stacks aren't leaning perilously close to toppling on my head.

I sent a few home with my mom this weekend (with the express and implied stipulation that I can take them back at any given time in the future). The rest I decided need to be cataloged! I'm tired of knowing I have a "thank you" in a pretty script about 2" long but can't find it anywhere. So, I am maybe halfway done with stamping every image from every set I own on to paper which I will categorize in a 3-ring binder for quick and easy reference!! I am excited to have it done, but am actually getting VERY TIRED of stamping right now. My right arm and shoulder are actually feeling very overworked. I may not be able to play volleyball tomorrow night and that would be a near tragedy!

When my binder is all done I will probably show you, but for now I am going to get cleaned up and go out on a walk. I'll leave you today with at least something good to look at, the last Deal of the Week from Stampin' Up!

Princess Party Kit, Regular price $15.96, Special price: $9.99

You can make your princess's fantasies come true with our Princess Party kit.

Pirate Party Kit, Regular price $15.96, Special price: $9.99

Hoist the Jolly Roger and get ready to have a swashbuckling good time!

Have a great day, and thanks so much for stopping by today!
~Kristin


Sunday, October 25, 2009

Girlie Girl Christmas

I've never been real big on "Girlie Girl" as a style, but I can handle elegant, sophistcated femine from time to time. The Limited Supplies Challenge on Splitcoast on Friday was to do a "Girlie Girl" card with no patterned paper. As yesterday, I made this with really little direction- I wasn't even consciously going for the LSC challenge. To get started I went to my Favorites folder in my gallery on Splitcoast (which I use add to frequently, but rarely remember to go back and use the ideas I loved so much) and just searched for something that "spoke" to me at the time. This card did it- I decided I loved the monochromatic layer on layer look. Mine started out that way, but in the end I caved and added the silver mat. I know, these cards look nothing alike... that's kind of how I CASE stuff.

After stamping the snowflake in Pretty in Pink on this Pink Pirouette paper I then embossed the same snowflake in silver on vellum and cut parts of it out. Attached the two together with a square rhinestone brad then embossed the sentiment, tied some ribbon with silver cord and trimmed the edge with my favorite 10-year old decorative scissor called Sunflower.

Hope you like it, and thanks for stopping by!
~Kristin

SUO Supplies
Stamps: Serene Snowflake, Fancy Flexible Phrases
Colors: Pretty in Pink, Pin Pirouette, Silver
Accessories: Vellum, silver EP, Silver ink, silver elastic cord, Pretty in Pink taffeta ribbon, Sunflower scallop scisor.

Saturday, October 24, 2009

Brayered One Layered

Have you ever sat down with some time to stamp but no real direction on what to do? I rarely do- either I have some designing to do for a class or workshop or design team, or I've got a challenge or several in mind that I've been wanting to play around with. However, every now and then I sit down with nothing concrete in mind. That's what I did last night and this is what happened.

I found an oval template laying on my desk leftover from a workshop this week and started just playing around. My first idea didn't fly, so I kept playing. I haven't used a brayer in a long time and am not sure if I've ever done it like this. Anyway, after coming up with the sunset-like background I decided to be very basic and use my new butterfly punch in solid black- no frills. What do you think of the result?? I'm pretty happy with it, but I can't WAIT to show you what my 8 year old DD did with this technique after watching me! I'd share it right now but she wrote a thank you note on it for Grandma and Grandpa who are visiting and we can't find it right now. As soon as it shows up I'll show you.

Hope your weekend is great! After a big full week I'm joying watching some women's volleyball on TV and just chilling. Thanks for checking in on me today!
~Kristin

SUO Supplies
Stamps: Flight of the Butterfly
Colors: (top to bottom) Summer Sun, Pumpkin Pie, Melon Mambo, Bravo Burgandy
Accessories: Brayer, butterfly punch

Friday, October 23, 2009

Extreme Friend!

Hey hey hey, guess what?! All new stuff today! I've gotten two new FREE sets this week from SU and couldn't resist combining them in one card. Extreme Elements entails all those elements in the background. The other set with the hearts is called "I {heart} Hearts" and will be available in 2010 in the SU Occasions Mini catalog I believe so this is your Sneak Peek!!

This is one of those cards that started out kind of rocky- I tried to embrace the "less is more" rule of thumb, but just couldn't stop myself (or wasn't satisfied so kept going). I tried to do distressed funk- do you think I succeeeded? LOL! In the end it finally worked out for the best I think. It screams pre-TEEN to me and I know my daughter will just love this!

The colors: Purely Pomegranate (oops, I lied, this is retired but you can pretend it is Rose Red), Certainly Celery and Taken With Teal are from the color challenge #65 at Color Throwdown!

Thanks for visiting me today! I'd love for you to drop me a line saying you were here. Gosh that reminds me of high school when it was popular to sign each other's notebooks with grafiti that said "Kristin wuz here!" No wonder I want you all to let me know you've visited- it's nostalgia!

~Kristin

SUO Supplies
Stamps: Extreme Elements, I {Heart} Hearts
Colors: Purely Pomegranate, Taken With Teal, Certainly Celery, Whisper White
Accessories: Spiral punch, square ice rhinestone brad, My Way arrows punch, Heart to Heart punch

Thursday, October 22, 2009

Patchwork Snowmen

Today's Ways To Use it Challenge (WT241) on SCS is to use patchwork on a card somehow. This idea of using various patterns with the Top Note die is not at all original- you've probably seen it everywhere! But I've never done it until today. I love the look of these retired textured papers called Parisian Breeze Specialty. I just used my square punch and glued them all on a base scrap of cardstock with the intentions of running it through the Big Shot with the Top Note die... but then I noticed a HUGS pile of these Top Note frames sitting in my leftover pile and decided to go that route instead.

The inside edges are sponged a bit and the ribbon runs underneath the edge of the Top Note frame. Since I was on a roll with using a retired stamp set and paper, I went ahead with the retired Baha Breeze corduroy button and chocolate felt ribbon! Baseically the only thing current on here is the use of the Snowflake & Top Note dies... oh, and also the black craft ink and clear embossing powder.

You know it's a good day when a challenge inspires you to try something new instead of forcing you to do something you'd rather not! Thanks for stopping by today! And don't worry- tomorrow I've got a card made with not only no retired products, but TWO brand new stamp sets you've never seen me use! In fact, one of them isn't even current yet and has never been seen in a SU catalog.

Have a great day,
~Kristin

SUO Supplies (mostly all retired)
Stamps: The World Over
Colors: Baha Breeze, Chocolate Chip, Whisper White, Kraft, Basic Black
Accessories: Clear Embossing powder, square punch, Snowflake die, Big Shot, Top Note die, sponge, chocolate felt ribbon, Baha Breeze Corduroy button

Wednesday, October 21, 2009

Seeds of Friendship

My friend Lisa and I try to challenge each other each week so we can virtually stamp together. Last week our challenge was to do an on-line challenge we'd never participated in. Well, I failed miserably. I was too busy so when I did stamp I just quickly found my old reliable challenges that I am familiar with. However, I still wanted to play along since she did so I did with this card. The sketch for this card is from Taylored Expressions (TESC87) which I've never done. I also used this week's color challenge on Splitcoast (CC241) to use Always Artichoke, Bravo Burgandy, Cameo Coral and Very Vanilla. I also slipped in some Ruby Red.

There are several things I think are worth mentioning on this card. First of all, if you don't recognize this stamp set it is because it is from 2006 and it appears from looking at the rubber, it's never been used EVER! It is called The World Over and I think it was a hostess set. The other thing is that the sketch I used involved 2 separate panels at the bottom which left a gap that I wasn't crazy about.... until I noticed that it actually serves as the stem for my flower! Very accidental, I can assure you.

The flower itself is made with the Big Shot as well as the Daisies #2 die and the Flower Burst embosslit. Embosslits are great because they emboss and cut out at the same time! Not to fill you with regret, but this is the one that was part of the Deal of the Week last week.

The rest is fairly obvious- some eyelet border punching, some paper piercing, a bit of sponging on the flower, use of markers and white gel pen to color in the flowers... that's about it. FUN I tell ya!

So thanks for stopping by today, again! And thanks for all the sweet comments- you guys are the best!
~Kristin
ETA: The flower in the center is not the shape of the Flower Burst Embosslit- I actually punched it out with a circle punch.

SUO Supplies
Stamps: The World Over
Colors: Bravo Burgandy, Cameo Coral, Ruby Red, Very Vanilla, Always Artichoke (ink only)
Accessories: Flower Burst Embosslit, Daisies #2 die, Big Shot, markers, gel pen, eyelet border punch, paper piercing tools, sponge

Good Morning!

Hello! After some sporadic posting I am back. I had a few SU events which all went well but kept me busy. Had sick kids home yesterday and had some yard work to do since it was so nice out, but today I'm solo and ready to stamp. Well, I still have some yard work to do and think I'll vacuum out my car one more time before it is too cold... plus washing some bedding so I can take advantage of this warmer weather and use my clothesline today. But FIRST, I will be stamping!

I made this card for today's Diva Color Challenge. Sometimes I really struggle with color challenges- isn't that funny since I'm a "color person"?! I guess I have strong ideas about color so of course every challenge isn't going to appeal to me. Next to each other these colors look a little drab, but it didn't take me long to get working with them. Funny thing is my biggest challenge was getting the gray in there once I had this designed. That's funny because I LOVE Basic Gray!

This week's Clean & Simple challenge on Splitcoast is to do a CAS Sympathy card. I didn't mind doing one because I usually don't until I need one, so now I will have one ready for an unfortunate time when I might need one. I also managed to fit in a sketch challenge from Monday's Mojo challenge. I'm not normally a fan of combining many challenges (I know you are laughing at me Lisa) but this one just fell together that way, so it isn't forced. KWIM?

Anyway, thanks for stopping by! I am hoping to play a little while today so I'll definitely have something to post for tomorrow. Have a great day and enjoy the sunshine if you have some where you live!

Oh Hey, I forgot to say, go check out the Divas today! (Like my rhyme??)

~Kristin


SUO Supplies
Stamps: Pocket Silhouettes, Circle Circus, Teeny Tiny Wishes
Colors: Old Olive, Certainly Celery, Real Rust and Basic Gray
Accessories: Distressing tool, Paper Piercing tools, Wide Old Olive grosgrain, 1 1/4" and 1 3/8" circle punches, Versamark, markers

Monday, October 19, 2009

Deals of the Week!!

This is my second post today- scroll down to see a Christmas card project!
Don't miss this week's Deals Of The Week!
First up is Circle Designer Brads
Regular Price: $5.95 Special Price: $3.99


Next up, 1/2" Library Clips
Regular Price: $6.95 Special Price: $3.99

Don't miss the
Basic Jumbo Grommets
Regular Price: $6.95 Special Price: $4.49

And finally
Mini Library Clips
Regular Price: $12.95 Special Price: $8.99 These fabulous products can all be seen on page 179 of Stampin' Up!'s current Idea Book & Catalog. These specials are good only through October 26th at 9:50 am (MT) that's 11:50 am (ET). If you would like to take advantage of any of these deals please contact me via email at: stamp_for_smiles (at) embarqmail (dot) com and I'd be glad to place the order for you!

Stumbled upon a fun idea!!

Yes, I stumbled upon one of my favorite Christmas card ideas this morning while I was supposed to be preparing for a workshop tonight, but first I needed to clean up my desk which meant putting away scraps and leftovers from previous projects. Then, like magic these three pieces of paper- Elegant Eggplant card base, Textured Kraft piece and already cut Real Red Scalloped Envelop- just came together at the center of my workspace! Immediately I thought I could take just a minute and put together a real quick card with these instead of doing what I should be. So this is what happened...

Today, like every day on the SU Website there is a group of cards featured in the Stamper's Showcase. One of them features this envelope on the front of a card, slightly angled with ornaments peaking through. I liked the idea enough and started playing around.

I wanted my envelope closed so the scallop part would show more, and then I got the idea to hide the cute ornaments inside as a fun bonus to the recipient. One idea lead to another and I decided the "bonus" could be school pictures of my kids in the shape of ornaments complete with some elastic cord so Grandma can hang them from her tree!!

Every year my mom manages to load her GIANT tree down with favorite collected ornaments, many handmade with past school pictures of her grandkids as well as all the photo cards she receives throughout the season. It is so fun to have all those memories hanging there, as well as cherished family photos of friends and loved ones. So I KNOW that Grandma will not only hang these pictures but she'll also cherish them for years!

Even though I never do the same design for my Christmas cards I am seriously thinking of reproducing this one! We'll see how many pictures I have of my kiddos.

Anyway, one final note about this card- the little stamped snowflakes on the Eggplant card base are done with a stamp from Delightful Decorations which is inked with Champagne Mist shimmer paint found in SU's Holiday Mini Catalog right now! The shimmer paint perfectly applied to the stamp with a Sponge Dauber.
I'm so glad you decided to visit today!
~Kristin
SUO Supplies
Stamps: Delightful Decorations, Teeny Tiny Wishes
Colors: Elegant Eggplant, Kraft, Real Red, Very Vanilla
Accessories: Champagne Mist shimmer paint, Sponge dauber, Scalloped Envelope Die, Petals-a-Plenty Textured Impressions Folder, Big Shot, Modern Label punch, Kraft Taffeta ribbon, Ornament punch, Silver Elastic cord

Saturday, October 17, 2009

Elegant Christmas Wishes Trio

As promised, here are the three versions of this card I made, CASEd by Lyssa Z. I think this first one is my favorite and am regretting that this isn't the one we're doing today for my SAS. It is an unusual color combo for me, but the color wheel helped. Rose Red and Cameo Coral!
Here's the one in Night of Navy. I also used Bashful Blue with some Brocade Blue ribbon.
This is the one we're doing today. It is in Elegant Eggplant and Almost Amethyst. The sparkle on the dove is a key element that I left off the first two, but I do plan to go back and add it. I was just worrying about color choices at the time of design.
Here are the three of them together. So let me know which one you like best?
Have a great day! I know I will be enjoying a great group of ladies making Christmas cards most of the day- then I'll be home to nap!
~Kristin

SUO Supplies
Stamps: Gifts of Christmas
Colors: Listed above (plus whisper white)
Accessories: Big Shot, Top Note, Petals-a-Plenty Textured Impressions folder, sponge, White organza ribbon

Friday, October 16, 2009

Lots to do!

If you've read my blog for any length of time (even a week would do it) you'll know that I am notoriously a procrastinator on things like planning! But, I have got all three of my designs done for my Holiday Stamp-a-Stack which is tomorrow!

This is the third and final design and it was CASEd from sweet blogger Lyssa Zwolanek. Now another thing you may have picked up from me is that I don't CASE (Copy And Share Everything) very often and when I do I generally change it up enough to be called my own with an influence or inspiration from someone else. Let me tell ya, not this time! I only made a few minor changes and mostly they were to accommodate the large numbers I needed the supplies for.

My colors for this card are Elegant Eggplant and Almost Amethyst. My Amethyst has been textured with the Big Shot and the Petals-a-Plenty Textured Impressions folder. That's about the only difference. I so enjoyed this card that I actually made it in three different color combos then let my daughter choose her favorite and this is what she chose. I'll post the trio tomorrow.

Here are the three cards that I've designed for tomorrow. I'm happy with them. They demonstrate a number of different Stampin' Up! products, stamps and tools and are a variety of colors. Two of them are fairly traditional in color which is what my customers prefer generally. I'm looking forward to our event- wish all of you on-line pals of mine could join us!

{So I promised to announce the winner of my Candy Corn contest today. If you'll recall from this post you had a chance to guess the number of corns in the jar. The answer is 319. So the winner is: "I will guess 268..Melissa in WI"

Melissa in WI, won't you please contact me with your address so I can send you a card? }

Thanks for visiting today and for all the sweet comments you guys leave me, you're the best and make my day! Gotta run, I've got lots to do.

~Kristin

SUO Supplies

Stamps: Gifts of Christmas

Colors: Elegant Eggplant, Whisper White, Almost Amethyst

Accessories: Top Note, Petals-a-Plenty Textured Impressions folder (Holiday Mini), Big Shot, Dazzling Diamonds, White Organza ribbon, sponge.

Thursday, October 15, 2009

Two more Christmas cards

Well, here are the two cards I'd already decided on for the Holiay SAS this weekend. This first one is very clean & simple and of course traditional. So many people prefer traditional colos so I try to accommodate them on at least one of my designs.
Of course you know me and I do prefer a bit more non-traditional so I always get those colors in there as well! This one is Almost Amethyst and Elegant Eggplant with some silver (one of my favorite color combos). The is regular and dry embossing on this card... but,
I have an idea for another card using this set so I just might change my mind AGAIN! It's not too late until Friday night, right?! I work best under pressure so it's all good. Although, I'm not the best mom under pressure so my family might not appreciate me being so wishy washy. This is EXACTLY why I don't try to design for events too far in advance.

Both of these cards are fairly straight-forward I think. The second one, I should point out, involves coloring in the dove with the White watercolor pencil- isn't it neat how the colors ends up looking almost Amethyst?! The corners were all punched with the Eyelet border punch (have you tried that before?!) and the silver piece is embossed with the Big Shot and the Petals-a-Plenty Textured Embossing folder from the Holiday Mini.

Well, gotta run and get some ideas out of my head! Thanks for visiting me today. I promise I will finalize my SAS projects by Friday and at some point will post them all together. Have a great day!
~Kristin

PS- Any more guesses in my Candy Corn contest?? I'll reveal the answer tomorrow and send a card to the person with the closest guess!

Wednesday, October 14, 2009

With All Your Heart!

For today's Diva's Coffee Break Designs challenge and the Color Challenge on SCS yesterday. to use Chocolate Chip, Bermuda Bay and Apricot Appeal. My first thought when I saw the long narrow panel on the left was this bird on teh branch from Asian Artistry (a level 2 hostess set).
The bird is was stamped a second time on some textured Apricot Appeal and cut out then watercolored slightly with some Pumpkin Pie.

I've been seeing the trend of using a larger scallop for a scallop border so I glued several 1" circles on in a row at the bottom then covered the seam with the Bermuda Bay ribbon.

Added details include the Lattice Die, Modern Label punch, and a Latte Button.

Thanks for visiting!
~Kristin

SUO Supplies
Stamps: Asian Artistry
Colors: Bermuda Bay, Chocolate Chip, Apricot Appeal, Very Vanilla
Accessories: Lattice Die, Big Shot, Latte Button, 1" circle punch, Modern Label punch, Aqua painter, Pumpkin Pie ink, Bermuda bay dotted grosgrain

Tuesday, October 13, 2009

Need your help! Blog Poll!!

Hello! I need your help. I have joined 3 other demonstrators to present a Holiday Stamp-a-Stack this Saturday and I really want to use the stamp set Serene Snowflakes for one of my three cards. However, I can't decide which of these three cards to use. So, vote for your favorite, keeping in mind that I will have 20+ ladies making this card. The poll will be at the top of my side bar for a few days.

Season's Snowflakes
(this one involves embossing in black and white plus gel pen accents)
Holiday Snowflakes*
(This one involved cleaning the snowflake three times per person.)

Christmas Snowflakes**
(This involves embossing in white only.)


*This card was CASEd from this one by KKenedy Designs.
**This is a CASE of my own card that was published in August 2008 seen here.
Thanks so much for your help! And if you live nearby (Kenton, OH) it is not too late to register for our SAS! Cost is $30 which includes 12 Christmas cards including envelopes as well as snacks, door prizes and lunch! Plus, we'll also have a table of some retired SU products for sale.
Glad you stopped by today! Please go vote in my poll!
~Kristin

Monday, October 12, 2009

Extreme Surfer Birthday

Extreme Surfer! I had so much fun using this new stamp for the first time! I am waiting on the Extreme Elements to go with it (for FREE for winning an SU contest) but just couldn't wait any longer to ink this guy up!

Can you spot the ancient SU products I used on this card?? Some of you may have never even heard of these: a strip of Mint Melody cardstock (this was a color several years ago that got dumped!) and the surfer is actually stamped in white in then dabbed with 2 shades of Pearl Ex! He is shimmery from different angles and looks pretty cool.

The sketch is from Karen Giron's Sweet Sunday sketch challenge seen here.

In order to funk up this card I decided to distress only the bottom edge of the ovals to mimic the look of water spray. The Brilliant Blue piece is stamped with Itty Bitty Backgrounds and white ink, then sponged on the eges. My grommets and silver eyelets at the top right are intentionally not lined up- I thought that would add to the motion of thisc ard... however, I punched the holes for the eyelets too big and the grommets made a mess so then it just looked messy. Later I got the idea that they kind of look like grommets on swim trunks so wished I'd lined them up just right. Ah well. So I tied some individual threads of the rope (on Clearance Rack right now!) through each hole and tied some at the bottom as well.

To emphasize the area with the sentiment I layered a jumbo grommet, regular grommet, and silver eyelet- not an easy task and believe me this card looks ugly inside. I'll have to put a layer in there to cover up this mess! Finally, the edges are distressed (of the Bermuda only) and the bottom edge is crimped. Hope you like it and that you can go have fun stamping something yourself! Why not- take a chance and do something a bit different for you! You never know what you'll end up with.

Thanks for stopping by today!
~Kristin

SUO Supplies
Stamps: Extreme Surfer, Itty Bitty Backgrounds, All Holidays
Colors: Bermuda Bay, Brilliant Blue, Mint Melody (retired!), Whisper White
Accessories: Silver eyelets, Jumbo Grommets, Small Grommets, rope, Pearl Ex (retired), distressing tool

Birthday Thank Yous!

Well, with the hustle and bustle of the weekend behind me I decided to get right on making some cute and simple thank you cards for my daughter to write in. This is my first use of the Movers and Shapers die the way it was intended- as a window. The Curly Labels with the cupcakes are actually mounted on the inside of the card.


The one on top was my prototype- the white cupcake is embossed. I scrapped the embossing idea for efficiency. Also decided to make them all different so I could use a variety of ribbon instead of finishing off my Melon Mambo dotted grosgrain. The top portion of these cards are dry embossed with an embossing folder and the Big Shot. Two cards can be done at a time by placing them on opposite sides of the folder and running through the Big Shot! I'll try to list all the colors in my supplies at the end. Now I realize I'm not done- I should've made at least 3-4 more.


Since today is her REAL birthday I thought I'd post this picture. Yesterday her dad took her squirrel hunting- I think this is a new tradition for the two of them- squirrel hunting on her birthday. This time I got to go along as the photographer (I was also on trash duty cleaning up what we might have missed in the dark the night before). I remembered my zoom lens this time so got some nice shots. Happy Birthday Sweetheart!

Thanks for stopping by to visit today!

~Kristin

PS- I suppose I should add that the pink .22 wasn't a birthday gift. She's had it since Easter! LOL! No, her gift was her newly redcorated bedroom remember?! And the new bedspread that she hasn't seen yet... I'll have it washed and on her bed by the time she gets home from school today!

Sunday, October 11, 2009

A Success!!

**No stampin' related talk whatsoever on this post. Feel free to skip to the next one if you aren't interested in birthday party pictures- thanks**
Birthday Girl- in her glory!
What a blast we had last night! This was the best birthday party we've ever done- the hay ride was great fun with 17 of us squeezed on. The birthday girl opened her presents on the way there which worked out just great!
Here she is with a few friends roasting hotdogs in the woods. This woods that we "borrowed" from some friends was an amazingly perfect setting. We took the wagon deep into the woods where there was a clearing the perfect size for a campfire and the games we had planned. Plenty of room but very secluded and the trees blocked all the wind!
This is her getting Mummy Wrapped! (I wouldn't have known it was her if I didn't see the bottom of her shirt sticking out!)
Here's her great dad who did a great job pulling the wagon with his four-wheeler. He also made sure the fire was just right and the straw bales got all arranged where they needed to be.

Here they are doing the Spider Relay- which was hilarious. I kind of made up my own because the internet game I read said to sew some extra legs to hang over the child while they bear walked. Whatever- no sewing involved. I just made the kids pick partners and they had to bear crawl while one was on top of the other. So they had the appropriate number of legs for a spider but 1 too many heads! I wish I had gotten the video camera out- the squealing and screaming was probably heard for miles! Zombie tag was a hit also but way too chaotic to get great pictures.
Here are all 16 of the kids on the hay ride (1 arrived late)! Birthday girl is way in the back. The only two boys invited were her brother and one of his friends.

I almost forgot, the hayride back home was so fun as well. The kids all took turns with the flashlight to their chins trying to tell made up ghost stories- oh my gosh I needed my video camera! It helped that we were going past all these corn fields! And as we neared home we all raised our glow-stick bracelets in the air and sang happy birthday at the top of our lungs!! It was truly a party to remember.

Thanks for stopping by! I'll be back to my regular stamping posts hopefully by tomorrow if I've recuperated suficiently.
~Kristin
Supplies:
17 cute kiddos, gobs of candy, hotdogs, apples, grapes, chips, fun games and prizes (more candy), cake, beautiful setting, nice fire, wagon and straw bales, presents and more candy!


Friday, October 9, 2009

Busy Weekend!

Sorry, nothing new right now. Busy working on my daughter's birthday party for tomorrow. We're hoping for a hayride and wiener roast, but with the amount of rain we're getting we are scrambling to plan some indoor games and activities.

Anyone hosting a Halloween or fall birthday party soon? I've done all the work already. Games should include Ghost Charades (win, lose or draw style), Eyeball relay, Zombie Tag, Mummy Wrap, Spider Relay, Slime Relay and Shrinking Island to name a few. We also have candy bracelets complete with skull candies to put together, a jar of candy corn to guess how many, we have glow stick bracelets, and gift bags for everyone. Plenty of candy and prizes.

Just to be sure everyone goes home good a sugared up we've got S'mores, cake and ice cream and did I mention candy?!

I'm always glad to get a birthday party behind me. Phew- they are work! I'm also excited to finally give our daughter her new bedding to match her room that you may remember I worked so hard on this summer. She knows it is coming but doesn't know what it looks like. She agreed she'd like me to have it all washed and on her bed when she gets home from school on Monday (her actual birthday).
Anyway, does anyone care to guess how many candy corns in the jar? I might send the winner a card but sorry, the candy will be long gone after tomorrow night. In case you are wondering, there are absolutely NO broken corns in this jar because I ...ah, kind of picked them out when counting. Just to make it fair, you know. By the way, I put the card in there so you'd not have to ask how big the jar is.

Thanks for visiting and being patient with me. I'm far too tired to be stamping tonight!
~Kristin

Thursday, October 8, 2009

Tutorial: Scallop Envelope Die Note Card Holder

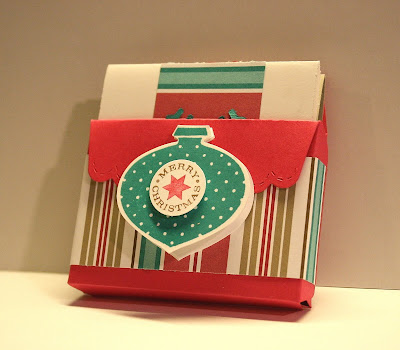
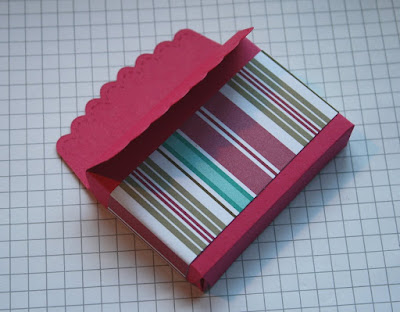
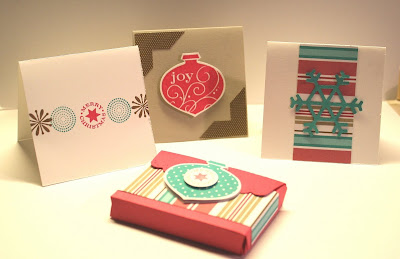
Well I've finally completed a quick tutorial to make a cute little box that will easily hold 3x3 note cards and envelopes! This is very quick and easy and makes a fun little gift. I also have a quick tutorial on the little ornament tag on the front which I'll either add to the end here or post separately.
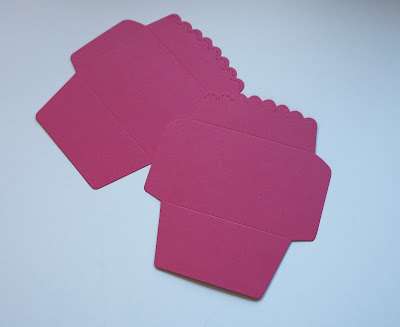
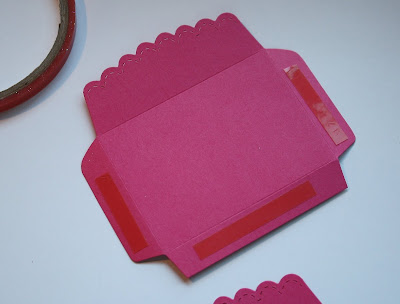
First you need 2 Scallop Envelopes. Mine are in Melon Mambo here.

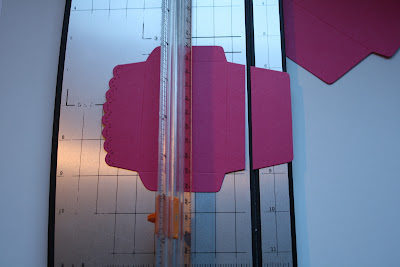
Next, cut the bottom flap down to only a 1/2".

Add some sticky strip to ONE of the envelops on the three flaps.

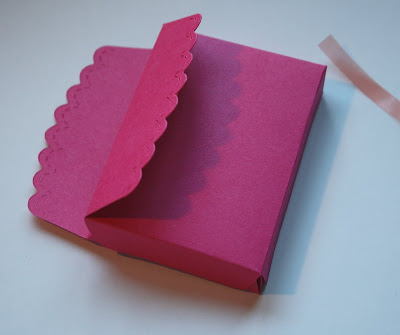
Remove the backing from the Sticky Strip and attach the two envelopes together on the tabs. Hint: at this point you will fold down one of the scalloped edges. However, it looks nicest if you fold forward the one whose flaps are folded back over the other one. If you do the opposite then all the open creases will show.
Next, cut a strip of decorative paper to 1.5" by 8.5" and wrap around the box. I usually adhere to the front with a bit of Snail adhesive then overlap the ends on the back and adhere there as well.
Last, decorate however you want and make some quick 3x3 notecards to fit inside. SU's Mini Square Envelopes (107309) are 3 1/8"x 3 1/8" will fit perfectly. This does not have to be a holiday project and would be great with any of SU's designer papers for any occasion!

I hope this is helpful! Let me know if you decide to try this out. Also, I need to reiterate that I did NOT invent this box but I have no idea who did come up with the idea so I can't give proper credit.

~Kristin