Showing posts with label holiday. Show all posts

Friday, October 26, 2012

Christmas Cards for Sale! Limited Supply.

 Hello!  Long time no see.  I have something new for you today- two somethings as a matter of fact!  How would you like to have 12 of your Christmas cards all done and ready to go?  This selection is available and come complete with inside greetings and envelopes too.  In fact, for $35 we will even throw in shipping for FREE.  These were all hand made by myself and two other Stampin' Up! Demonstrators from leftover supplies from our recent Stamp-a-Stack.  They are high quality and made with 100% Stampin' Up! product.   If you are interested shoot me an email (Stamp_for_smiles (at) embarqmail (dot) com) or leave me a comment here with your email address.  Supplies are VERY limited so first come first serve. 
Next up is yet another Christmas card, and you can make this one yourself!  ;)  Found this fun sketch at Create With Connie & Mary but guess what... yep, I missed the contest deadline again.  That's OK because I love how it turned out and love the sketch enough to use it again just for FUN! 

Thanks for stopping in to visit me toay!
~Kristin
 
SUO Supplies
Stamps:  Bootiful Occasions, Teeny Tiny Wishes
Colors:  Whisper White, Pool Party, Midnight Muse
Accessories:  Comfort Cafe DSP, Northern Flurry embossing folder, Liquid Applique (no longer a SU product, Whisper White Organza ribbon, scallop border punch

Tuesday, October 2, 2012

Christmas Deer

 So have you seen this Christmas Deer stamp set in the Stampin' Up! Catalog?  It is on page 19.  If you like it, I highly recommend the "wood mount" version for $4 more because of the teeny tiny nature of the ornaments.  I would NOT want to lose one. 

This is my "rustic" version using the deer, complete with the Woodgrain background and the beautiful new Brushed Bronze button from the Holiday Catalog.  This must be a Utah deer because the deer I've seen in Ohio don't have bodies quite this big usually. 
Here is my first attempt to recreate yesterday's card using the deer instead.  I stamped him with Versamark ink then melted the Heat and Stick powder and immediately doused with Dazzling Diamonds glitter for some serious sparkle.  In person, the detail of the antlers does show up much better.  Hard to photo.  This isn't the version we'll be making on Saturday at my annual Holiday Stamp-a-Stack either....
 
But this might be the final version!  This time he is embossed in Pewter then sponged with some Midnight Muse ink.  The ribbon is the new Satin Stitched in Midnight Muse. 

So what do you think?  Do you like this as well as yesterday's card?  I ended up using Marina Mist instead of Baja Breeze.  I didn't have enough of the Baja cardstock and no time to order more... plus, Marina Mist is just my favorite blue anyway!  If you have suggestions on how to improve this feel free to speak up.  I'm unsure of the sentiment placement since this stamp isn't as symmetrical as the tree from yesterday.  And I do miss the paper piercing, even though I don't think the deer would fit anyway.  Hmmmm.

Thank you for stopping by, and for your comments!  They do make a girl feel loved!  Have a great day.
~Kristin

Stampin' Up! Supplies
Stamps:  Christmas Deer, Snow Swirled (sentiment)
Colors:  Marina Mist, Midnight Muse, Whisper White
Accessories:  Pewter embossing powder, scallop border punch, sponge, Modern Label punch, Satin Stitched Midnight Muse ribbon

Monday, October 1, 2012

Editing Magic!

 Good morning fellow stampers!  I'm back with another Christmas card I promised a few days ago.  I was so happy with this one when it was all done, but got busy and left it sit around on my desk waiting to be photo'd... when tragedy struck. 

OK, I'm being dramatic, it's just a card... but it felt like the end of the world for a few minutes when this card, which was my favorite of the last dozen or so, fell over onto an open red inkpad.  Have you ever had this happen??  It's NOT a good feeling.
Here's the original picture.  Isn't that sickening?  But thanks to some wonderful editing tricks I managed to get it close to it's original state, at least in the photo.  Now in person it is still ruined!  And the red inkpad didn't discriminate, it ruined the main image, the ribbon and all the layers of scallops too just to be sure I couldn't reuse any piece of it.  Except the little sentiment down there. 

This was a design I had experimented with for the Stamp-a-Stack this Saturday (still time to register if you live in the area- Kenton, Ohio).  While I love this one, it is not one of the finals because I bought the new Christmas Deer stamp and really wanted to use it.  So the design will be the same, but the stamp and the ribbon (this one is retired) will change.  Plus, the paper piercing is left off- much too time consuming to have 20+ women trying to do it with only one template. 

Anyway, thanks for stopping by!  I'll be back with more SAS designs in the next few days hopefully. 
~Kristin

Oops, forgot the supply list, sorry! 

Stampin' Up! Supplies
Stamps:  Snow Swirled
Colors:  Baja Breeze, Midnight Muse Whisper White
Accessories:  Clear Embossing powder, Paper Piercing Essentials pack, Modern Label punch, Baja Breeze Seem binding ribbon, scallop border punch, sponge

Wednesday, November 3, 2010

Thanksgiving Trees


Wow!  It has been a LONG time since I pulled out Lovely as a Tree stamp set.  I know it's a classic, but I just don't reach for it very much any more.  Well, for some reason this sketch just called for a quick rotation and a reach for those trees! 

I started out with a Very Vanilla oval and embossed the trees with Early Espresso (by inking with Versamark first then the Espresso) and clear powder.  I was going for a fall look by dabbing some fallish colors into the trees, but the background looked so bare so I just kept layering and layering color until I was about to go overboard.  LOL! 

Today is another Diva Coffee Break Designs sketch challenge.  We'd love to have you play along with us and check out all the designers' creations! 

Thanks for stopping by and a hello to all my new followers from Stampin' Connection!  Great to have you!
~Kristin

SUO Supplies:
Stamps:  Lovely As a Tree, Holidays and Wishes
Colors: Cajun Craze, Early Espresso, More Mustard, Summer Sun, Pumpkin Pie, Cherry Cobbler, Always Artichoke
Accessories: Clear EP, Big Shot, Lattice Embossing folder, Modern Label punch

Monday, October 18, 2010

Glitter Window Snowflake

Good day ladies and gentlemen!  I've got another card for you today- I know, shocker!  I've got fall baseball behind me now, and only two weeks left of Midget League football then I'll be stamping much more frequently.  Also behind me is a birthday week and this week I'll be prepping for my upcoming Stamp-a-Stack.  Do you ever have a few weeks where each time you check something off your massive list you breathe a little bit easier??  That's where I'm at right now- I can see the end of the tunnel. 

Today's CAS challenge on SCS is a sketch challenge.  I decided to do the Glitter Window technique for the lower snowflake (put packing tape behind the cut out then sprinkle with Dazzling Diamonds!).  I do like how this turned out with the exception of my crooked sentiment *sigh*. 

This card also qualifies for this week's Just Add Ink challenge to use BLUE!  I think I've got that covered.  If you want some great challenges I highly recommend this blog. 

Well, gotta run get some dinner on.  Have a great week!
~Kristin

Tuesday, September 28, 2010

Not Exactly Traditional

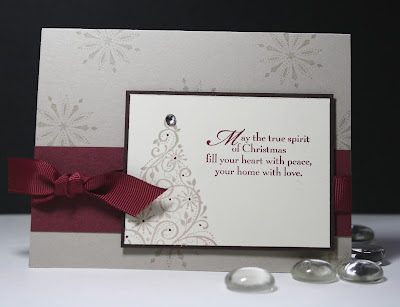
 Elegant, unique, not exactly traditional:  that's what I lean towards (strive for) when designing Christmas cards.  It is rare to find a straight-up green and red card from me- not sure why.  I suppose because I like thinking outside the box and by the time Christmas rolls around I'm about sick of the red/green combo in my face.  Now that's not to say I don't appreciate cards in those traditional colors- because I do, truly!  Even some of my favorites have been true red and green.

With that said, I've chosen Sahara Sand, Bravo Burgandy and Vanila with a touch of Early Espresso for these two designs.  What do you think of that color combo??  I love it and can see it for so much more than holiday cards! 

These are both quite simple as I'm working on designs for my upcoming Holiday Stamp-a-Stack.  Simple is always best for these events with 40 or so people wanting to do the same 12 cards in a limited time.  But simple doesn't have to mean boring or lacking that something special. 
So what do you think?  Would you be excited about making either of these two cards at a Stamp-a-Stack?  The first one entails sponging and a rectangle mask, with a rhinestone and some lovely narrow Espresso Taffeta topping it off.  The second one, which happens to use the CAS sketch challenge from yesterday on SCS, is a Sahara Sand base with monochromatic snowflakes and a portion of the tree showing from the set Snow Swirled.  The extra details include a few touches with the Bravo Burgandy marker on the tree and a rhinestone topper as well. 

Quick, simply and lovely is the goal.  What do you think?  Feel free to "vote" by leaving a comment- I'll let you know what I decide before the SAS on October 23.  If you are anywhere near Kenton, Ohio and are interested in joining me for this fun event I'd be thrilled to call you my guest!  Cost is $30 and that includes lunch and snacks, 12 holiday projects (all cards except one gift packaging idea) and lots of door prizes and fun!  Leave your email address if you're interested in getting the flyer.

Thanks for stopping by! I'm hoping to get some scrapbooking done today... we'll see what happens!

~Kristin

SUO Supplies
Stamps: Snow Swirled
Colors: Sahara Sand, Bravo Burgandy, Early Espresso, Very Vanilla
Accessories: Wide Bravo Burgandy grosgrain ribbon, narrow Early Espresso taffeta ribbon, Basic Jewel Rhinestones, sponge.

Tuesday, November 24, 2009

Pumpkin Patch

I saw these adorable pumpkins on LeeAnn Greff's blog and just had to copy them! They are fun, smell good and will be perfect for the Thanksgiving table! My daughter even enjoyed making one. The stem is a Cinnamon stick which makes it smell wonderful, and the vine piece is from the Scribbles Swirls Sizzlit. The large and medium pumpkins were done with 8 (each) scallop circles from the Circles Scallop#2 die and the Big Shot. The shorter one is done with 8 scallop oval punches.

You can make these fuller if you want by simply adding in more scallops. They would probably stand a little easier as well the fuller you make them. Since these (plus another big one I gave to my hostess recently) took 4 full sheets of cardstock I pulled out a not so favorite color Tangerine Tango. I just didn't want to use up the last of my Pumpkin Pie paper.

Sorry it took so long for me to post these. Since I gave the only completed one away I had to take the time to make more... and I've just not gotten much stamping done lately. Although I do have all our Christmas decorations up (except the tree)! This is extremely early for me!

Come back tomorrow for a cool Diva sketch challenge!
~Kristin

Tuesday, November 11, 2008

Last but not least...

So these are all the extra gift bags I made up leftover from my Christmas Stamp Camp last month. These all sold except two. And last, I found three flat marbles in my stash (these were all the rage for me last year) so I whipped them up into magnets but they didn't sell.
OK, that's all for craft fair jazz! Tomorrow I'll be posting my first effort at being at design work for a fun blog group. Stay tuned and thanks for stopping by!
~Kristin

Thursday, November 6, 2008

"Green" Ornaments!

Yes, I know they're not actually green, but they are both made with recylcled materials! I don't know about you but I have GOBS of ribbon! And I use it- enough to empty a spool every now and then. I got the idea from a few fellow stampers over the years (in other words I have no idea where or from whom) but the gist is to save the cardboard and or plastic centers from the empty ribbon spools. I have several laying around, but some I've saved for so long the cardboard is too beat up to use (the edges show a bit even when covered with paper). I've also added fabulous felt snowflakes to these, a bit of bling with some glitter, and rhinestone brads on the large ornament! Complete them with ribbon or cord to hang from the tree.

Anyway, the large one I made with giant chipboard snowflakes from a pack I bought from SU last year. These are similar to the chipboard pieces available in the Holiday Collection Stampin' Kit right now through the end of the year or while supplies last! Check out this kit, if you haven't already. It is featured in the December 2008 issue of Country Living magazine in an EIGHT PAGE spread! The kit not only includes dozens of chipboard pieces, but also beautiful die cut designer papers , an exclusive stamp set and many many other items to make lovely ornaments with a hand-made feel!

Wow, look how that turned into a plug for the current promotion and I hadn't even planned on that!

Wednesday, October 15, 2008

Let it Snow (not literally!)

Here are two more Holiday cards I completed yesterday. I really like this first one, even more so in person, so I made 10 more to sell this weekend. Unfortunately I messed up and cut the base out of whisper white (not in this one, but in the other 10) and the images are all stamped on very vanilla so... I'll be making 10 more for 20 total! With the Big Shot the background piece is quite easy. I just wheeled an entire piece of Baha Breeze cardstock with the Snow jumbo wheel in Vanilla ink then cut 3 at a time out with the Top Note Die! I think on the others I make the banner won't hang over the edge because it won't fit in a standard envelope if I do that. Ooh, forgot to mention that the scallop oval was made just by piecing two scallop circles together.
This second card will not be duplicated, at least not with the brads since I won't have enough to make very many. I do like the simplicity of it though. The wreath was made by stamping a snowflake from Snow Burst multiple times. The chocolate chip card base was wheeled with the Poinsetta jumbo wheel and versamark, but I'm not sure if it shows much. Had a heck of a time with lighting today due to rain.

Thanks for stopping in today!

Tuesday, October 7, 2008

You Are Invited!

Holiday Stamp-a-Stack


Get a jump start on your Christmas cards plus a BONUS adorable gift bag*!

The class fee of $30 includes all the precut materials for 16 cards, 4 each of 4 designs, complete with coordinating envelopes and a bonus gift bag perfect for that little last-minute gift!

At this Stamp-a-Stack you will enjoy using the new Big Shot, stamps and gorgeous ribbon from the current Holiday Mini Catalog as well as a variety of papers, ribbon and versatile stamp sets that aren’t just for holidays!

Contact me today to reserve your seat in this great class!
Prepayment is required with reservation by October 19th.
*The original design for this gift bag is by SU Demo Diana Gibbs.

Wednesday, September 17, 2008

Holiday Greetings!


Are you ready for that yet- holidays I mean? I'm not sure I am as long as it's still warm out...
This is another of those posts from the past since I am knee-deep in projects and other efforts (think FIL's birthday, me in charge of special lasagna dinner tonight). I thought I'd share this card that is hands-down my most viewed (8574), commented (95) and requested card I've ever made. Isn't that funny?? I mean, I like it but gosh, I like others just as much.
Anyway, I offered directions in my gallery back when I posted this in October 2006 and I am still getting requests for them. Here is the abreviated version: first cut an oval from a sheet of thin typing paper and use it as a reverse mask- meaning lay it over the vanilla cardstock then sponge creamy caramel so make a subtle oval. Before removing the mask stamp trees from Lovely as a Tree and French Script (or other background). Remove the mask then stamp the entire piece with Linen & Weathered background stamps. Next, stamp the large tree and the greeting in craft ink (Handome Hunter in this example) and emboss with clear EP- throw in some dazzling diamonds while you're at it. Mat, layer, add some bradsm mabye some sponging and you're done.
The cool thing is I now see cards often with this basic technique- a masked oval in the background with a larger overlapping image and greeting- and I inwardly smile and take credit. :)
Anyway, maybe tomorrow I'll finish what I'm working on for my niece who just turned one and show it to you. It is so cute so far- if I do say so! I don't think she's blogging yet so it shouldn't ruin the surprise for her.
See ya tomorrow!