Showing posts with label gift idea. Show all posts

Wednesday, April 17, 2013

Notecards for Lovina

As I mentioned yesterday I made some notecards for my Amish neighbor lady the other day.  She made a beautiful piano bench cover for me that I'd been wanting for a long time.  It was something my mom was going to do but didn't get around to it before she died.

I provided the fabric and materials and Lovina had it done in a day!  She didn't want to charge me since they use our phone often, but I couldn't just do nothing in return.  So I set about to make a very simple set of notecards.  I think there were about 5 of each.  The only color is the Cherry Cobbler L.  Instead, I used the tiny embossed hearts for some character and charm.  I hope she likes them!

So glad you stopped by today!  In case you are interested, I've started selling some of my jewelry pieces on Facebook.  I hope to open an Etsy store one of these days.  Many of the pieces are sold now, but I am designing and adding more every day. I would love to have you stop by!

Have a beautiful day!
~Kristin

SUO Supplies
Stamps:  Lovely Letters Alphabet, Four Frames
Colors:  Naturals Ivory, Cherry Cobbler, Soft Suede
Accessories:  Adorning Accents embossing folder, Big Shot

Tuesday, January 29, 2013

Swarovski Snowflakes and a Baby Card

 Good morning!  Thought I'd share a picture of these Swarovski Crystal Snowflakes I made for my family for Christmas this year.  Like true snowflakes, no two are alike. I had fun finding different color and bead combinations!   This free tutorial by Bead Animation was so wonderfully done and helped me tremendously.  The first snowflake took me about 2.5 hours but they got much easier and faster each time!  If you'd like to see each one individually I have them posted on my Beading and Jewelry page (link at the top of my blog).
 I made this baby card a while back for some friends who had their 4th baby boy (!!) just before Christmas...  great idea, but I still haven't sent it.  I know, I'm such a slacker!
Here's the simple inside.  These Designer Series Papers (Sycamore Street DSP) and the Island Indigo ribbon are both new to the Stampin' Up! lineup, and are each FREE with a $50 purchase due to the fantastic Sale-a-Bration event going on now until March 22nd.

So glad you visited me today!
~Kristin

Friday, August 31, 2012

Gift Ideas: Baby & Home Decor

 
Good morning!  I hope you've had your coffee because I have lots of pictures for you today!  First up is this baby mobile I was honored to make recently.  It was requested to match THESE things I made a while back for a good friend's new baby.  It is entirely made of Stampin' Up! papers, old and new, Stampin' Up! felt ribbon and a piece of plumbing pipe insulation that I bought and cut then wrapped with the dotted ribbon (not SU). 
 
The long pieces of felt that the circles are attached to were wrapped around the circle and held in place by either a button (which is hand sewn on for safety!) or a knot of tempting turqhoise ribbon.  They all very in length and the circles are different too.  I think I used at least 20 different patterns of paper. 

EDITED TO ADD:  I completely forgot to mention that the circles (all punched with SU's punches) were done like this... I punched two circles in matching paper and glued one of them to a punched chipboard circle (thin enough chipboard that it would punch).  The one with the chipboard backing was the outward facing circle.  The other was glued to the back of that with the ribbon sandwiched in between.  Some of them had chipboard behind both sides, but that was a mistake.  They didn't stayed glued nearly as well and I had to clip them with small binder clips for hours while they dried completely.  The glue I used was Tombo Mono.  Hope that helps!
 
I didn't take pictures of the entire process because I was under a time crunch.  But I have a few tips on using the pipe insulation.  It is much cheaper than using one of those wooden rings ($4) for needlepoint and doesn't have that clamp part to figure out what to do with.  I bought a piece about 5 feet long at the hardware store ($1.75) then cut off the length I needed (you could probably make 2 out of one piece).  In order to make sure your circle doesn't end up oblong here is what you should try:  hold the tube in a loop then slightly overlap the two ends.  Eyeball the angle at which they overlap then try to cut that angle off one end.  (Don't panic with my vague instructions, it isn't an exact science).  Then the two ends will meet flush and your tube will stay more circular.  Tape the connection with duct tape then cover with whatever material you want.  I used ribbon! 
 
On to project two: 
This project doesn't involve Stampin' Up! products at all (even though it could), but since I gather you are somewhat crafty or you wouldn't be here, and since I need a place to brag to a captive audience, you get to enjoy this one as well.  

So I found this frame in my barn.  No idea what it was for- square is an odd shape for a frame. 
 Decided to cover the cardboard backing for the frame with an old map (I've got tons- you'll see that in the future).  Chose my favorite saying of all time and cut it out with my daughter's Cricut in two different fonts.  Then used temporary adhesive (I used removable Dotto) to apply the letters just where I wanted them.  I also wanted a faux matt around the final project so I used painters tape on the edges.  Here's another TIP:  Be sure to destickify (yep, made it up) the tape by sticking it to your shirt or pants or couch over and over before applying it or else your map might tear (mine still did a little). 
 Then spray the entire thing. 
 We used black spray paint.  I was a tad worried that the paper map wouldn't hold up to the wet paint and let my daughter make an executive decision to not go solid black, but just enough to see the letters.  I like that you can not only see the map through the font, but also behind the paint a bit. 
 Here is how it looks on the wall.  We barely let it dry before we got it up there!  Just couldn't wait! 
 
If you're curious about where on earth we hung this... you probably don't recall but in 2010 we bought a 12x16 foot playhouse for our kids.  It has taken us two years, but it is now livable.  We've painted the entire outside, stained the deck, wired it (with a little help from an electrician), insulated, boxed in plywood walls and painted the crap out of it.  It has kept us crazy busy for many many hours!  I'll do another post on it if anyone is interested, but this is one shot of the inside.  The table, chairs and ladder were all paint projects I've worked on all this week and last.  Hopefully I am DONE painting for awhile.  Thanks to Pinterest we have many more ideas to come!
 
I am going to link a few of the ideas that inspired these projects: 
 
mobile:
paint over letters: 
 
Thanks for stopping by!  If either of these projects inspires you to do something I'd love to see it!  Leave me a link to your online photos or blog post!
 
Have a great day!
~Kristin


Saturday, July 7, 2012

Last Artisan Entry: Paper Beaded Jewelry

Well, this post wraps up my 10 Artisan Award entries.  This is my final 3D project.  I made a bunch of paper beads with the Cheeful Treat DSP, a hostess option from the previous catalog.  To make the beads you use narrow triangle strips of paper and roll them tightly over a toothpick then glue then end down to hold in place.  I then strung them on fishing line and painted them with Modge Podge.  Once they dried I sprayed them with a matte acrylic sealer. 

Once the beads were done I decided to make my very first set of earrings and matching two-strand bracelet.  I am so proud of how they turned out!  Making jewelry is harder than I thought!  I added SU's Filigree brads for decorative finishes to both, plus a Basic Rhinestone to the bracelet.  

 Since the focus was my jewelry pieces I kept the gift box quite simple- an unused plastic stamp case filled with some crimped paper filler and tied with a satin vanilla ribbon.  The gift card was made with the Mixed Bunch stamp set and matching flower punch. 

I mentioned these were extra special to me yesterday so I'll tell you why.  Not only are these my very first attempt at making jewelry, but I used my mom's huge stash of jewelry making supplies.

As some of you may recall my dear mom passed away very suddenly last July 6th.  She was an avid jewelry maker and most of my favorite necklaces, bracelets and earrings are all her designs!  In her honor I decided to give it a try- something I've always wanted to do. 

My dad sent me all her stuff- including how-to books thank heavens!  And as I was trying to figure out what to do I came across the beginnings of a two-strand bracelet that she had started.  No beads yet, but she'd done the hard part of putting the findings together for one end. 

That was my only jewelry making "lesson" I'd ever gotten from her and the inspiration to attempt a two strand bracelet instead of something more basic.  So now you know why they were so special to me and why I made my little gift card a Mother's Day card. 

So thanks for sticking with me on my Artisan Award journey, even though it didn't end as I'd hoped.  Hopefully the timing will work out for me to try again next year.  Have a safe weekend and hug your loved ones while you can!
~Kristin

PS- Just this past week I've attempted another jewelry design.  When it is complete I will post it here, even though it will be non stamping related entirely.  Maybe I'll start another page on my blog for jewelry!

Wednesday, May 30, 2012

Baby Shower Gifts... Part 4

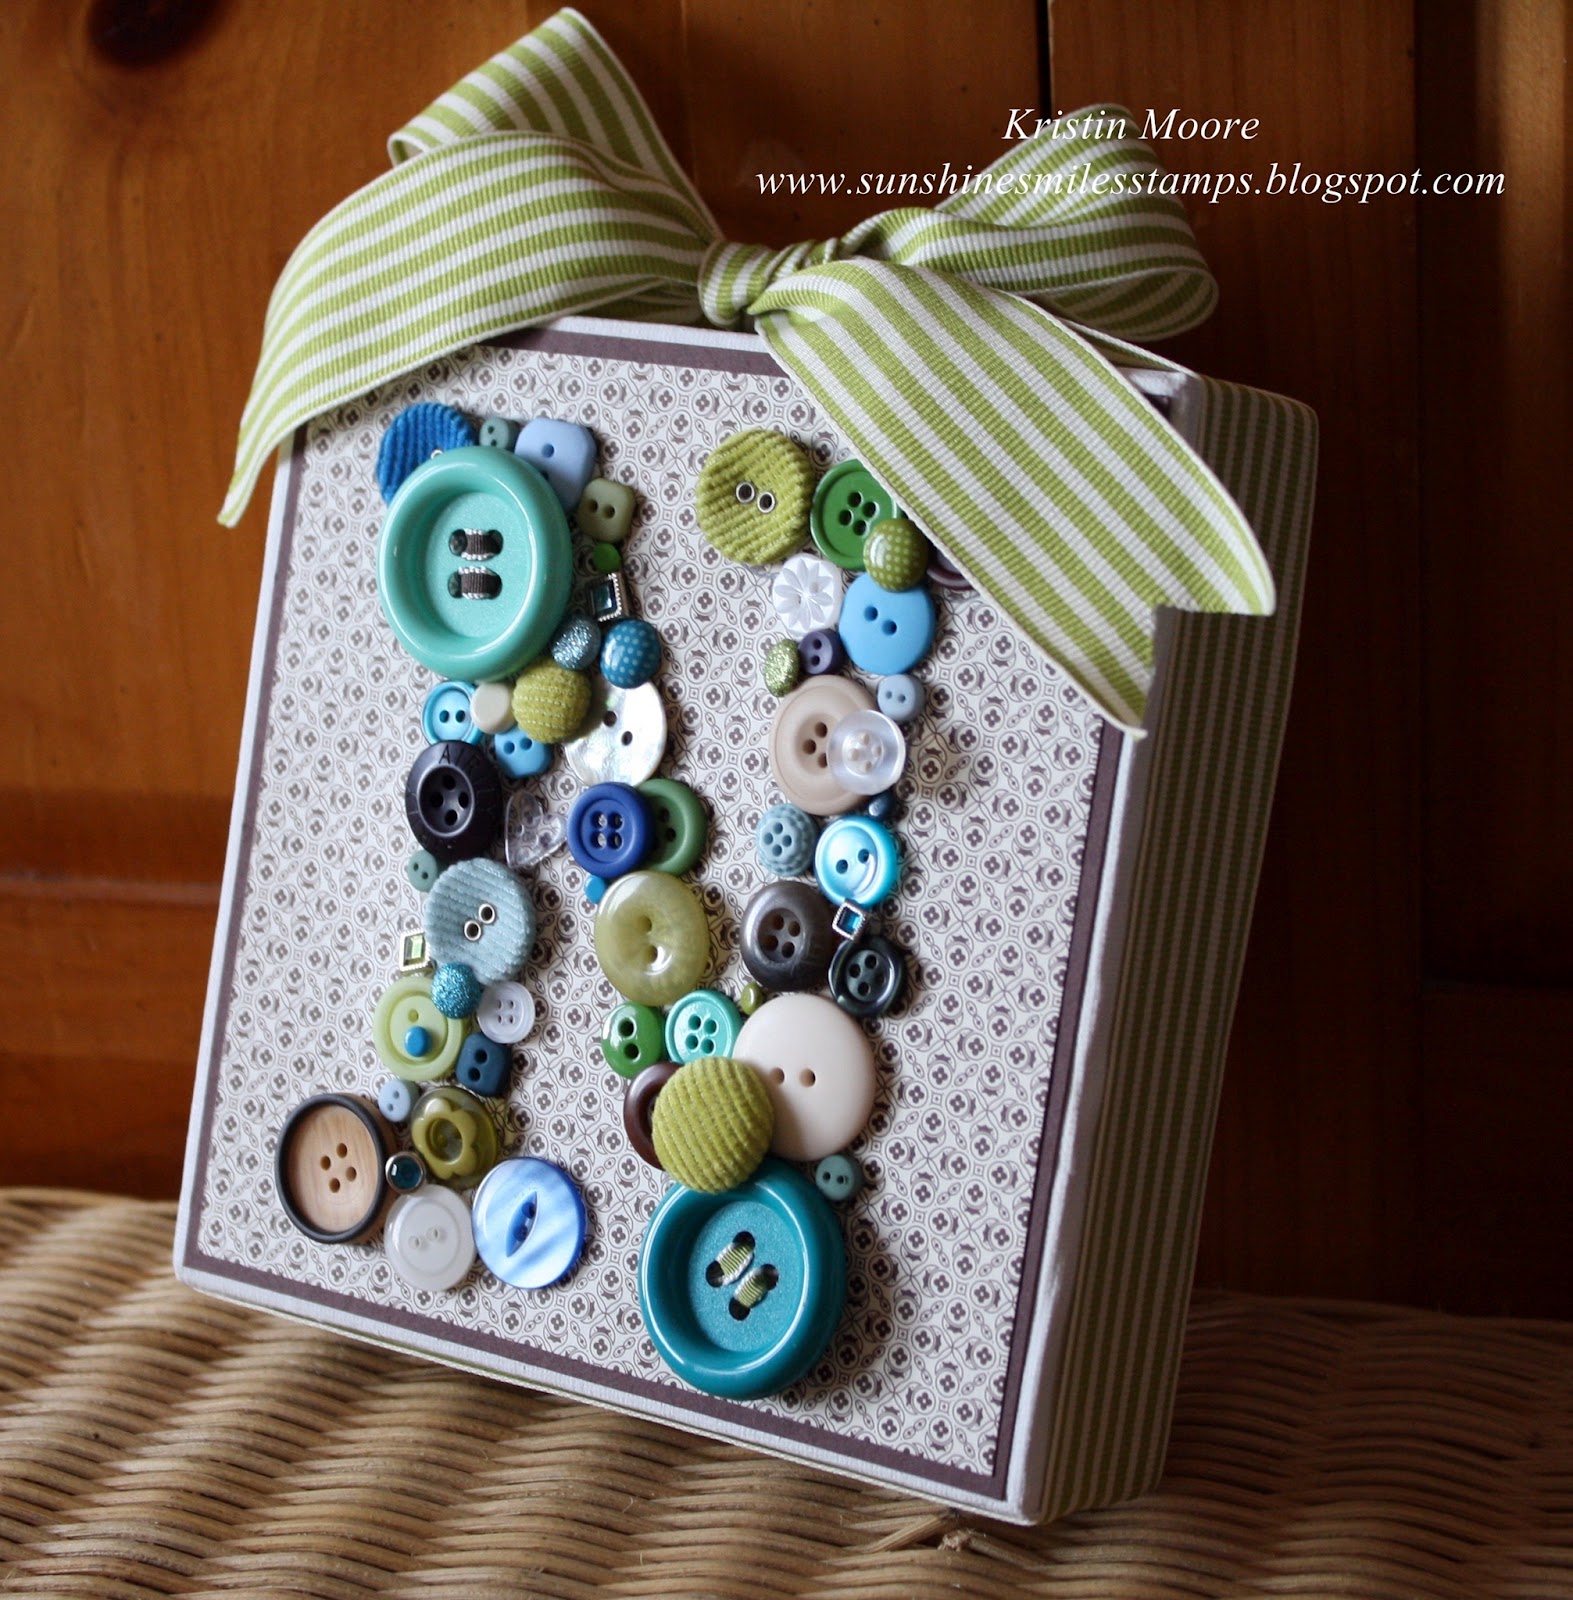
Finally, what I've been waiting to share with you.  My favorite of the Baby Shower Gifts.  Saw this idea on Pinterest and thought it was adorable.  It was so much fun to use cherished things from my stash, some old and some new!  So many possibilities with this one.  This little canvas is a 6"x6" and came in a four pack so I can do THREE more before I need new supplies.  Isn't that awesome?!  The ideas have been swirling ever since I bought them. 
Here's a view of the edge so you can see how it is wrapped in Old Olive striped ribbon.  Love that finishing touch even though the sides were nice.  Many of these buttons and brads were from my SU stash and some were from my "random buttons that fell off" stash.  I did buy a few too, but not many.
I was finally able to upload my picture of the whole set.  If you'd like to see them individually please see the previous 3 posts. 

Thanks for stopping by!  I hope you've enjoyed these as much as I did making them! 
~Kristin

Tuesday, May 29, 2012

Baby Shower Gifts.... Part 3

If you go to the trouble of making unique, coordinating gifts then it is a MUST that the packaging and card match too!  Using several repeating elements tie them all together regardless of what they are.  Here is the gift bag I gussied up to go with the gifts.  I tried to keep it simple and elegant.   


Here is the card I made.  It turned out so nice compared to my first idea!  Let's just say it got scrapped before I even got very far.  Don't you just love these colors together?!  Thought the embossed dots would soften it all up and add a tiny bit of whimsy.  Hope you like it!  Up tomorrow is my most favorite part of all!  And hopefully I can add my picture of the entire group (fingers crossed).  Thanks for visiting,

~Kristin

PS- In case you missed them, here are the other parts to this gift so far. 

Monday, May 28, 2012

Baby Shower Gifts.... Part 2

If you saw my teaser yesterday you are ready for the second installment of "Baby Shower Gifts" so here it is.  I thought it would be fun to make a door hanging "Do Not Disturb" sign.  This could be used on the baby's bedroom door, or even on the front door so as to warn visitors to avoid using the doorbell. Of course it has to have a decorated flip side too!  Even if it isn't used it will be a cute matching decor item just for fun!
In case you missed it, here is the first item in this series.  The details can be found HERE.

Same supplies used as yesterday plus the Labels Collection Framelit.  And I think it is kind of appropriate that the free font I downloaded from the internet is called Reisling.  Just what a new mama needs, eh?! 

Hope you'll stop back tomorrow for Part 3 in my Baby Shower Gifts series.  Hint:  Everything must match!
~Kristin

Sunday, May 27, 2012

Baby Shower Gifts.... Part 1

Did I mention before that I was working on something really exciting??  Well, I went to a baby shower today of a very special family friend and decided to put my best effort into creating something unique. Since my photo of all the gifts, card and packaging won't upload for some crazy reason I am only showing you the first part today.  That means I can drag this out for a few days and you'll have to come back to see the rest.  Of course, I'll save my favorite part for last.  (How's that for a teaser?)

I managed to find out ahead of time that baby Noah is whom we are anticipating and his room will be decorated in Chocolate, Olive and Turquoise.  Isn't that a fun color combo?  I hope she'll send pictures when the room is all complete! 

I love the name Noah so had to do something with his name.  This is a banner made with chipboard squares the size of restaurant coasters, just cut from spare chipboard included in random Stampin' Up! products.  I used a retired pack of SU papers called Au Chocolate.  I'm so glad I had a lot left over because they gave me the perfect base to work with!  Here are closeups of each letter:   


I used all Stampin' Up! products with the exception of the pawprint brad on the "O".  I also used the Cricut to cut the letters out.  I will include a list of products I used at the end.  Well, be sure to stop back for Baby Shower Gifts... Part 2.  Here's a hint at what's to come:  Do Not Disturb!

Thanks for stopping by!
~Kristin

SUO Supplies: 
Stamps:  Have a Ball (retired)
Papers:  Au Chocolate DSP, Old Olive, Tempting Turquoise, Very Vanilla
Accessories:  Variety of ribbons and buttons (some retired), small star punch, Polka Dots embossing folder, Big Shot

Saturday, September 18, 2010

It's the Thought Collection

 Since I've been posting so sporadically lately I thought I'd go ahead and post all four of these at once.  I made them the same day as my last post, all with similar elements that I cut out at once then mixed and matched until I had a whole set.  These were fun and easy to do! 
 Each of the stamped images are from the stamp set It's the Thought, which was in the Summer Mini catalog.  Had you noticed that there are now a Level One and Level Two hostess set in the front of every Mini Catalog?  Yep, that's right!  So when you are finalizing your order of $150 or more, or your workshop, make sure to check them out before making your final decision!
 Sometimes little images can be hard to use.  So I punched them out with the new Decorative Label punch and added some interest to the card base with a variety of strips of paper that have been dry embossed with the Big Shot or punched with one of our border punches. 
I added a bit of ribbon, linen thread or an Antique Brad for a unique touch on each.  Too keep the set similar and easy to make I used the same colors on all 5 cards:  Crumb Cake, Wild Wasabi, Cajun Craze (which is quickly becoming a surprising favorite for me!), and Peach Parfait.  The rows of embossing on the bottom two cards are not a Stampin' Up! product, however our Big Shot easily accommodates most all brands of embossing folders!  I also made sure to stamp the Woodgrain background in Crumb Cake ink on every design to further tie them together.  Wouldn't this make a cute gift set to give to a favorite great-Aunt or long distance cousin?! 

Thanks for stopping by!  We've got a baseball game this afternoon and our very first midget league football game tomorrow- wish me luck.  :)

Hugs,
~Kristin

SUM Supplies
Stamps:  It's the Though, Woodgrain background stamp
Colors: Crumb Cake, Cajun Craze, Peach Parfait, Wild Wasabi
Accessories: Decorative Label punch, linen thread, Antique brad, Double Stitched Wasabi ribbon, SU embossing folders: Square Lattice, Vintage Wallpaper, other embossing folders:  Cuttlebug:  With Love

Wednesday, September 1, 2010

Stacked Hand-Made Gift Boxes

***This is the second post for today.  Scroll down to make sure you do not miss the DCBD challenge posting.  I meant to schedule this for tomorrow but messed up.  Oops.***
 So what do you think of my hand-made gift boxes??  I found this wonderful tutorial from Tina at My Therapy, My Creations that made them so so easy.  It can be found here:  paper box tutorial.  I used the Scallop Circle and Scallop Circles #2 dies with a piece of cardboard that comes in every pack of Designer Series Paper to make the bottoms and lids for these boxes.  Then covered them with cardstock.  There is one TIP that I'd like to point out if you decide to try these:  FOLLOW the tutorial when she says to glue the cardstock and cardboard together BEFORE running them through your Big Shot.  Trust her!  Trust me! 
 Here is a shot of the largest box open.  I am giving this set to a friend with a little something special in each box (I'll show that on another post).  Each box has a little stamped surprise in the lid and, for the bigger two, in the bottom of the box as well.  That's one reason this project is so fun- tons of areas to jazz up however you want!
Here is another shot of the inside of the lid for the largest box.  Sentiment is from In My Thoughts, leaves are from Great Friend.  I also used the new Chantilly Lace, an antique brad, pearls and the Large Oval punch and scallop oval punch with Oval All for the label on the outside.
 This is the medium box with a sentiment from Full of Life and 3 Jewel Basic Rhinestones.
 Here is the smallest box.  It has pearls all the way around it plus a hand-made carnation flower on top (more on how to make those later!)
On the inside of this lid I used a stamp from Think Happy Thoughts and punched a little flower with the Boho Blossoms punch, attached with a Rose Red brad.  For all three boxes I used retired Raspberry Tart DSP (designer series paper).  The measurements I used are as follows: 

Large box: 2"x12" strip & a 1"x113/4"
Medium box: 1 1/2" x 9 1/4" and 1"x9" (as per the tutorial)
Small box: 1 1/2" x 5" and 1" x 4 3/4" 

For the larger two boxes I just cut circles that looked like they would fit with my circle cutting system.  For the small box my 1 1/4" punch worked perfectly!  These circles are to line the inside so the edges of paper don't show. 

Want to know more about the paper carnation?  Here is a tutorial that is super easy:  paper carnation tutorial thanks to Emma F. at Lady and the Stamp.  These have been around awhile so I might just be the last person to try them.  If you haven't either then check out this tutorial! 

Hope you have a great day.  If you have any questions about this post just post a comment and ask, I'll do my best to answer. 
~Kristin

{PS- Special thanks to Tina and Emma for your inspiration and wonderfully done tutorials!}

Friday, May 28, 2010

Some Teacher Gifts

Phew! The last week of school is certainly a busy one! It doesn't have to be but of course I PROcrastinate and make myself miserable. I basically spent all day yesterday making these teacher gifts for my kiddos' last day of school today and also 5 graduation cards that my hubby suddenly needed. I didn't even get a picture of those. Thank goodness I love making stuff like this.
For the kids' 3 main teachers I prettied up these tiny tins I bought several months ago at the dollar store. They were actually gift card holders with a Christmas theme. I just pulled out the plastic insert that held a gift card and decorated the outside.

I used the old Alphabet set, Doodle, in rainbow hues to label the tins, then added a little scallop edge and some ribbon around the edges to finish them off. Inside are a set of 12 or so tiny note cards that I always think will be handy for teachers to send notes home with students for various reasons. The cards ended up being 4x5 folded in half. I did a variety of styles for the note cards along with a monogram set for each teacher. Here are some pictures of the notecards. I'll label the stamp set below just in case you are curious! Spring Solitude
Flight of the Butterfly
Good Neighbor
Vintage Labels & Lovely Letters Alphabet
Good Neighbor
Vintage Labels & Lovely Letters Alphabet

Here is the little M&M holder I made for my son to give to his teachers. I thought he might be a little embarassed handing out the pink ones below. For this one I use the Have a Ball & Sporting stamp sets.
These were done with the Oval All set and Pocket full of Flowers
Well, that's all I've got for you today! Thanks so much for stopping by. If your teacher gifts aren't done yet hopefully these will inspire you to get going!
Measurements to make the little stand up chocolate holders are different every time I make them. The last time I posted them with measurements they didn't work for me this time so here's what I would recommend trying: you can get four from one sheet of cardstock if you make them 2.75 inches wide by 8.5 inches long. Then try scoring at 1", 4.5" and 5.5".
Have a great weekend everyone!
~Kristin