Showing posts with label jewelry. Show all posts

Thursday, September 27, 2012

Yes, I made that!!

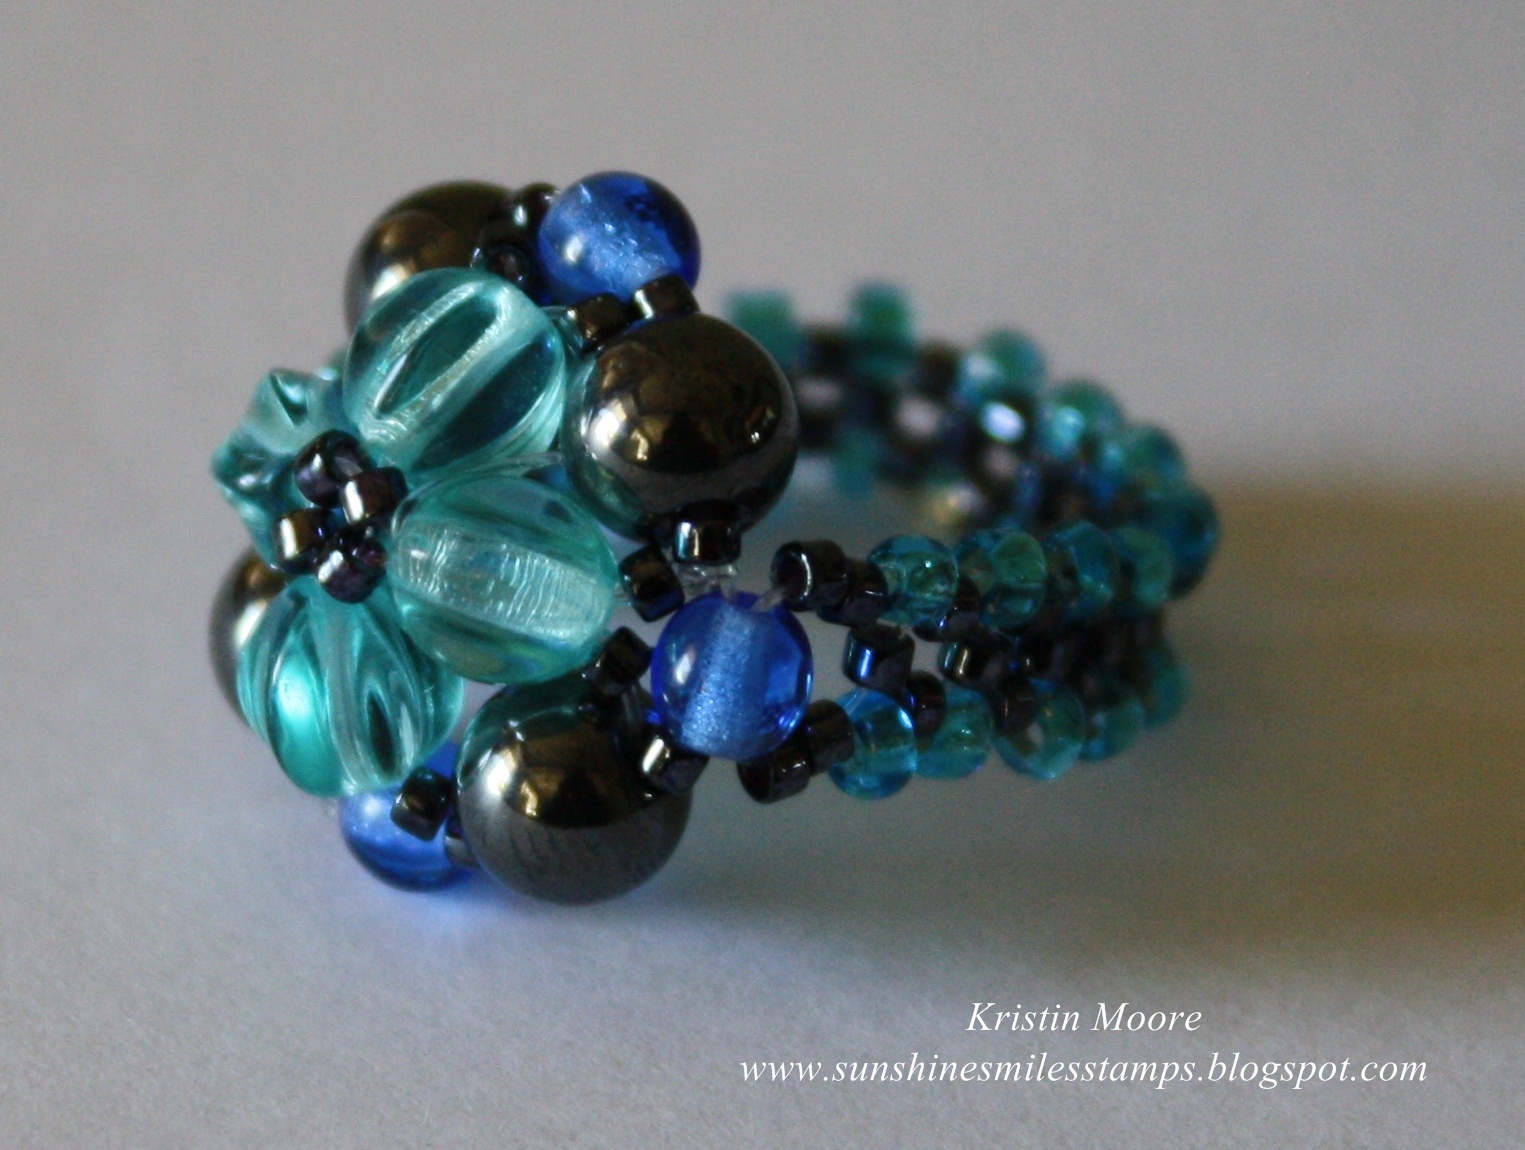
 Can you believe I actually made this?!  Thanks to this wonderfully done YouTube tutorial by Beadifulnights I did!!  It probably took me 3 hours or more and I'm sure it isn't perfect, but I adore it and it is so comfortable to wear.  The best part is I got to pick whatever beads and colors I wanted so it is just my style! 
Here is a side view so you can see how pretty the band is too.  This entire ring is made of only beads and fishing line.  That's it!  This project is probably a little advanced for where I am in my new beading hobby, but I learned a LOT and stuck it out.  So grateful for all the talented and generous beaders out there (a lot like the stampers I know!) for helping out us newbies!! 

I'll be back soon with a Clean & Simple Christmas card I really like, as soon as I get enough sunlight to take a decent picture. 

Thanks for visiting and have a great day!
~Kristin

Tuesday, September 25, 2012

Purple Pendant

 Isn't this stone pendant beautiful?!?  I just love the gray and purples tones.  I have no idea what it is but I added these four little beaded things (no idea what to call them) I found already made (thanks mom!).  She obviously had something in mind... These earrings were already made as well as a matcing bracelet that I forgot to photo so I had to finish off the set!
Thanks for stopping by!
~Kristin

PS- Beads are the only ones not labeled in this particular storing tray.  Maybe agate??

Monday, September 24, 2012

Some Swarovski- a bracelet

Still trying to figure out this photography thing... was trying to make myself a really simple bracelet in colors that I wear a lot for every day wearing.  While I really like how it turned out, it is still pretty style specific, so not exactly an every day piece. 

I'll try to list the beads I used here.  Keep in mind that I am using my mom's stash and she labeled some things and not others.  Jahloneh (?) czech beads, blue agate, green avent, apatite green, blue zircon swarovski, and some silver accents. 

Thanks for stopping by!
~Kristin

Sunday, September 23, 2012

BEADS!!!

 Good morning!  In case you are wondering, I've discovered a new hobby and think I'm in LOVE!  Unfortunately, if you are used to coming here for cards... well, they'll still be here but interspersed between some beaded jewelry pieces! 

This is a triple strand bracelet with matching necklace I made recently.  They are both on stretchy cord, which is good and bad.  The necklace is actually a single strand which hangs to my waist so it is VERY HEAVY!  The neat thing is that I can double it, like in the picture here, or even triple it easily!  The beads are a variety from my stash- some of which I do not like on their own, but love in this completely random combination!

Forgive my photography.  Either I'm struggling or something is up with my camera because it took me dozens of pictures to get these ho-hum shots.  I need to experiment with my backgrounds I guess, and maybe learn a little something about my camera settings.  I HOPE it isn't that something is wrong with my camera!! 

So what do you think?  I already wore this playful set and had so much fun with it!  Thanks for stopping by!  I'll be back with more jewelry for sure, and some Christmas cards too. 
~Kristin

Wednesday, August 22, 2012

Wedding Invitation & Beaded Jewelry Gift

I think I mentioned in the past a wedding invitation I helped a friend on and since a few of you have requested to see it, here you go.  I hesitated to post before because the wedding hadn't occurred yet and because it didn't photograph nearly as well as it looks in person.  This bride wanted very natural and simple and she chose all the details. 
 
The soft suede cardstock was cut to fold over the vellum cardstock by 1.5" so the final size is 4.25" x 5.5" just like a standard card, fitting nicely into a standard envelope.  It was tied with a bow of twine (I used linen thread for my example here).  

The piece underneath with the printed details is Naturals Ivory cardstock.  We incorporated the green (Wild Wasabi) from her wedding colors by stamping this image from Inspired by Nature (it is stamped off once so not too distracting.) 
 
I didn't take a picture but the programs were this exact style but ended up being 4.25" by 7.5" finished, including the 1" folded over piece at the top.  This way we were able to efficiently use an entire piece of cardstock!  I am a tad anal about being efficient. 
 
In case you missed it, HERE is the card I made for the happy couple.  Of course I had to make sure it coordinated in color and style!

 Up next is a gift I've been working on for my best friend Nicky for a LONG time (her birthday was in June!).  I finally gave it to her yesterday after several setbacks so I'm able to post it now without spoiling her long awaited surprise.  This is the first set of necklace, bracelet and earrings I've ever made and I'm super pleased with how they turned out.  Her daughter told me her favorite color was purple (how did I not know that after 30+ years??) so that was my starting point- these beautiful natural polished purple stones. 

Funny story about the necklace... after I had it all done, and realizing that I didn't really know what I was doing, I decided I should wear it around for a little bit to make sure it wasn't scratchy etc.  So I put it on and proceded to sit at my desk to check a few emails.  Approximately five minutes later it suddenly without warning snapped and beads flew everywhere!  I honestly was only moving my fingers so I'm SO GLAD I thought to wear it.  That is one of the reasons it was so late, I basically had to start over!


Now that my kids are back in school you'd think I'd be stamping every day but I've still got so many projects to clean up from and catch up housework that it might be a few days still.  We've finally gotten our playhouse/game room painted and started putting furniture in so I've been cruising Pinterest obsessively trying to come up with cute ideas.  Now to put them all to use!  Maybe I'll have some fun pictures to share once we're all settled in. 
 

Well, that's it.  Thanks for stopping by!
~Kristin

Thursday, August 9, 2012

You Mean So Much

I'm back today with another pair of earrings I made myself to match this bracelet and a necklace that my mom had made.  These natural polished stones are so shiny and smooth- they are just gorgeous in person!  More practice needed for me though.  But once I'm good at this I'll have trouble giving things away I'm afraid. 

The Clean & Simple sketch challenge FTL 202 came in handy for getting my stamping mojo going.  These are some of the new In Colors:  Summer Starfruit, Raspberry Ripple and Midnight Muse not to mention the lovely new Natural Composition Specialty Designer paper in the background there (the Crumb Cake with a shiny raised floral pattern on it). 

 I made a fun discovery while playing around for this card:  the large flower burst from Betsy's Blossoms punches out nicely with the Blossom flower punch.  The little center piece is "fussy cut" from another stamp in the same set. 


Other details include the blue pattern from Comfort Cafe DSP, sentiment from my new set One in a Million, topped off with some linen thread on a mini library clip. 
Here is the sketch challenge.  Think you might try it?  I missed the entry deadline but am glad I found it.  Lots of possibilities with this one!  (Edit:  Turns out I didn't miss the deadline, silly me!)

Thanks for stopping by.  Must run now.  Spent all morning putting 36 freezer bags of sweet corn up.  Had 51 ears left and I told my husband we didn't need that much corn- PHEW!  Now my daughter is waiting for me to help her with some painting projects (shelves for her room and some wooden letters that spell out her name).  Stop back tomorrow for a quick post with a baby card for twins. 

Have a great day!
~Kristin

Oops, forgot my supply list: 

SUO Supplies
Stamps:  Betsy's Blossoms, Flowering Flourishes, One in a Million
Colors:  Naturals Ivory, Crumb Cake, Raspberry Ripple, Midnight Muse, Summer Starfruit
Accessories:  Comfort Cafe DSP, Natural Composition Specialty Designer paper, First Edition DSP, Modern Label punch, Mini Library Clip, Linen Thread, Blossom punch, Top Note Die, Big Shot

Wednesday, August 8, 2012

Excuses, a card and some jewelry!

1. Painted a chair.
2. Two baseball games (Little League State Playoffs- 12U District Champs!!!).
3. Canoed down Crystal River in Northern Michigan.
4. Camped at Interlochen State Park.
5. Climbed the Sleeping Bear Sand Dunes.
6.  Dentist appointments, doctors appointments, vehicle appointments.
7.  Helped with wedding programs.
8.  Measured, cut and installed plywood walls in kids' playhouse.
9.  Made some jewelry.
10.  Attended a wedding.
11.  Put together my new Ikea bookcase. etc. 

These are the reasons I've not posted on my blog, nor stamped anything of significance in over 2 weeks!  Am I excused?  I do have some fun pictures to share proving some of my excuses. 

Is anyone else so overflowing with creative, crafty ideas (Pinterest is evil!) that they just sit spinning those ideas instead of actually doing them?  That's how I'm feeling right now.  Possibly because I have laundry and other responsibilities that must come first but I'd rather be painting all these wonderful pieces of furnture and making all these jewelry pieces and cards in my mind....

.... well, that was the post I started about a week ago.  Finallly getting around to adding some pictures to my excuses and actually posting. 

Here are some of them, and even a card I made recently (I actually have one to share tomorrow too!) 
Here's my quick card featuring my fun new set: Flowering Flourishes, and the new Paper Piercing Essentials pack! 

HERE is the before and after on my rocking chair project.  I bought this chair with the ripped out seat when I was pregnant with my first child, which would've been about 13 years ago, intending to have it redone in time to rock him in it.  Well, this summer I decided it was time (now that he no longer fits in my lap) to do something with it.  Inspired by the local Amish, I painted it yellow and stuck in my pot of flowers which by now are humongous and flowing over the arms and front of the chair!

Here is a picture of us at the Sleeping Bear Dunes taken before we climbed down that giant cliff to Lake Michigan. 

And finally, my first attempt at beading.  Well, second attempt counting my Artisan Award entry.  I made this pair of earrings to match the necklace that my mom had made.  I can't wait to find the perfect occasion to wear them!  Let me know if you are at all interested in future jewelry/beading attempts because I have a feeling I'll be making more.


Thanks for stopping by!  I've got more to show you tomorrow assuming I get it posted.  I have a certain young lady who is "SO HOT" and really needs to go swimming before she dies of heat exhaustion.  Couldn't I just turn the AC back on?? 

Thanks for stopping by!
~Kristin

Saturday, July 7, 2012

Last Artisan Entry: Paper Beaded Jewelry

Well, this post wraps up my 10 Artisan Award entries.  This is my final 3D project.  I made a bunch of paper beads with the Cheeful Treat DSP, a hostess option from the previous catalog.  To make the beads you use narrow triangle strips of paper and roll them tightly over a toothpick then glue then end down to hold in place.  I then strung them on fishing line and painted them with Modge Podge.  Once they dried I sprayed them with a matte acrylic sealer. 

Once the beads were done I decided to make my very first set of earrings and matching two-strand bracelet.  I am so proud of how they turned out!  Making jewelry is harder than I thought!  I added SU's Filigree brads for decorative finishes to both, plus a Basic Rhinestone to the bracelet.  

 Since the focus was my jewelry pieces I kept the gift box quite simple- an unused plastic stamp case filled with some crimped paper filler and tied with a satin vanilla ribbon.  The gift card was made with the Mixed Bunch stamp set and matching flower punch. 

I mentioned these were extra special to me yesterday so I'll tell you why.  Not only are these my very first attempt at making jewelry, but I used my mom's huge stash of jewelry making supplies.

As some of you may recall my dear mom passed away very suddenly last July 6th.  She was an avid jewelry maker and most of my favorite necklaces, bracelets and earrings are all her designs!  In her honor I decided to give it a try- something I've always wanted to do. 

My dad sent me all her stuff- including how-to books thank heavens!  And as I was trying to figure out what to do I came across the beginnings of a two-strand bracelet that she had started.  No beads yet, but she'd done the hard part of putting the findings together for one end. 

That was my only jewelry making "lesson" I'd ever gotten from her and the inspiration to attempt a two strand bracelet instead of something more basic.  So now you know why they were so special to me and why I made my little gift card a Mother's Day card. 

So thanks for sticking with me on my Artisan Award journey, even though it didn't end as I'd hoped.  Hopefully the timing will work out for me to try again next year.  Have a safe weekend and hug your loved ones while you can!
~Kristin

PS- Just this past week I've attempted another jewelry design.  When it is complete I will post it here, even though it will be non stamping related entirely.  Maybe I'll start another page on my blog for jewelry!

Monday, November 10, 2008

Good Monday Morning!


All right- I finally have uploaded some pictures and cropped and digitally altered to make everything appear better than it really is. LOL! Except me- I'm so unphotogenic so I probably won't even be uploading that picture!

Here's my table with my DD working for me. She does like to help, but she also likes to shop at the other booths which is one reason I don't make much at these things. Ha ha! The pillows on my table are my mom's- she makes the best luxuriously soft pillows for babies and kiddos (my kids LOVE them!) and they are completely washable. My daughter was hoping none would sell so she could have everything left!


Next up are the long-promised domino necklaces. I'm kind of torn about these things- they are pretty and fun to make but I also really struggled coming up with a way to make sure the ink was permanent and didn't rub off. I ended up spraying them with tons of coats of the same sealer I use on my tiles, but I'm afraid they will still scratch off if tested too much. My only option left that I might try is embossing the entire piece with clear EP. However, now that I have the ribbon and jewelry findings on each one I don't want to take those off, so not sure if I'll do it at this point or not.


A few of these I painted with a coat of Luimere- that shiny paint that SU used to carry. Mine is a little chunky now due to age and a crack in the lid, but it still worked and I actually liked the texture it added. Also, the Lumiere helped keep the craft ink in place and not rub off!

Well, I'll save the rest for another day. Thanks, as always, for stopping by!

~Kristin