Wednesday, January 23, 2013

Lots of News!


OK, yet another example of why I stink as an SU demonstrator... my first post about Sale-a-Bration includes a card with no SAB stamps.  Sorry, haven't had much time to stamp lately... I'm in the middle of making 225 wedding invites for a client which need to be done in a month. (*Yikes*)  However, I did use this new Designer Series Paper from the new Spring Catalog called Parker's Patterns.  I just adore the masculine, but fun look!  

Check out the links below for more great details about not only Sale-a-Bration and the Spring Catalog, but also a most exciting new offering called Paper Pumpkin, a monthly surprise creative treat in a box from Stampin' Up!  


 If you are interested in placing an order for any of these totally cool Stampin' Up! products, or would like to host a Workshop Wow contact me by clicking on my profile at the top right, or leaving a comment with a way to contact you!  (If you'd rather I not publish the comment just say so, then no one else will get your contact info.)

Also, the sketch I used for this card is from Splitcoast Stampers sketch last week!  If you'd like to try it out click here:  Sketch Challenge.

Thanks for stopping by!  If you'd like to see the wedding invitation I'm working on stop back tomorrow.
~Kristin

Thursday, January 17, 2013

Madison Avenue Thank You- FULL of Sale-a-Bration!

How's this for colorful?  I used a recent Mojo sketch for this one, as well as my new Designer Series Paper called Sycamore Street and stamp set Madison Avenue, plus the coordinating Petite Curly Label punch and stamp set Pretty Petites (all FREE during Sale-a-Bration!). 

Interested in earning any of these free products for yourself?  Just contact me to place an order of $50 or more, to schedule a Workshop Wow for you and your friends!

You may also notice some embossing along the edges there.  That is an embossing folder I borrowed from a dear friend Karen.  I forget what it is called, but it is not offered by SU.

Have a great day!
~Kristin
 
SUO Supplies
Stamps:  Madison Avenue, Petite Pretties
Colors:  Summer Starfruit, Island Indigo, Rich Razzleberry, Tangerine Tango
Accessories:  1 3/4" circle punch, Petite Curly Label punch

Wednesday, January 16, 2013

Thank You

As I mentioned yesterday, my pal Lisa Henke and I decided to do some virtual stamping together on Monday as we occasionally do.  Basically that means we chat via email and choose challenges to do together then enjoy stampin' with a stampin' buddy (sort of).  It is fun because we live about 3 hours apart and rarely get to see each other. 

So Lisa chose our first challenge which is the Clean and Simple challenge from Splitcoast.  The challenge was actually a color challenge to use Bermuda Bay (or any tuquoise color), Kiwi Kiss (lime green), Ruby Red (any red) and Chocolate Chip (brown).   I did use the Burmuda Bay on the sentiment, but the background blue is actually Pool Party. 

Before the holidays of 2012 I had the privledge (as an SU Demo) to preorder a few things from the now current Spring Catalog which runs through May as well as the Sale-a-Bration catalog which runs from Jan 22- Mar 22 (SOON!).  It was hard to get all those new goodies during such a hectic season but it was worth the wait because I had so much fun playing yesterday! 

You have probably noticed by now the two new embossing folders I put to use.  The top one is appropriately called Cloudy Day (from the new Spring catalog) and the bottom one is Vine Street (FREE during Sale-a-Bration)!  If you are like my your stash of embossing folders is growing because they are ADDICTING!! 

In an effort to keep this as CAS as possible I kept the stamping to a minimum with just a flower and a sentiment.  BUT, the stamps and even the tiny punch are ALL BRAND NEW also!!  The flower is from a Sale-a-Bration (FREE) option called Madison Avenue and that tiny little thank you is from Pretty Petites which coordinates with the new punch Petite Curly Label (both FREE during Sale-a-Bration!).

Gosh, that's enough info I'd say.  But here is a quick shot at the inside detail.  I just stamped the vine image 3 times then punched out two of the stamped flowers and put them on dimensionals so they pop out. 

Thank you for stopping by today!
~Kristin
 
SUO Supplies
Stamps:  Madison Avenue, Pretty Petites
Colors:  Kiwi Kiss (retired), Pool Party, Ruby Red (retired), Chocolate Chip, Bermuda Bay (retired), Whisper White
Accessories:  Petite Curly Label punch, Cloudy Day embossing folder, Vine Street embossing folder, Big Shot, 2 1/2" circle punch, Coredinations cardstock (in Pool Party), sanding block

Tuesday, January 15, 2013

Above & Beyond


Is it too late to say Happy New Year?!?  I hope your 2013 has kicked off nicely and you have hopes for a great year ahead.  I am getting a slow start but ready to dive in with some thank you notes that are always needed just after the holidays! 

This great new Honeycomb embossing folder could sit here no longer without being used!  It is a fabulous new addition to the Stampin' Up! lineup in the new Spring Catalog which is good now through May 31!  Also new is the Bitty Butterfly punch which coordinates with the Elegant Butterfly punch.  Can you tell that I tried to make the butterflies progressively come off the page with the bottom one flat and the top one ready to fly off?  Not sure if I accomplished that but I can at least tell you of my vision.  ;)

To kick off my stamping for the year I decided to try out two challenges, and some virtual stamping with my good friend Lisa Henke!  Every now and then Lisa and I "get together" and choose challenges to work on at the same time, then we get to ooh and ahh over each other's creations.  These are the challenges I chose.  Tomorrow I'll post the card and challenge she chose.  Thanks Lisa!  The color scheme for this card is brought to you by ColourQ while the awesome sketch is from Fab Friday... check them all out (Lisa's blog too!).


One more thing, Stampin' Up!'s annual Sale-a-Bration begins January 22nd so be sure to contact your demonstrator (hopefully me!) to schedule a Workshop Wow which will be sure to dazzle you and your guests!

Thanks for stopping by, and here's to a fabulous and creative 2013! 
~Kristin

SUO Supplies
Stamps:  One in a Million
Colors:  Basic Gray, Night of Navy, Going Gray (retired), Crumb Cake, Daffodill Deligh,. Whisper White
Accessories:  Big Shot, Honeycomb embossing folder, Bitty Butterfly punch, Basic Rhinestone

Wednesday, December 26, 2012

Christmas Wrap-up

 Better late than never?  Here are the last few Christmas cards of the season.  I haven't sent the first one yet... wonder if I should just get started for next year and forget about it this year??  I don't think I've EVER sent them out on time.  UGH! 
 Does this design look familiar?  HERE is the original I copied.   A quick and easy one!

 
And maybe a better picture of yesterday's card. 

I hope you all had a very Merry Christmas and get to stay home and enjoy a relaxing day today.  Here in Ohio we are facing a blizzard, hoping for 10-12 inches of snow!!  Then we'll be off to sled. 

Thanks for stopping by,
~Kristin

Friday, December 21, 2012

Sparkly Noel

Back in November I found THIS STUNNING CARD by Robin Merriman and immediately saved it to my "cards to copy" file!  Well, I finally did, with a Christmas twist.  Obviously I loved her layout and design, plus just HAD to copy the music notes!  For this one I used the tree from Snow Swirled and added some glittler ornaments to the tree.  Colors:  Cherry Cobbler, Early Espresso, Confetti Cream, Sahara Sand. 

I hope you get the gist in this crummy photo- it is actually quite pretty in person.  Thanks for stopping by!
~Kristin

Thursday, December 20, 2012

Merry!

Still not much sunlight to take better photos so I'm just going to forge ahead with the photos I've got.  This was another experiment with my new Cordinations cardstock in Pool Party with my Northern Flurry embossing folder.  Fun, quick and simple. 

Hope you are staying warm and safe in your current weather.  Here in Ohio we're facing high winds and the likelihood of snow throughout the night and tomorrow.  Are you ready for the upcoming holidays?  I just finished my wrapping tonight- PHEW!  Have a few more gifts to make out of paper and beads.  ;)  Oh, and need to get started on my Christmas cards.  Better late than never. 

Thanks for visiting today,
~Kristin

SUO Supplies
Stamps:  Pennant Parade
Colors:  Early Espresso, Pool party, Gumball Green
Accessories:  Northern Flurry embossing folder, Early Espresso baker's twine, clear rhinestone brad, Pennant Punch, jewelry tag punch

Tuesday, December 18, 2012

Down to Your Toes


Hey there!  Guess what- I STAMPED!  I know- shocker, right?!  Well I did.  And I made five Christmas cards and I really like them all, and just for fun I'm going to spread them out.  Might as well since I haven't posted since November.  I apologize in advance for the less than stellar photos.  Didn't have much sun to work with this afternoon.  Maybe I'll get better pics of the rest before I post them. 

Here's my first one.  I've paired Bootiful Occasions with my new Pool Party Coordinations cardstock.  See the lighter color on the textured area??  You get that just by lightly sanding.  Such a neat effect!  Also new to me is this Vintage Faceted Designer Button that I tied on with some Island Indigo Baker's Twine.  Other things to note:  the oval which I cut out with the ALL NEW Ovals Collection Framelit, will be available beginning January 3, 2013 in our luscious new Spring Catalog!

I did stamp the inside too (remember my resolution?) but kept it pretty simple so I didn't bother photographing. 

Well, thanks for stopping by and not dropping dead from shock that I've actually posted something.  If you want to see what else I've been working on go to the top of my page here and click on "Jewelry and Beading."  ;) 

~Kristin 

PS- Just Add Ink is having a final hurrah Christmas challenge so I'll click on over there and link this just for fun!

Wednesday, November 14, 2012

Lace, Vellum & Pearls

Look what I found... I made this card last week sometime then promptly forgot all about sharing it.  I borrowed the sketch from the Clean & Simple blog.  

 Quick peek at the inside...
...and the sketch. 
 
Thanks for visiting today! 
~Kristin
 
SUO Supplies
Stamps:  One in a Million, Flowering Flourishes
Paper:  Pink Pirouette, vellum cardstock, Whisper White
Accessories:  Lacy Brocade embossing folder, white organdy ribbon, basic pearls, White embossing powder
 
NOTE TO SPAMMERS:  DON'T BOTHER.  I WON'T PUBLISH YOUR COMMENT SO GO AWAY!!!

Friday, November 9, 2012

Many Thanks: MDS

I know, it looks a little different from what you normally see on my blog.  That's because this is a digital card.  Made entirely in MDS, My Digital Studio.  MDS is Stampin' Up!'s digital software for scrapbooking, card making or any other project you can come up with.

I've used it to make my blog header, business cards, wedding invitations, birthday invitations and thank you notes as well as projects for my home!  I am new to MDS so am just learning all the neat tricks that you can do with digital. 

One of my favorite things about creating digitally is that you get to control the size, color and location of everything- FULL CONTROL!  It's the best for a control-freak like me. 

I'm not good enough yet to give a full description of just what I used, but I can tell you this- the patterned paper inside the letters... I made that myself!  And I can share it with you! Thanks to the wonderful MDS blog and all the incredible people on the forums willing to answer my silly questions!  Best part is, the MDS blog is available to everyone, not just SU demonstrators!  You can find the custom paper I made HERE and while you're there you can join the group and be my friend!

So anyway, if you haven't considered MDS yet now you can give it some thought.  I'm planning to crank out some scrapbooks with it so I'll be able to share those with you eventually.  Don't worry, I am not going to stop my traditional scrapbooking! 

Here is the Paper Players challenge I am participating in today.  Giving thanks!  Have a great day and thank you for stopping by!
~Kristin

Tuesday, October 30, 2012

It's beginning to look a lot like Christmas!

Thanks to Hurricane Sandy we've got some white stuff outside and even for Ohio this is crazy weather!  We hit almost 80 degrees last week.  Thank goodness we got most of our yard work done although my ferns are still hanging on the front porch looking pathetic. 
 
Since snow makes us think Christmas I might as well share these two Christmas cards I made the other day.  These little "inchies" were laying on my desk from previous projects so I couldn't let them go to waste.  Added them to the Apothecary Accent Framelit that I hadn't used yet then decided to layer the whole piece on this Embossed Holiday Frame.  I don't do much white on white layering, but I think I like the clean look.  What about you?  Finishing touches include a Mini silver brad and two regular sized silver brads, along with some dotted scallop ribbon which I tried like the dickens to tie in a bow but it just didn't work out. 


Here are more little inchie squares I had left over so made this one very quickly! 
 

 And here is the inside using the one pattern that didn't lend itself to a 1" square.  The paper is called Be of Good Cheer DSP.

And finally, a peek outside my backdoor.  It is supposed to change to rain soon so thought I'd take a picture before it is all gone.  We are all happy to have a day off from school today thanks to Sandy!

Have a great day!  Safe and warm wishes to our friends on the East coast being affected by the hurricane and her after effects! 

~Kristin

SUO Supplies
Stamps:  Joyous Celebrations, Many Merry Messages
Colors:  Very Vanilla, Soft Suede,  Cherry Cobbler, Gumball Green
Accessories:  Big Shot, Holiday Frame Embossing folder, square punch, postage stamp punch, silver brads, Cherry Cobbler scalloped dotted ribbon, Apothecary Accents Framelits, small oval punch, Be of Good Cheer DSP

Sunday, October 28, 2012

Not 1, not 2 but 3 cards this time!


I had so much fun using THIS SKETCH from Create with Connie & Mary that I just had to use it again.  I LOVE the diagnal aspect!  Just like my last card, I used the Comfort Cafe DSP, but this time I used it for a casual card that could even be considered masculine I suppose.  I cut this boot out in three different colors before I got it right- this one is River Rock stamped with Soft Suede ink. 

 My daughter needs some thank you notes for birthday presents she received this month so I set my sights on those.  This one puts 2 challenges to test:  The sketch from Fab Friday (which I took some artistic liberties with) and the color challenge from Color Me Beautiful (Calypso Coral, More Mustard, Raspberry Ripple, Always Artichoke, Vanilla).  I just love how this turned out- the colors are fallish but wonderfully vibrant together, and the variety of textures are so FUN- just what I needed on this cold blustery day!  Edited to add:  the Color Me Beautiful sketch is one from several weeks ago that I'd written down in my sketch journal.  Oops! 
 Here's another Thank You note.  This time I followed the sketch from Paper Players, and the color challenge from Color Q.
 
Quick shot of the inside. 
 
Well, thanks for stopping by! 
~Kristin

Friday, October 26, 2012

Christmas Cards for Sale! Limited Supply.

 Hello!  Long time no see.  I have something new for you today- two somethings as a matter of fact!  How would you like to have 12 of your Christmas cards all done and ready to go?  This selection is available and come complete with inside greetings and envelopes too.  In fact, for $35 we will even throw in shipping for FREE.  These were all hand made by myself and two other Stampin' Up! Demonstrators from leftover supplies from our recent Stamp-a-Stack.  They are high quality and made with 100% Stampin' Up! product.   If you are interested shoot me an email (Stamp_for_smiles (at) embarqmail (dot) com) or leave me a comment here with your email address.  Supplies are VERY limited so first come first serve. 
Next up is yet another Christmas card, and you can make this one yourself!  ;)  Found this fun sketch at Create With Connie & Mary but guess what... yep, I missed the contest deadline again.  That's OK because I love how it turned out and love the sketch enough to use it again just for FUN! 

Thanks for stopping in to visit me toay!
~Kristin
 
SUO Supplies
Stamps:  Bootiful Occasions, Teeny Tiny Wishes
Colors:  Whisper White, Pool Party, Midnight Muse
Accessories:  Comfort Cafe DSP, Northern Flurry embossing folder, Liquid Applique (no longer a SU product, Whisper White Organza ribbon, scallop border punch

Monday, October 15, 2012

Blue Ribbon Birthday- a Mojo Sketch & TEXTURE!


Surprise!  Yep, I'm back to stamping.... at least for today.  Saw the weekly Mojo sketch in my email inbox and couldn't resist.  So between laundry loads and other things I managed to squeek this one out. 
Also decided to join the SUO Challenges to use texture.  Duh!  That's not too hard.  Gotta love those embossing folders.  I managed to use THREE on here!  Polka Dots, Stripes and the Chevron.  So fun! 
 
I had planned to join a color challenge somewhere but somehow these colors grabbed my eye from my own scraps and I HAD to go with them.  Basic Gray, Perfect Plum, Wisteria Wonder and Summer Starfruit! 
 
Besides the texture on here I spiffed things up with some Summer Starfruit stitched satin ribbon and some Filigree brads, and of course several punches! 
 
I also made a new necklace this weekend so if you're interested hop on over to my Beading and Jewelry page (link at top below my blog title).  Here's the sketch if you'd like to play along!
 
 Thanks for stopping by today! 
~Kristin

Tuesday, October 2, 2012

Christmas Deer

 So have you seen this Christmas Deer stamp set in the Stampin' Up! Catalog?  It is on page 19.  If you like it, I highly recommend the "wood mount" version for $4 more because of the teeny tiny nature of the ornaments.  I would NOT want to lose one. 

This is my "rustic" version using the deer, complete with the Woodgrain background and the beautiful new Brushed Bronze button from the Holiday Catalog.  This must be a Utah deer because the deer I've seen in Ohio don't have bodies quite this big usually. 
Here is my first attempt to recreate yesterday's card using the deer instead.  I stamped him with Versamark ink then melted the Heat and Stick powder and immediately doused with Dazzling Diamonds glitter for some serious sparkle.  In person, the detail of the antlers does show up much better.  Hard to photo.  This isn't the version we'll be making on Saturday at my annual Holiday Stamp-a-Stack either....
 
But this might be the final version!  This time he is embossed in Pewter then sponged with some Midnight Muse ink.  The ribbon is the new Satin Stitched in Midnight Muse. 

So what do you think?  Do you like this as well as yesterday's card?  I ended up using Marina Mist instead of Baja Breeze.  I didn't have enough of the Baja cardstock and no time to order more... plus, Marina Mist is just my favorite blue anyway!  If you have suggestions on how to improve this feel free to speak up.  I'm unsure of the sentiment placement since this stamp isn't as symmetrical as the tree from yesterday.  And I do miss the paper piercing, even though I don't think the deer would fit anyway.  Hmmmm.

Thank you for stopping by, and for your comments!  They do make a girl feel loved!  Have a great day.
~Kristin

Stampin' Up! Supplies
Stamps:  Christmas Deer, Snow Swirled (sentiment)
Colors:  Marina Mist, Midnight Muse, Whisper White
Accessories:  Pewter embossing powder, scallop border punch, sponge, Modern Label punch, Satin Stitched Midnight Muse ribbon

Monday, October 1, 2012

Editing Magic!

 Good morning fellow stampers!  I'm back with another Christmas card I promised a few days ago.  I was so happy with this one when it was all done, but got busy and left it sit around on my desk waiting to be photo'd... when tragedy struck. 

OK, I'm being dramatic, it's just a card... but it felt like the end of the world for a few minutes when this card, which was my favorite of the last dozen or so, fell over onto an open red inkpad.  Have you ever had this happen??  It's NOT a good feeling.
Here's the original picture.  Isn't that sickening?  But thanks to some wonderful editing tricks I managed to get it close to it's original state, at least in the photo.  Now in person it is still ruined!  And the red inkpad didn't discriminate, it ruined the main image, the ribbon and all the layers of scallops too just to be sure I couldn't reuse any piece of it.  Except the little sentiment down there. 

This was a design I had experimented with for the Stamp-a-Stack this Saturday (still time to register if you live in the area- Kenton, Ohio).  While I love this one, it is not one of the finals because I bought the new Christmas Deer stamp and really wanted to use it.  So the design will be the same, but the stamp and the ribbon (this one is retired) will change.  Plus, the paper piercing is left off- much too time consuming to have 20+ women trying to do it with only one template. 

Anyway, thanks for stopping by!  I'll be back with more SAS designs in the next few days hopefully. 
~Kristin

Oops, forgot the supply list, sorry! 

Stampin' Up! Supplies
Stamps:  Snow Swirled
Colors:  Baja Breeze, Midnight Muse Whisper White
Accessories:  Clear Embossing powder, Paper Piercing Essentials pack, Modern Label punch, Baja Breeze Seem binding ribbon, scallop border punch, sponge

Thursday, September 27, 2012

Yes, I made that!!

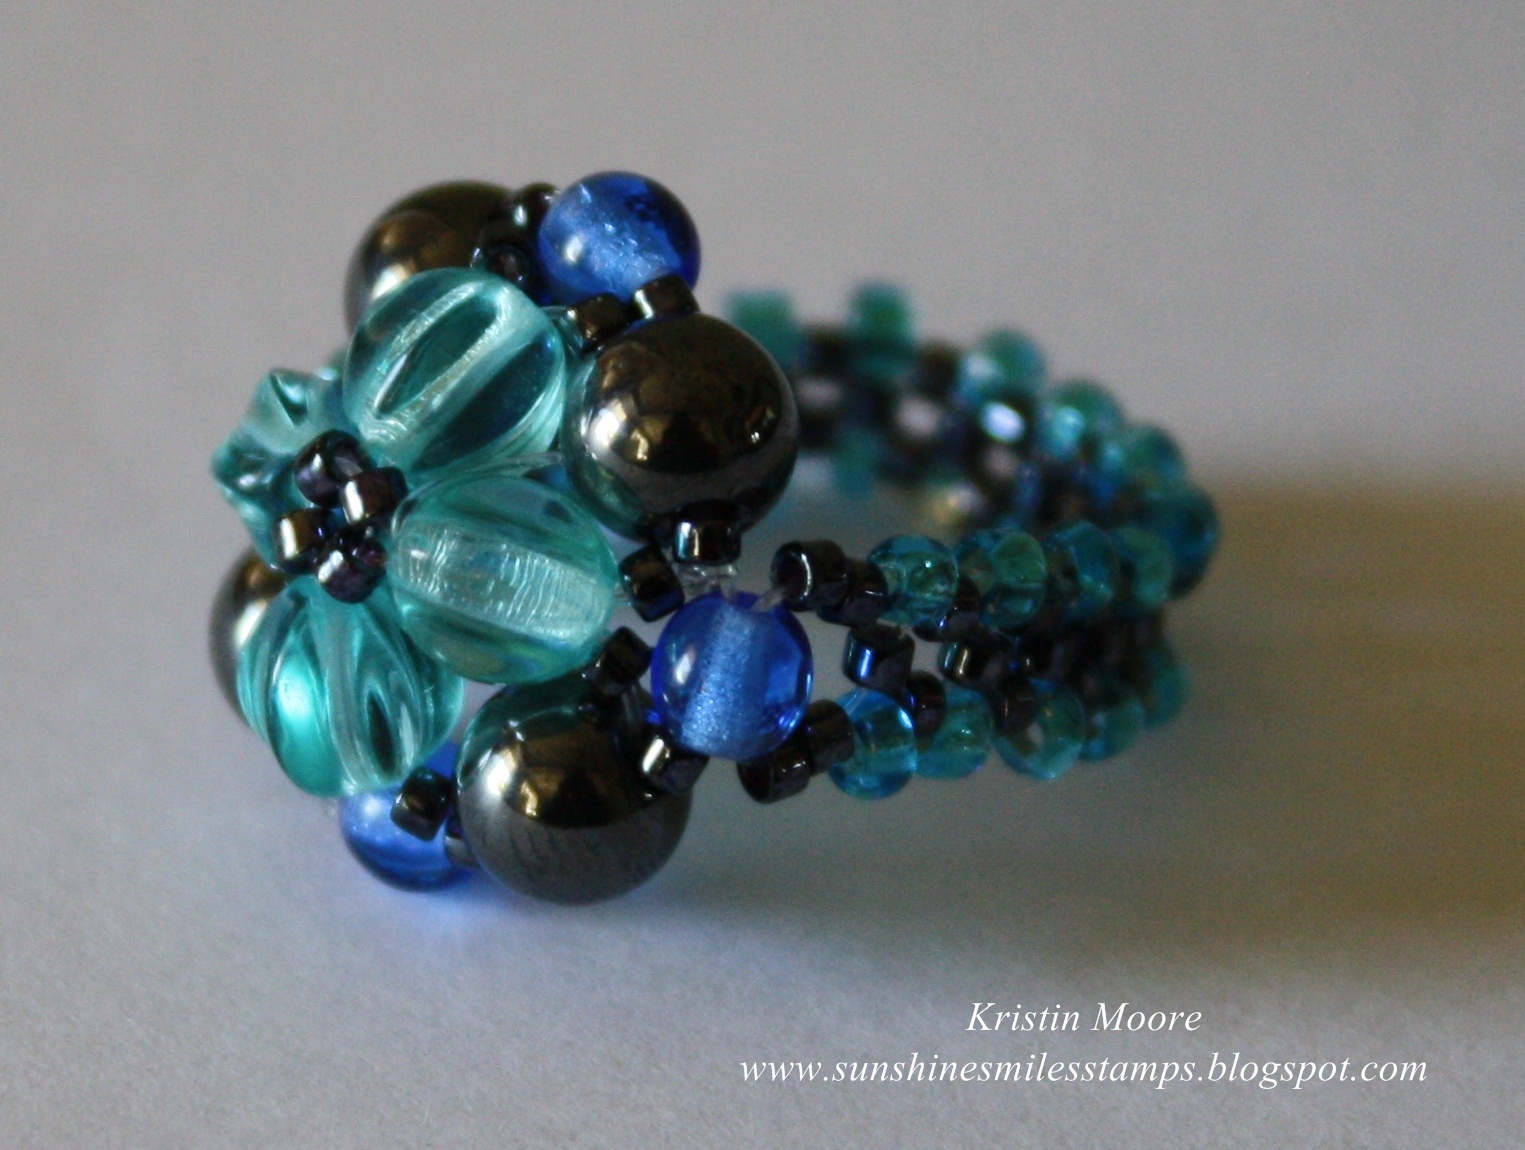
 Can you believe I actually made this?!  Thanks to this wonderfully done YouTube tutorial by Beadifulnights I did!!  It probably took me 3 hours or more and I'm sure it isn't perfect, but I adore it and it is so comfortable to wear.  The best part is I got to pick whatever beads and colors I wanted so it is just my style! 
Here is a side view so you can see how pretty the band is too.  This entire ring is made of only beads and fishing line.  That's it!  This project is probably a little advanced for where I am in my new beading hobby, but I learned a LOT and stuck it out.  So grateful for all the talented and generous beaders out there (a lot like the stampers I know!) for helping out us newbies!! 

I'll be back soon with a Clean & Simple Christmas card I really like, as soon as I get enough sunlight to take a decent picture. 

Thanks for visiting and have a great day!
~Kristin

Wednesday, September 26, 2012

Holiday Cheer

I've been working to come up with some designs for our annual Stamp-a-Stack which is coming up October 6th.  Since I've been neglecting my stamping for jewelry lately I'll post four cards at once.  I have another done, but haven't yet photographed it. 
 
 My new order from SU will be here on Friday so I'll have more stuff to play with and post then!  This first one is using the new Holiday Frame embossing folder.  I love how the Cherry Cobbler baker's twine looks but the punch I used on the corners is not by Stampin' Up! so I don't think we'll be making this one. 

For this one i stamped an ornament from Delightful Decorations on the Limited Edition DSP then embossed it with clear powder.  I have ordered the Cherry Cobbler powder so next time I can stamp with Versamark instead of the Versamark then Cherry Cobbler combination.  

 
This style of stamping has a name, something like Subway style?!?  Basically you just gather a large number of sentiments and stamp them in varrying directions.  I have at least 15 different stamps on here, many from very old retired stamp sets, all stamped in various shades of green.  The card base is Gumball Green, and it is finished off with some Cherry Cobbler Seem Binding.  Are you getting the idea that I like Cherry Cobbler for Christmas cards??
And finally... this one is actually Real Red with Always Artichoke and Naturals Ivory.  The tree, from Snow Swirled is an old favorite.  I embossed it in silver on the Limited Edition DSP then sponged over it with Artichoke ink.  If you're wondering, my sponge dauber had some other green on it and even though it was dry, it showed up more than the artichoke.  Next time I'll use a brand-new sponge dauber.  The tree ornaments were punched from the glittery red paper with a standard hole punch and the 1/8" hole punch. 

Thanks for visiting!  Why don't you let me know YOUR VOTE if you had to choose which of these you'd want to make at a Holiday Stamp-a-Stack. 

~Kristin

Tuesday, September 25, 2012

Purple Pendant

 Isn't this stone pendant beautiful?!?  I just love the gray and purples tones.  I have no idea what it is but I added these four little beaded things (no idea what to call them) I found already made (thanks mom!).  She obviously had something in mind... These earrings were already made as well as a matcing bracelet that I forgot to photo so I had to finish off the set!
Thanks for stopping by!
~Kristin

PS- Beads are the only ones not labeled in this particular storing tray.  Maybe agate??

Monday, September 24, 2012

Some Swarovski- a bracelet

Still trying to figure out this photography thing... was trying to make myself a really simple bracelet in colors that I wear a lot for every day wearing.  While I really like how it turned out, it is still pretty style specific, so not exactly an every day piece. 

I'll try to list the beads I used here.  Keep in mind that I am using my mom's stash and she labeled some things and not others.  Jahloneh (?) czech beads, blue agate, green avent, apatite green, blue zircon swarovski, and some silver accents. 

Thanks for stopping by!
~Kristin

Sunday, September 23, 2012

BEADS!!!

 Good morning!  In case you are wondering, I've discovered a new hobby and think I'm in LOVE!  Unfortunately, if you are used to coming here for cards... well, they'll still be here but interspersed between some beaded jewelry pieces! 

This is a triple strand bracelet with matching necklace I made recently.  They are both on stretchy cord, which is good and bad.  The necklace is actually a single strand which hangs to my waist so it is VERY HEAVY!  The neat thing is that I can double it, like in the picture here, or even triple it easily!  The beads are a variety from my stash- some of which I do not like on their own, but love in this completely random combination!

Forgive my photography.  Either I'm struggling or something is up with my camera because it took me dozens of pictures to get these ho-hum shots.  I need to experiment with my backgrounds I guess, and maybe learn a little something about my camera settings.  I HOPE it isn't that something is wrong with my camera!! 

So what do you think?  I already wore this playful set and had so much fun with it!  Thanks for stopping by!  I'll be back with more jewelry for sure, and some Christmas cards too. 
~Kristin