Showing posts with label embossing. Show all posts

Friday, August 30, 2013

True Friend

 This was probably inspired by some sketch challenge a few months back, but since it has been that long since I made it I don't have any clue which one.  It does showcase a few of the new items I have from the current catalog... Epic Day DSP (LOVE this paper!), Feels Good stamp set and the In Color Dahlia layered on a Brushed Bronze button.  Clean and simple.

Are you ready to start thinking fall colors??

Thanks for stopping by!  Have a safe and fabulous Labor Day weekend.  I am hoping to get one last loop around the lake on the skis.
~Kristin

SUO Supplies:
Stamps:  Feels Good
Paper:  Epic Day DSP, Crumb Cake
Accessories:  Gumball Green Dahlia, Bushed Bronze button, Dotted scallop trim border punch, Pewter embossing powder

Tuesday, April 16, 2013

Thinking of You: Last of the series

Here it is, the last of the series of 6 that I donated to a fundraiser for a local Domestic Violence shelter.  In fact, I think today is the day of the auction.

Yet another pattern of this Epic Day DSP is shown here.  If this paper is any indication of the types of goodies coming out in the new SU catalog on June 1, I am THRILLED!  Can't wait!

Thanks for stopping by.  Tomorrow I've got a very simple set of Monogram cards I made for my Amish neighbor recently.  Stop back!
~Kristin


EDITED TO ADD:  Geesh!  Just realized how awful my pictures look the last several posts.  They look great on my editing software but once uploaded they look overexposed and just awful.  Any tips for me?  I have no idea why this happens periodically.  Sorry!  I'm making this one large instead of XL to see if that helps...
SUO Supplies
Stamps:  Teeny Tiny Wishes
Paper:  Crumb Cake, Very Vanilla, Epic Day DSP
Accessories:  Big Shot, Polka Dots embossing folder, Labels Collection framelits, Basic Gray striped ribbon, Modern Label punch, Everyday Enchantment brad

Monday, April 15, 2013

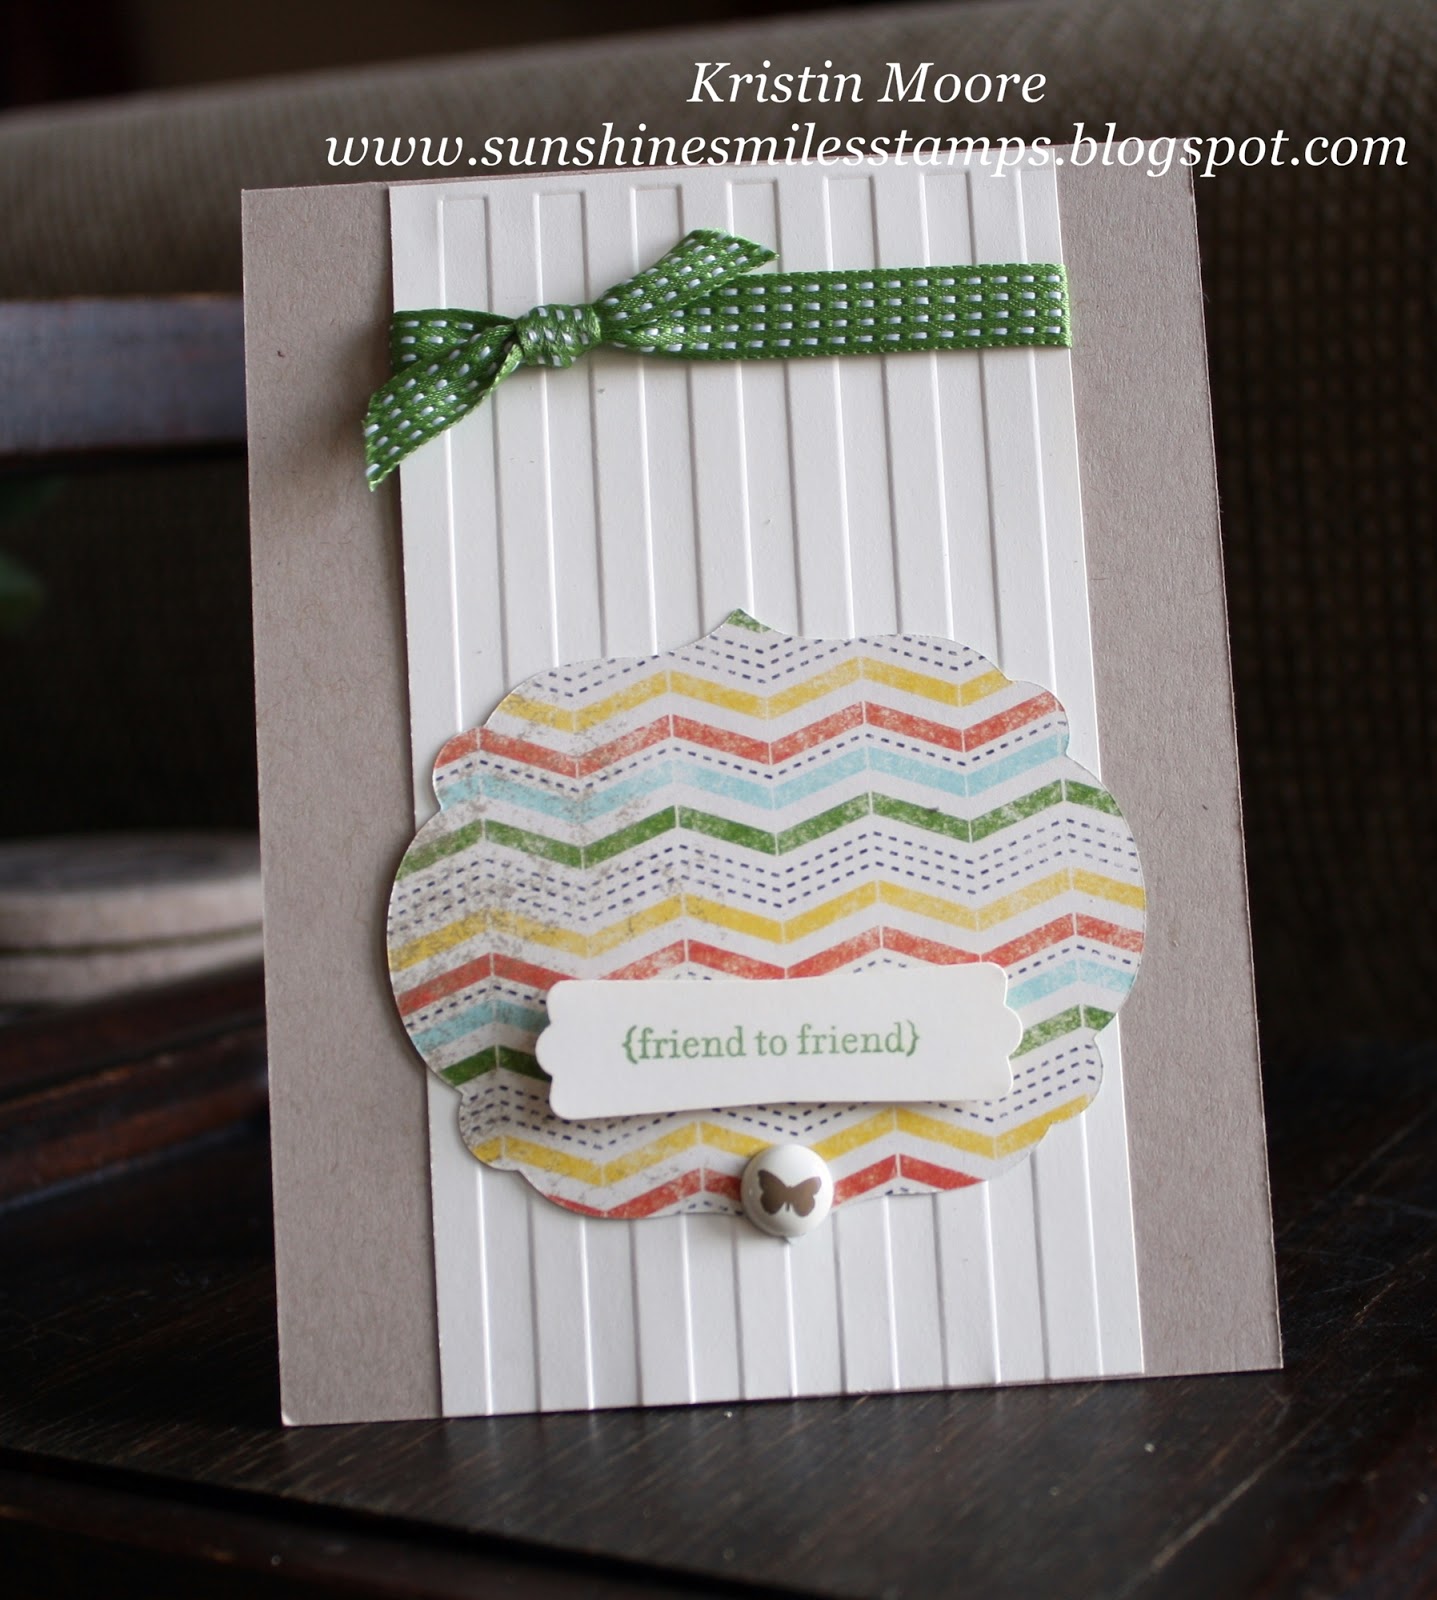
Friend to Friend- fifth in the series

Ooh, isn't that paper just wonderful?  I adore it with this Gumball Green Satin Stitched ribbon!  And the Stripes Embossing Folder...  That butterfly brad is another from that old Everyday Enchantment collection.  Have any of those left?  I still have a few- will be sad when I run out!

Thanks for stopping by today.  One more left in the series I think.  Enjoy!
~Kristin

SUO Supplies
Stamps:  Teeny Tiny Wishes
Paper:  Crumb Cake, Very Vanilla, Epic Day  DSP
Accessories:  Gumball Green Sating Stitched Ribbon, Everyday Enchantment brad, Stripes embossing folder, Big Shot, Labels Collection framelits

Sunday, April 14, 2013

Happy Anniversary & Happy Birthday: third & fourth in a series


Hi there!  Up next in the series of six is this clean & simple anniversary card.  What do you think of the texture and sophisticated color combination together?  That wide striped ribbon is Basic Gray, embossing folder is called Vine Street, and brad is from the retired Everyday Enchantment collection.  Isn't it awesome that even retired products from Stampin' Up! coordinate with the current stuff?  I just love using up older favorites. 


And here is a birthday card made in that same series of six that I donated recently for a Domestic Violence Shelter fundraiser.  For all 6 cards I used a similar sketch as well as the new This and That Epic Day Designer Series paper which is a sneak peek from the upcoming brand new Stampin' Up! catalog (June 1), and is available now in a bundle with some other fabulous coordinating products.  Check them out!  Stop back tomorrow to see the next one in the series!

This one uses the Chevron embossing folder!  Doesn't it just add a funky flair to those gorgeous designer papers?!!  Once again, I used Teeny Tiny Wishes for the sentiments on both of these, as well as the Modern Label punch and the Labels Collection Framelits.  

Gotta run, stop back tomorrow for another in this series!  
~Kristin

Saturday, April 13, 2013

Get Well Wishes: second in a series

Hello!  Here is the second card in the series of six cards that I donated recently for a Domestic Violence Shelter fundraiser.  For all 6 cards I used a similar sketch as well as the new This and That Epic Day Designer Series paper which is a sneak peek from the upcoming brand new Stampin' Up! catalog (June 1), and is available now in a bundle with some other fabulous coordinating products.  Check them out!  Stop back tomorrow to see the next one in the series!

If you aren't in love with this new designers series paper yet, just wait!  I've got 4 more to show you...

~Kristin

Stampin' Up! products
Stamps:  Teeny Tiny Wishes
Colors:  Crump Cake, Very Vanilla, Summer Starfruit 
Accessories:  Big Shot, Honeycomb embossing folder, Satin Stitched ribbon, Modern Label punch, Pool Party button,  Labels Collection framelit, Baker's Twine

Friday, April 12, 2013

Hello Baby: first in a series


Good morning!  I have a clean & simple baby card to share this morning.  I made this in a series of six cards that I donated recently for a Domestic Violence Shelter fundraiser.  For all 6 cards I used a similar sketch as well as the new This and That Epic Day Designer Series paper which is a sneak peek from the upcoming brand new Stampin' Up! catalog (June 1), and is available now in a bundle with some other fabulous coordinating products.  Check them out!  Stop back tomorrow to see the next one in the series!

Thanks for visiting and hope you are having a great spring!
~Kristin

Stampin' Up! Products
Stamps:  Teeny Tiny Wishes
Paper:  Crumb Cake, Whisper White, Epic Day DSP
Accessories:  Big Shot, Cloudy Day embossing folder, Labels Collection framelits, Calypso Coral Button, Calypso Coral baker's twine, Modern Label punch

Monday, October 1, 2012

Editing Magic!

 Good morning fellow stampers!  I'm back with another Christmas card I promised a few days ago.  I was so happy with this one when it was all done, but got busy and left it sit around on my desk waiting to be photo'd... when tragedy struck. 

OK, I'm being dramatic, it's just a card... but it felt like the end of the world for a few minutes when this card, which was my favorite of the last dozen or so, fell over onto an open red inkpad.  Have you ever had this happen??  It's NOT a good feeling.
Here's the original picture.  Isn't that sickening?  But thanks to some wonderful editing tricks I managed to get it close to it's original state, at least in the photo.  Now in person it is still ruined!  And the red inkpad didn't discriminate, it ruined the main image, the ribbon and all the layers of scallops too just to be sure I couldn't reuse any piece of it.  Except the little sentiment down there. 

This was a design I had experimented with for the Stamp-a-Stack this Saturday (still time to register if you live in the area- Kenton, Ohio).  While I love this one, it is not one of the finals because I bought the new Christmas Deer stamp and really wanted to use it.  So the design will be the same, but the stamp and the ribbon (this one is retired) will change.  Plus, the paper piercing is left off- much too time consuming to have 20+ women trying to do it with only one template. 

Anyway, thanks for stopping by!  I'll be back with more SAS designs in the next few days hopefully. 
~Kristin

Oops, forgot the supply list, sorry! 

Stampin' Up! Supplies
Stamps:  Snow Swirled
Colors:  Baja Breeze, Midnight Muse Whisper White
Accessories:  Clear Embossing powder, Paper Piercing Essentials pack, Modern Label punch, Baja Breeze Seem binding ribbon, scallop border punch, sponge

Tuesday, June 26, 2012

Love You Much: Artisan Award Entry

So far you've seen a card, my recycled album clock and a scrapbook page... all entries in SU's Artisan Award contest in which I did not make the finalist round.  Up next is another card.  This was one of the first cards I made so I was sick of it by the time I shipped it off.  In fact, considered redoing it several times.  Now that I've not seen it in person for over a month I am liking it again.   

The fun details that I thought made it unique are the punched flower window with a white lattice piece behind it showing through.  I love the idea of seeing something behind that punched flower... but maybe the lattice is too busy, or the white too stark?  That's the part I reconsidered dozens of times then left.   


Perhaps my favorite detail is the three rows of scallops at the bottom that show from the inside when the card is closed.  Sort of like a 2 for 1!  I left the inside blank so it could be used as a note card for any occasion.  Thanks for stopping by! 
~Kristin

SUO Supplies
I'll stop back to add supplies.  Must run right now!


Friday, March 23, 2012

Flower Garden Butterfly


Here's one I've been anxious to share.  Initially I planned to punch the butterfly three times in a row with different colored ink behind each of them.  However, only one would fit on my basic gray paper so this design evolved.  Not sure what made me try to emboss all the layers with the Flower Garden embossing folder, but I'm so glad I did!  It worked as good as I had hoped.  I love the look of one of the flowers from Mixed Bunch behind the butterfly opening.  Wish I'd had this designed earlier and we would be making this at my SAS on Saturday.  Maybe next time.  

Here's a quick shot of the inside.  Simple.  Gotta run.  Have a great day and thanks for stopping by!
~K

SUO Supplies
Stamps:  Mixed Bunch, Teeny Tiny Wishes
Colors:  Baja Breeze, Basic Gray, Whisper White
Accessories:  Big Shot, Flower Garden embossing folder, butterfly punch, Baja Breeze seam binding, dotted scallop ribbon border punch, pearl

Thursday, February 16, 2012

Mixed Bunch & Punch

Hope you are up for another card using Mixed Bunch and the coordinating punch because here it is.  This time I clear embossed the elegant flower design before punching it out for some added detail to this otherwise fairly simple card.   I love those antique brads and especially think the style works nicely with this flower image! 
Here's a closeup shot- hoping to show the embossing detail better.  Of course I can't possibly finish a card without my trusty Big Shot and at least one embossing folder or die!  Here I added the framed tulip frame over both the River Rock and the Early Espresso layers. 

Want a TIP on how to emboss without having the Craft ink??  Ink your stamp in Versamark first then whatever color of classic ink you want.  There will be just enough sticky to catch your embossing powder!  Works every time! 

Thanks for visiting!! 
~Kristin

SUO Supplies
Stamps:  Mixed Bunch, Happiest Birthday Wishes
Colors:  River Rock, Early Espresso, Marina Mist
Accessories:  Antique brad, quilted Espresso ribbon (from Holiday Mini I think), Blossom Punch, Framed Tulips embossing folder, Clear Embossing powder

Wednesday, September 28, 2011

Ice Cream Birthday

Ugh!  Not a very good photo- it is so hard to get a good picture of a light colored sentiment!  Well, you get the idea anyway...  I did this a few days ago for a sketch but I cannot find it anywhere.  If it looks familiar please let me know where I found it so I can add the proper link! 

I was looking forward to using my punches (Pennant & Build-a-cupcake) to make an ice cream cone- so fast and easy!  The background is called "Stitched" and is embossed in white powder.  My white ink by itself just didn't show up enough.  Hope you like it!  Thanks for coming by today.

~Kristin

SUO Supplies
Stamps:  Stitched background, Create a Cupcake
Colors:  Pear Pizzazz, Pink Pirouette, Early Espresso, Whisper White
Accessories:  Pennant Punch, Build-a-cupcake punch, scallop border punch, Modern Label punch, glimmer brads, square rhinestone brads, Chocolate chip epoxy brads, Big Shot, dotted embossing folde, white embossing powder

Thursday, February 24, 2011

Bliss is...

...debossing, embossing and creating my own decorative paper with stamps!  For such a simple card I sure have a LOT of techniques going on.  This new FREE stamp set, Bliss, is ideal for making elegant cards with a beautiful demask background!  (maybe that's not what you'd call it)  Anyway, I used whisper white ink on that larger detailed stamp in the background- it shows up awesome on Black paper.  You could even use any light colored craft ink as well!  The main image with the bird on top are stamped with black craft ink then heat embossed with clear powder, then I dabbed a bit of Blushing Bride ink on the bird's belly. 

My circle piece, which is Pink Pirouette, was embossed with the Vintage Wallpaper embossing folder and Big Shot, then flipped over and gently sponged with some ink.  I've also got a large silver brad, small rhinestone and some black satin ribbon on there to step up the bling!  Oh, almost forgot about the paper piecing around the circle- it looks neat if there is light showing through. 

Speaking of forgetting, I started out using the Mojo Monday sketch challenge for this but now am realizing I left off the verticle ribbon piece... may have to rework this so it fits and so I like it a bit better. If I redo it I'll be sure to add it to this post!  I also missed the deadline to enter this.  Oh well, still a fun sketch to use!

Thanks for stopping by!
~Kristin

SUO Supplies
Stamps: Bliss
Colors: Basic Black, Blushing Bride, Pink Pirouette
Accessories: white ink, 2 1/2" circle punch, Big Shot, Vintage Wallpaper embossing folder, distressing tool, rhinestone, clear EP, large silver brad, sponge, black satin ribbon, paper piercing tools

Tuesday, April 13, 2010

Fifth Avenue Gift Set

Good morning! This week I'm working on making some card sets to sell at a Mom's group Craft Bazaar that my sister is involved in. This set is inspired by a card by Jackie Wright that I saved to my "Cards to CASE" file back in October 2009. My birthday card below is nearly a duplicate of hers and the others just kind of fell into place.

This is perfect timing because this stamp set, Fifth Avenue Floral, is 20% off this month, along with a few others. Click HERE to find promotion details! If you'd like to see other blog posts using this stamp set click HERE. Greenhouse Garden is another beautiful set that is currently offered as part of this promotion. Click HERE to see blog posts with Greenhouse Garden.

For each card I stamped the flower multiple times in vanilla ink then embossed with vanilla embossing powder. Stampin' Tip: To add a bit of dimension I then colored in each image with the Versamarker! Yep, that's one great way to use that Versamarker. For a few of them I also used markers to add a tiny hint of color to the centers. Finished them off with some dotted grosgrain ribbon in either Rich Razzleberry or Crushed Curry. Aren't they just sunny and happy? Here is a closeup look of each one:


Thanks for stopping by today! I've got a few other sets I've done as well so I'll be showing those over the next few days. Be sure to stop by tomorrow for a FABULOUS Diva Coffee Break Designs color challenge! You won't want to miss it!
~Kristin
SUO Supplies
Stamps: Fifth Avenue Floral, Warmest Regards (retired sentiment set)
Paper: Kraft (will soon be called Crumb Cake and have ink to match!!)
Accessories: Vanilla Embossing Powder, Crushed Curry & Rich Razzleberry dotted grosgrain & matching markers, Versamarker, Chocolate Chip and Mellow Moss ink

Sunday, February 14, 2010

CAS54: Wishing for Spring!

Today's CAS challenge on Splitcoast is to consider the theme: Wishing for Spring! Well, that's not too hard this time of year now is it?! We've still got tons and tons of snow laying around and are expecting possibly 6 more inches today I guess. I'm usually wishing for spring around the second day of winter!
This is the first card I made for this challenge today. To me spring is soft colors and beautiful blooming trees! So I used Kraft, So Safron, Certainly Celery with a touch of Cameo Coral. I made the flower with three layers from the Boho Blossom punch pinned together with the Sending Love Chocolate Epoxy brad. I embossed the tree in Vanilla then sponge a bit of Cameo Coral for a hint of spring to come.
I went for an altogether different look for this card. This is the closest stamp I've got to a hyacinth looking flower. The grape hyacinth are the first flower after the crocus to come up at my house. I always look forward to seeing them peek through the snow. This card is entirely Sahara Sand cardstock heavily sponged with Whisper White ink. Hope you like it!
Hope you'll go play along with the CAS challenge- and be sure to try out for the new DT stint that starts in March!
Thanks for visiting!
~Kristin

SUO Supplies:

Card #1:
Stamps: Thoughts & Prayers, Picture This
Colors: Kraft, So Saffron, Certainly Celery, Very Vanilla, Cameo Coral, Chocolate Chip
Accessories: Big Shot, Perfect Polka Dot Textured Impressions folder, Sending Love Chocolate Epoxy brad, Word Window punch, Boho Blossoms Punch, Vanilla EP

Card #2:
Stamps: Pocket Silhouettes, Happy Harmony
Colors: Sahara Sand, Whisper White, Elegant Eggplant
Accessories: Distressing tool, Paper Piercing tools, sponge dauber

Monday, October 5, 2009

Pillow Inspired!

Oh boy am I procrastinating! I have a list of 5 errands I should be out running right now, but I am messing around with my stamps instead. Gotta smile though because I love how this quick card turned out! Today's CAS challenge on splitcoast is to be inspired by a pillow HERE.


Well, here is the one I chose and I'm sure you'll some resemblance! I love inspiration challenges because the sky is the limit... not sure why I don't do them more often.

Anyway, to duplicate the look I embossed my beloved Medallion background in black on Bermuda Bay, then added some white touches with the White Gel Pen. Finished off with a sentiment and some ribbon and done. Actually, very quick and easy.

Gotta run, thanks for stopping by today!
~Kristin

SUO Supplies
Stamps: Medallion, Cute & Curly, Teeny Tiny Wishes
Colors: Black, Bermuda Bay, Whisper White
Accessories: Bermuda Bay dotted grosgrain, Curly Label punch, black EP, small oval punch, white gel pen

Sunday, September 20, 2009

Christmas Joy

I am enjoying this new Delightful Decorations from SU's Holiday mini catalog, especially because it has a coordinating punch! I actually ordered this set thinking it would be perfect when I wrap gifts (on Christmas eve) and run out of tags like I inevitably do! But I didn't realize how versatile it would be for cards and scrapbook pages as well until I started playing with it.

This time I embossed the ornament in Real Red then watercolored in the swirls with some Old olive so it would match the fabulous new ribbon called Sleighbells (also from the Holiday Mini). The flourishes from Baroque Motif are embossed in gold on a vanilla card base. The bottom strip of DSP is from the new pack called Christmas Cocoa. Finally, I finished it off with some gold elastic cord (also in the Holiday Mini).

Do you like this layout? It is from another Fall-to-Layout on the Clean & Simple blog that I mentioned yesterday.

Have a great day!
~Kristin

SUO Supplies
Stamps: Delightful Decorations, Baroque Motifs
Colors: Old Olive, Real Red, Very Vanilla, Gold
Accessories: Ornament punch, Gold elastic cord, clear EP, Gold EP, Sleighbells ribbon, Christmas Cocoa DSP

Saturday, September 19, 2009

Dreamy Bermuda Snowflakes!

I've been so inspired by (Michelle) Zindorf on SCS for her brayering techniques and amazing art! This card of hers is what I had in the back of my mind when I started playing around with these stamps and colors.

I started out just doing one snowflake on glossy white paper then kept going and then decided to cut it out with the Top Note die and Big Shot. I intended to daub on some Bermuda Bay, Sage Shadow and Soft Sky but turns out I really only needed the Bermuda Bay. I used a sponge dauber and just added the deepest color first and as the ink ran out I kept swirling and daubing (not an exact science obviously!) Ooh, did I mention that the snowflakes are embossed in white?? I guess that would help!

Initially I had the sentiment embossed in white on a piece of Bermuda cardstock which looks lovely, but covered up too many of my snowflakes so I decided to switch to vellum so nothing is covered. So glad I did!

I hope you like it and maybe try this technique out yourself!
Smiles,
~Kristin

SUO Supplies
Stamps: Serene Snowflakes, Many Merry Messages
Colors: Whisper White, Bermuda Bay
Accessories: Top Note die, Big Shot, Glossy white cardstock, vellum cardstock, white EP

Friday, September 4, 2009

Homemade DSP

While on the journey of making another card today I hit many bumps along the way so took a break and went on a tangent... this is the tangent. I was inspired by the Night & Day DSP available in the new SU Holiday Mini. I decided I could maybe mimic the look myself so I embossed the flourish from Baroque Motifs on Going Gray then stamped my By Definition background stamp in Basic Gray over it and buffed the extra ink off the embossed areas. Worked like a charm!

Next I stamped and embossed the square bird image in black and punched it out with the square punch. Also punched a square in the front panel of this card which is raised on dimensionals so the bird is actually recessed. Stamped some flowers at the lower right (in Staz On)then added the ribbon which is from the old Ribbon Originals pack called Valet... Please tell me why I rarely use my Ribbon Originals until they are RETIRED and no longer available?!? It is a sickness I swear!

The ribbon is actually in one of the box bows, but is very hard to see. Here is a closeup of the bow which happens to also show how the square the bird is in is actually behind the front panel.

I could not decide on a sentiment and really didn't want to take the chance of screwing this card up since I really like it, so there's your reason why no sentiment. I'll place something nice on the inside when the time comes!

Thanks for stopping by! Have a safe and happy holiday weekend!
~Kristin

SUO Supplies
Stamps: Of the Earth, By Definition (retired), Baroque Motifs
Colors: Going Gray, Basic Gray, Black, White
Accessories: Valet Ribbon Originals (retired), square punch, black EP, white EP, sponge

Friday, August 28, 2009

Silver on Silver!

Well I am finally done with some deadline stuff I was working on so decided to try my hand at the CAS design team sketch again. I liked my first try, but it had a totally different look than I had envisioned. This time I wanted to use my BRAND new stamp set called Serene Snowflakes that will debut in the Holiday Mini catalog beginning on September 1! What better way to show the beautiful elegant shimmer of snowflakes than to emboss silver on silver?!?

Isn't the effect just gorgeous? I haven't done this in quite a while, but I think it is always stunning! I've also paired an old favorite Elegant Eggplant with the brushed silver cardstock for a nice contrast. Boy I've missed using my Eggplant!

Here's the insdie. I loved the look of the 3 little flakes embossed on the corner so did that on the inside. I left plenty of room to add either a handwritten note or a family picture when the time comes.

Every year for Christmas cards I send about 40-50 and no two are ever alike (I just love experimenting and designing too much) but I'm thinking this might be "THE CARD" this year. What do you think?

Thanks for stopping by and for being patient with the non-stamping posts the last few days!

~Kristin

ETA: I'm thinking about using this card at an upcoming Holiday Stamp-a-Stack on Oct. 17! Mark your calendars now if you are local and I'll get more details out as soon as they are available!

SUO Supplies

Stamps: Serene Snowflakes, Best Yet (retired)

Colors: Silver, Elegant Eggplant

Accessories: Silver EP, Silver Elastic Cord, Boho Blossoms punch, Lovely Label punch

Thursday, November 13, 2008

Wonderful You!


Here's another card for you today! I made this with leftovers laying on my desk from the card I made yesterday... designing seems to happen for me that way- by accident!

The black accents, flower & punched sentiment piece, are both embossed with black so they really stand out. This looks so much sharper in person. The flower panel is on dimensionals so the dimension shows more in person too.

The blush blossom piece is wheeled with the matching wheel to this set in Sahara Sand ink, then scalloped and pierced.

To get that same blush blossom color in the flower I decided to scribble inside the lines with my Watercolor Crayon (isn't it nice that those crayons come in SU's colors?!) then blend it with the aquapainter. I love the sheen it has IRL- very cool.

This is one of those cards that took me longer than it should have. I had ideas, then changed them, then didn't like it and had to keep working at it until I finally ended up with something I like. Anyway, thanks for stopping by. I hope you like it too!
~Kristin

Stampin' Up! Supplies
Stamps: Wonderful You, Cute & Curly
Cardstock: Basic Black, Kraft, Blush Blossom, Very Vanilla
Ink: Sahara Sand, Basic Black
Accessories: Watercolor Wonder Crayons, Black EP, Scallop edge punch, Curly Label punch, small oval punch, black brads, aquapainter, paper piercing tools (Crafter's Tool Kit!)