Tuesday, March 20, 2012

Vellum Softness

Isn't vellum neat?!  It can just add a bit of softness that is just perfect.  Even better when you find it in your stash of previously embossed but unused tidbits.  Remember yesterday when I mentioned the layering technique with the new Blossom punch and the Modern Label punch?  Well, here it is.  How fun is that to use something you've already got with something you just got to make something really cool?! 
Actually got a decent shot of the inside so here it is for your viewing pleasure.  Thanks for stopping by today!  Have a great week.
~Kristin

PS- Only 12 days left for getting FREE stuff, like the designer paper & designer brad used here, with a $50 order.  It's Sale-a-Bration and it's ending soon!  Let me know if you'd like to place an order or schedule a workshop.
SUO Supplies
Stamps:  Mixed Bunch, Silhouette Sentiments, Happiest Birthday Wishes
Colors:  Pool Party, Calypso Coral, Whisper White
Accessories:  Blossom Punch, vellum, dotted scallop ribbon border punch, Everyday Enchantment DSP & brad, Modern Label punch, Rhinestones, Elegant Bouquet embossing folder, sponge dauber

Monday, March 19, 2012

Wedding Card Stash=1


I don't know about you, but I NEVER have a wedding card when I need one.  They just don't get made that often, probably because I don't specialize in "elegant".  So when trying to decide on a sentiment for this one I figured it might be a good idea to build up my stash.  Wedding card stash=1. 

This striped embossing folder keeps making appearances in cards that are drawing my attention.  So it came to mind when putting this one together.  Like how it takes a lot of plain white area and adds some interest?  Texture can do that!

My ribbon is pretty sad.  Considering I tried to duplicate a neat tutorial for making it all curly and bouncy like (wrap around a pencil and heat).  Well it was for awhile but, just like my hair, it went flat.  Since taking the picture I've tied the ribbon in a bow so it isn't so sad looking. 

Wondering about the sentiment piece??  Well, obviously it is the Modern Label punch.  But behind it is one petal from the new Blossom punch.  Not entirely necessary since I have the Movers & Shapers die that would layer perfectly, but since someone pointed out on their blog that they layer nicely I had to give it a go.  Maybe tomorrow I'll show you a better example.  

 Yes I did the inside too.  Kept it simple as well.  Just layered a smaller label framelit with the Modern Label punch and added a few pearls.
Funny thing.  After I completed this card the other day I was browsing around the internet for more inspiration and came across this sketch which I think is darn close (given some creative license) to my card.  So off to Stampin' 411 to enter! 

Hope you like it!  Off to play some more. 
~Kristin

SUO Supplies
Stamps:  Fresh Vintage, Petite Pairs
Colors:  Rich Razzleberry, Lucky Limeade, White
Accessorie:  Big Shot, Framelits Labels Collections, Pearls, Modern Label punch, Stripes embossing folder, Blossom punch

Sunday, March 18, 2012

Birthday Duo


I looked up the other day and saw two random rolls of ribbon on top of each other.  They weren't doing anything wrong, but the colors together struck me!  Then last night I had some time to stamp (in fact, LOTS of stamping time this weekend- Yeehaw!!) and this is what came of it.  Lucky Limeade and Black.  Funny thing is, I didn't use either roll of ribbon as I had intended- left them alone to do their thing. 

I borrowed the sketch from Freshly Made Sketches because it is fun and I felt like it.  And you know, my mood is pretty much what drives everything I do... laundry, stamping, exercise, cooking.  If I don't feel like it, I don't do it.  Anyway, this set which I earned for FREE with a $50 order (until March 31) hadn't seen ink yet so I whipped it out. 
 Here's a shot at the inside.  Does that look anything like a banner underneath the sentiment??  My daughter swore up and down that it did, but I'm not so sure.  I loved the idea of a fun birthday banner on the inside but didn't feel like putting the effort into a full blown pennant banner full of layers etc.  So I punched a large star and cut off it's legs.  Voila.  I guess.  It's fun anyway and I figure this will be a birthday card for one of my son's friends one of these days and they don't even read them... just give them a shake to see what falls out.  LOL.

Just for fun I made a second card at the same time as the first, just reversing the colors and stamps basically.  I NEVER do that, so it was nice to end up with two cards in nearly the time of doing one.  Who knew!
Well guess what.  I've got 11, YES ELEVEN more cards to share with you over the next several days.  You won't know what to do having something new actually show up if you decide to stop back soon! 

Thanks for visiting with me today and I hope you have fabulous weather to enoy, wherever you are!  Off to do some yard work.
~Kristin

SUO Supplies
Stamps:  Party This Way
Colors:  Lucky Limeade, Black
Accessories:  Crimper, Linen thread, narrow ribbon (in Old Olive and Black), Vanilla craft ink, Stampin' Dimensionals

Friday, March 16, 2012

Words With Friends Birthday Card

In February one of my good friends, who happens to play Words With Friends with me, turned 40... so I had this brilliant idea to make a Words With Friends themed card at the last minute.  Well, last hour.  OK, maybe two hours and that is how long it took.  If I'd started sooner it would've been square and had other squares filled in, and in general looked more authentic.  But I barely made it out the door on time with this one and it was a surprise party so my typical lateness would not have been very effective!


But it was FUN!  Here's a shot of the inside that didn't take near as long as the front.  I wanted to glitter up the "40" and the cupcake, but I knew it wouldn't dry on time so had to skip that step too. 

Well, that's my attempt at a humorous homemade 40th birthday card.  She got a good laugh out of it so that's what matters! 

I've been enjoying this beautiful spring weather, and trying to get some other projects done which is why I haven't been on here much lately.  If this weather keeps up then that might not change any time soon.  We'll see.  I'm ready to sit and stamp today, but my desk is a disaster from the last few weeks of hecticness.  Did get my taxes done yesterday though- huge relief! 

Thanks for stopping by!
~Kristin

Sunday, March 11, 2012

Sneak Peek!!

Shhhhh, don't tell that I've spilled the beans... but here is one of my three designs for our upcoming Stamp-a-Stack on Saturday March 24th!  There is still room so if you'd like to make this and 11 other designs just leave me a quick comment or shoot me an email and I'll get you the registration information.  Cost is $35 and that includes 12 cards, lunch and snacks, door prizes and a $5 coupon towards an order that day.  And don't forget the laughter and entertainment!  Hope you can join us- it isn't just for the crafty types, all are welcome, we're glad to help you along the way. 

Thanks for stopping by!
~Kristin

PS- All of my cards have a little surprise inside!

Saturday, March 10, 2012

On Pleasant Pond


How about quick scrapbook layout today?  I had fun with this one, especially since it uses full size, uncropped pictures and 6 of them to boot.  Of course I managed to squeeze two more little ones on there.  I was thinking this was a sketch I copied, but since it was so long ago now I can't find it.

The papers I used are Baja Breeze and Kiwi Kiss, plus some black and whtie.  Also put my pennant punch to use, and some other SU stuff from my stash.  I love putting things to use that I've hung onto for a long time! 

Thanks for stopping by!  Stop by tomorrow for a sneak peek of one of my cards for the SAS coming up on March 24th.  I'd love to have you so if you are local let me know and I'll get you a registration form. 
~Kristin

PS- This layout is of a playdate we had with my BFF and her girls.  The little one in the yellow swim vest is my now 10 year old!  So fun looking back at these pictures from when they were so small!

Wednesday, March 7, 2012

Stamping Ego Boost

I owe some thank yous that are well over due!  And they are all related to the SAME card!  I apologize for my lack of acknowledging these folks.  Tiffany Bauer at My Crafty World honored me by featuring this card of mine as one of her picks on her awesome blog back in February!!  Here's the post. 

Also, Chat (Nitestamper) at Me, My Stamps & I chose to use that same card for her weekly Consider it Cased post!  She made her own beautiful version too.  Check it out!

And finally, the ever-so-sweet Nancy Riley featured that card as one of her weekly iPicks!  How exciting!  I always look forward to seeing what Nancy will choose each week- she finds the best stuff!

So there you go.  Thanks ladies, for boosting my stamping ego just a smidge!  ;) 
~Kristin

Catch Up Mode

Good morning!  Sorry I've been away so long.  Scheduled a last minute 8 day trip to Florida with my dad and just got home on Friday.  It was great- 83 degrees every day, beautiful, sunny, perfect days.  Couldn't have been better!  But now I am playing catch up.  The downside of every getaway I suppose. 

Here are a few of the scrapbook layouts I completed awhile back and never got around to sharing.  The first one went fairly quickly, for me, with the Pina Colada Simply Scrappin' Kit.  I love those when I actually put them to good use and stop hoarding them! 

This one took forever.  I'm happy with how it turned out but not how long it sat on my table while I fretted over it.  It didn't help that the kit I used was not by SU so it didn't really match anything I had.  But, I did have fun using my daughter's Cricut to cut a bunch of flowers.  Even so, I still waited to get my new stamp set Mixed Bunch to finish the page.  This layout came from a sketch on Let's Scrap.  Not sure if I can remember where my other one came from- maybe a magazine or my stack of sketches I have printed that I have kept in my bag for years. 

Well, I've got an event for a variety of vendors this Saturday (Yikes!) and our Spring Stamp-a-Stack to prepare for on March 24th so I'd better skeedaddle.   Thanks for stopping by!
~Kristin

Saturday, February 18, 2012

Recycled Art


Just for future reference, if you are ever in need of a last minute Valentine box this little number took us about an hour probably.  Dug through the recycling, found this giant plastic cheese puff container from my son's birthday party in January and added some patterened paper, some ribbon and a little bling.  Voila!  Bonus:  matching crinkled paper strips for gift boxes that was had laying around just happened to match!  

 Had to have her name on it so it wrapped around the other side.  Letters courtesy of the Cricut. 

Here is one of the layouts I completed in January.  I've since done about 3-4 more so that's what you'll be seeing next probably.  Kept this one pretty clean and simple mostly because of lack of MOJO and inspiration, and a number of pictures to fit in.  My journaling isn't all that exciting so I won't bother retyping it, but the note on the red piece is kind of funny.  This was my dad's birthday present and he kept teasing my son asking him what it was, who repeatedly said "I'm not tellin' Papa, it's a surprise!".  However, my then 2.5 year old daughter blurts out "It's a gun! It's a gun!"  LOL!!  We've not trusted her with many surprises since then.  :)

Cardstock, label die (in red) and embossing folder for texture on trees is all by SU.  Letters and trees cut out with Cricut. 

Thanks for stopping by!
~Kristin

Thursday, February 16, 2012

Mixed Bunch & Punch

Hope you are up for another card using Mixed Bunch and the coordinating punch because here it is.  This time I clear embossed the elegant flower design before punching it out for some added detail to this otherwise fairly simple card.   I love those antique brads and especially think the style works nicely with this flower image! 
Here's a closeup shot- hoping to show the embossing detail better.  Of course I can't possibly finish a card without my trusty Big Shot and at least one embossing folder or die!  Here I added the framed tulip frame over both the River Rock and the Early Espresso layers. 

Want a TIP on how to emboss without having the Craft ink??  Ink your stamp in Versamark first then whatever color of classic ink you want.  There will be just enough sticky to catch your embossing powder!  Works every time! 

Thanks for visiting!! 
~Kristin

SUO Supplies
Stamps:  Mixed Bunch, Happiest Birthday Wishes
Colors:  River Rock, Early Espresso, Marina Mist
Accessories:  Antique brad, quilted Espresso ribbon (from Holiday Mini I think), Blossom Punch, Framed Tulips embossing folder, Clear Embossing powder

Mixed Birthday Bunch

Remember my mention of a new photo editing software a few weeks ago?  Well, it can't work miracles, I learned today.  To result in a beautiful picture you must start with something a step up from so-so, as you can see.  Of course this Movers & Shapers window deal makes taking a nice photo a tad difficult as well.  But you get the idea. 

This new set, Mixed Bunch, with coordinating Blossom punch is FUN to play with!  I just wish I had a punch (other than circle) to punch out the smaller flowers in the set.  You can see that I tried to use the Bojo Blossoms punch for the uppermost flower but obviously it isn't a perfect fit.  Here's another attempt...

It actually looks like Crumb Cake here but it is River Rock.  You'll notice a series of birthday cards over the next few days- I'm trying my darndest to work out a Birthday Bonanza class pretty soon.  I'll get there, I promise... just no promises as to when. 

Thanks for visiting today!
~Kristin

SUO Supplies
Stamps:  Mixed Bunch, Well Scripted
Colors:  River Rock, Rich Razzleberry, Old Olive, Wisteria Wonder
Accessories:  Big Shot, embossing folder, Movers & Shapers die, Wisteria Wonder ruffled ribbon, Dotted Wisteria Wonder brad

Wednesday, February 15, 2012

You're Welcome??


Welcome!  Who would I send this to?  Someone new in my life?  A family of a new baby?  Thought about putting "home" below "welcome" but to be honest, I don't know of anyone away who will be returning soon.  Then I thought I could add "you're" above welcome but that's just silly.  Who sends a "You're welcome" card.  LOL! 

Either way, I'm sure someone will find this in their mailbox someday.  I certainly enjoyed making it.  I was insppired by a card on page 20 in the current Occasions mini catalog.  I changed up the colors and the stamps but kept the layout pretty much identical.  Couldn't resist adding that embossed background to my card.  But what drew me to the layout in the place were those tiny little pearl-clad flowers floating off the top and bottom edges of the main image.  

As promised, here is a picture of the Valentine my daughter passed out to her classmates last Friday.  We made 26 of them and this one was left over.  I meant to photo all 26 as they are much more impressive that way... but I missed the opportunity so this is what you get.  The skinny sleeves are from SU- 50 in a pack.  We've done a number of projects with these and will have 5 or so left over!  I just photographed her Valentine box that we had fun with so I'll try to post that tomorrow. 

Thanks for stopping by today!
~Kristin

SUO Supplies
Stamps:  Up in the Air (hostess set)
Colors:  So Saffron, Soft Suede, Lucky Limeade
Accessories:  Big Shot, Elegant Lines embossing fodler, Dotted Soft Suede ribbon, Basic pearls, bitty flower punch, scallop trim border punch

Saturday, February 11, 2012

World Got a Present


Hello world!  I'm happy to be blogging 2 whole days in a row! 

 I've got another card that I'm pleased-as-punch to share with you today.  Playing with the current (yes, it is still current!) MOJO sketch.  It's kind of a shabby-whimsical-vintage look.  Well, maybe not so vintage. 
Anyway, I had fun messing around with this new stamp set called Up in the Air.  I just ADORE this particular image.  In fact, in case you hadn't noticed it (the flowers) is available as a Decor Element in the regular catalog on page 233!  I have it on my laptop (in Real Red) and LOVE it. Check it out:

 
Other new-to-me stuff I used include:  Happiest Birthday Wishes (hostess set on p. 10) for the inside and outside sentiments, my Lots of Tags Sizzlits for the label shape and patterned paper from Everyday Enchantment DSP (SAB).  Ooh yeah, also the Adorning Accent Edgelit on the Old Olive piece at the bottom.  
Hope you like it!  I've got a special friend to send it to belatedly.  Not mentioning any names since it is still sitting here on my desk. 
Thanks for stopping by today.  Maybe, just maybe I'll be back real soon with a scrapbook layout or two (completed 1 and have had one in progress for weeks now) and some Valentine stuff.  Have a great weekend!
~Kristin

PS- Yes, I did the inside up as well (I know you are supposed to be calling me out on that resolution of sorts) but it is very simple and plain and didn't photograph that great so I left it out. 

SUO Supplies
Stamps:  Happiest Birthday Wishes, Up in the Air
Colors:  Pool Party, Old Olive, Chocolate Chip, Daffodil Delight
Accessorites:  Big Shot, Lots of Tags Sizzlit, Adorning Accents Edgelit, distressing tool, wide oval punch, Lattice Embossing folder, Old Olive narrow ribbon

Friday, February 10, 2012

Works Every Time!

Nineteen days.  That's how long I've been un-blogged.  Sorry 'bout that.  I've done some crafting here and there, bits and pieces.  But this winter hibernation mode has sunk in and I'm barely getting the necessities done on a daily basis.  Let alone photographing and blogging stuff.  Nothing like a new box of Stampin' Up! goodness to get ya going again!  Works every time.

Love this sketch from Create With Connie & Mary... loved the colors too so that was my inspiration for this one.  Played around with my new Labels Collection Framelits and the SAB stamp set Fresh Vintage.  Oh, and my new Adorning Accents Edgelits.  If you don't know what I'm talking about, check out the Occasions Mini Catalog good through April 30th.

Here's a quick peek at the inside.  And a view of the sketch from CCMC.  Isn't it cute?  Thanks for stopping by!
~Kristin

SUO Supplies
Stamps:  Petite Pairs, Fresh Vintage (SAB)
Colors:  Poppy Parade, So Saffron, Pumpkin Pie
Accessories:  Big Shot, Adorning Accents Edgelits, Labels Collection Framelits, Calypso Coral Organdy ribbon (SAB), Everday Enchantment Brad, Mini Silver Brad, Designer Printed Brad, Boho Blossoms punch, Blossom Bouquet Triple Layer punch

Correction:  I listed Everyday Enchantment paper as the patterned dotted paper on here.  It isn't.  Sorry.  I can't even figure out what it is from.  *insert eye roll*

Sunday, January 22, 2012

On the topic of Valentines

Hello hello hello!  Right back at ya with yet another Valentine.  Funny, I don't send many... I probably have a stash of Valentine's I've made over the years and never sent.  I should send them- there are a few people I love.  Or I could just sign them and slip them under a few pillows.  Hmmm, like that idea. 

At the risk of sounding like a broken record, I used a sketch today.  Yep.  Isn't it fun?  I'm all about asymetrical so it spoke to me.  You should see all the sketches I DON'T use.  Seriously, there are tons out there.  I only bring you the best.  :)  This one is from Splitcoast Stampers- they have a sketch every Wednesday. 

Kept this one pretty simple.  A little stampin', little embossin', little punching.  Ooh, did you notice my cupid's arrow??  Can you guess how I did it?  I'm the last one on the bandwagon, but I finally have SU's large snowflake punch.  If you have it punch one and play around- I'm confident you can figure out this arrow.  And YES, I did have to cut some things and glue some things.  It didn't come out exactly like that.  The seam is hidden behind the sentiment piece.

More embossed dots, did you notice??  I have gotten my money's worth out of that embossing folder.  Actually, I didn't even pay for it.  Jackie Pedro sent it to me a LONG time ago! 

As promised, here's the inside all done up.  Fast and easy. Thanks for stopping by! 
~Kristin

SUO Supplies
Stamps:  Love you Much, Short & Sweet
Colors:  Rich Razzleberry, Night of Navy, Pink Pirhouette, Whisper White
Accessories:  Big Shot, Polka Dots embossing folder, Large snowflake punch, large heart punch, markers, scalloped trim border punch, Modern label punch, Pearls, Narrow Rich Razzleberry ribbon

Saturday, January 21, 2012

Picky like that


OK, alright, you guessed it.  I'm addicted to sketch challenges!  Frankly, I like them better than color challenges.  You see, I am picky about colors and combinations of colors and sometimes my mood even determines what colors I want to use. 

(don't ask me what my favorite color is like my daughter does often.  I CAN'T possibly answer that.  Like I tell her, I like all colors, just not together, not for everything and not on certain days)

I kind of get the attitude like "don't tell me what colors to use"... but I'm fine being given a sketch.  In fact, I prefer it.  That probably says something about my brain and ability or lack thereof, to design.  That might also explain why I've resorted to giving YOU a color challenge.  I'm bossy like that. 

So today I've used a sketch from Pals Paper Arts.  Love it- gives me JUST enough to work with.  Gets those creative juices flowing. 

Today I've also used some contraband.  Shhh.  The only reason I'm pointing it out is because otherwise I imagine I'll get someone asking where in the SU catalog are those embossing folders I used.  No where.  Well, not entirely true.  I used my trusty polka dots, so of course you can find them.  And the newer one (the oval frame) called Designer Frames.  Those are in there too.  The others, not so much.  They are in a set of 5 skinny strip folders called With Love by Provocraft.  That's all I'm saying 'bout that. 

And before you ask, here is the inside.  Crummy picture, even with all the editing in the world and beautiful sunlight.  Crappy camera (user).  That center piece is actually Pool Party which is why it looks so off white.
So after all the fuss, what do you think of my color combo?  I had it written down as a future challenge to use here... but got antsy and couldn't resist it.  (Same with yesterday's card!)  It is Concord Crush, Pool Party and Basic Gray.  With white of course. 

Well, I already mentioned almost everything I used in this card but I know some of you aren't reading a word of this (can't blame you) and will just cut to the list of supplies if you even want to know.  So here it is, and thanks for stopping by!
~Kristin

SUO Supplies
Stamps:  Best Yet
Colors:  Concord crush, Basic Gray, Pool Party, Whisper White
Accessories:  Big Shot, contraband previously mentioned, Polka Dot embossing folder, Designer Frames embossing folder, Concord Crush Stitched Poly ribbon, Basic Pearls

Friday, January 20, 2012

A Punchy Window

OK, so I'm a few days late.  I have a good excuse... I didn't get around to it.  :)  Anyway, this week I'm using the MOJO sketch challenge and if I remember to link it there as soon as I'm done with this post then I might actually make it in time.  (their linky closes on 1/22 so get busy!) 

I've seen this idea to use the Heart to Heart punch in this manner.  Like a window you can see through.  It fits nicely in the big 2 1/2" circle punch which I stamped with the hearts from the Confetti stamp set.  Finished it off with a Printed Designer brad in Calypso Coral, some Vanilla Seem binding ribbon, touches of dazzling diamonds glitter and a paper pierced border.  Oh, can't forget the embossed dots either.  Sentiment is from Teeny Tiny Wishes, my go to set!

Since I told you to call me out on it I'll just state for the record that I DID do the inside as well, but it is just a few punched hearts bundled in the corner with a touch of the ribbon.  And it didn't photograph well.  So you'll have to trust me. 

Thanks for stopping by!
~Kristin

Don't forget, you still have time to play along with my first challenge ever!!!

SUO Supplies
Stamps:  Confetti, Teeny Tiny Wishes
Colors:  Blushing Bride, Calypso Coral, Poppy Parade, Very Vanilla
Accessories:  Big Shot, Polka Dots embossing folder, Printed Designer Brad, Vanilla Seem Binding, 2.5" circle punch, paper piercing tools, Heart to Heart punch, dazzling diamonds

Tuesday, January 17, 2012

Owl You Do

Good morning!  How about some cute little owls to start your day?!  Today I'm playing along with the sketch challenge at Create with Connie & Mary as well as the color challenge at Color Throwdown.  My original plan was to use 6 different owl stamps, which I did manage to find in my collection.  But I wasn't sure I'd like the end result so I stuck to just this one from Aviary with the idea that I'd also use my owl punch to make a larger one to be offset.  Well, I couldn't figure out how to get it on the front side so he ended up on the inside.  Voila! 

I've been having fun doing up the insides of my cards lately.  Sure makes it easier when I grab one to send, or when I need to increase my stash to sell at the local consignment shop.  I've even started stamping the envelope to match then slipping them in a clear envelope for safe keeping.  Just stick on my address label and a clear label to show what is stamped on the inside and it's ready for sale. 

Anyone else trying to design the inside as well?  I used to dread it because I was always ready to move on to the next card, but it is SO much more enjoyable to send and receive a card with the inside all cute-ified!  This is one of my New Year's resolutions.  Feel free to call me out on it if I don't keep it up! 

 Thanks for visiting me today!  Stop back tomorrow for my first Valentine of the year! 

~Kristin

SUO Supplies:
Stamp:  Aviary, Petite Pairs, Picture This (inside sentiment), Punch Bunch (inside owl)
Colors:  River Rock, Soft Suede, Soft Sky, Daffodil Delight
Accessories:  Styled Silver Hodgepodge, small oval punch, corner rounder, scallop border punch, owl punch, Daffodil Delight pompom trim, basic pearl, punch pack (small flower on owl inside)

Monday, January 16, 2012

How 'bout a color challenge??

Good evening my fellow stampers!  Exciting news- I've been playing around and decided to throw a color challenge your way.  I found some time to play this weekend and started a list of some color combos I'd like to use soon.  Then one thing led to another and I figured out how to make a Color Challenge...uh, logo-thingy and even signed up for a free Inlinkz account.  Yes FREE so we won't have thumbnails, but who knows, if everyone plays along then we can progress to the paid stage, right? 

Anyway, the challenge is to use Certainly Celery, Elegant Eggplant and Marina Mist together somehow.  I did on my card above which also features last week's Mojo Monday sketch.  I missed the deadline for the submissions, but still love the sketch! 

I used my fierce Extreme Surfer dude with Extreme Elements for accents. 

Ooh, almost forgot to show you the inside.

Well, can't wait to see who plays along and what you come up with!  I'd love to feature one of you on a future post.  The collection closes on January 30th so you've got two weeks.  On your mark, get set, GO!  (But come back!)

~Kristin

SUO Supplies
Stamps:  Extreme Surfer, Extreme Elements, Party Hearty
Colors:  Certainly Celery, Elegant Eggplant, Marina Mist, Whisper White
Accessories:  Large star punch, Elegant Eggplant narrow grosgrain, Marina Mist ribbon, Top Note die & Big Shot
___________________________________

Wednesday, January 11, 2012

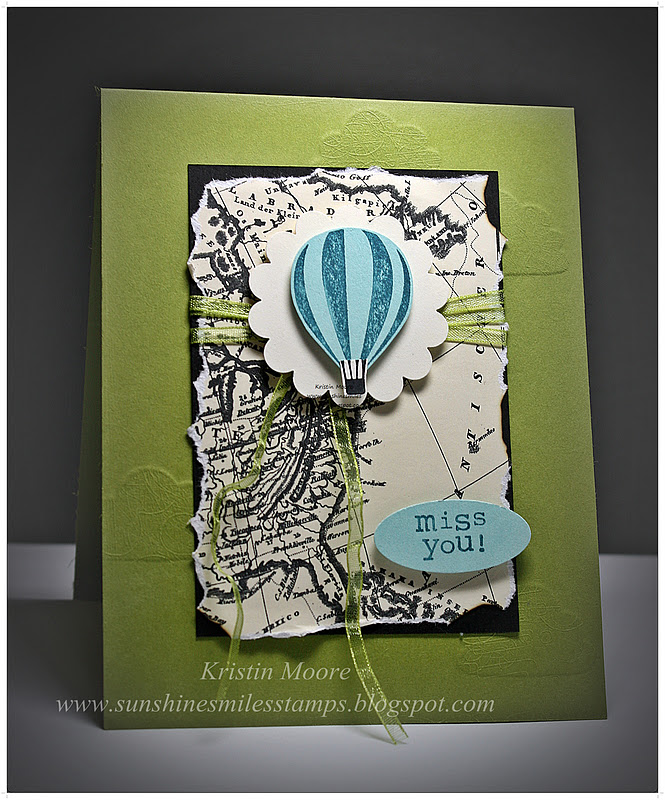
Miss you!

Hello again!  Well, here is another card and another attempt at creative photo editing with my new software.  I'm still learning obviously, it seems a little overprocessed to me, but I think this is an improvement over yesterday. 

Anyway, had fun playing with this sketch from the Clean & Simple blog.  Not sure why, but as soon as I saw it I thought I wanted to use this map paper from the Newsprint collection of Designer Series Paper.  The hot air balloon from Up, Up & Away set came to mind next.  Colors are Lucky Limeade, Island Indigo, black and vanilla. 

Did you happen to notice the embossed clouds on the Lucky Limeade card base??  Here's a hint at how I did those.  It's been awhile since I've tried making my own texture plate so took me a few tries, but in a nutshell here's how you do it:  punch or cut out shapes from scrap cardboard (this was a thin piece that I was able to punch).  Next, glue the cutouts to a scrap piece of cardstock.  I use a piece that is exactly 5.5"x4.25 so I can line it up with my card front.  Finally, stack it like this:  Multipurpose platform first (no tabs), then a cutting pad (clear plate), your template with clouds or whatever, cardstock, silicone rubber, then impressions pad. 

You may need to experiment with the "sandwich" a bit to find out what works for you... but please BE CAREFUL, Big Shots are NOT indestructible!  I'd start with a lean sandwich first then make it thicker until it works for you.
Gotta run.  Thanks for stopping by again!
~Kristin

SUO Supplies
Stamps:  Up, Up & Away
Colors:  Lucky Limeade, Island Indigo, Basic Black, Very Vanilla
Accessories:  Build-a-Cupcake punch, scallop circle punch, small oval punch, Everyday Enchantment organdy ribbon in Lucky Limeade (a Sale-a-Bration freebie starting Jan. 24!), and Newsprint DSP

Striving for Clarity

Ooh, looks like I sparked a friendly little debate on my last post.  Thanks for your input- all of it!  For clarification, it is correct to believe that I was not trying to alter my card in anyway, I'm actually quite pleased with it as-is. However, I was trying to increase your viewing pleasure by producing the best possible photograph of my card.  With that said, I do quite agree that my frame or "vignette" as one commenter called it needed to be scaled back a bit.  Wish I knew how because then I think I'd have a happy medium that we might all be able to live with. 

I will continue to play with it and strive for that perfect balance, maybe even with my next post, we'll see.  I do have a card done that I'd like to share, and maybe today is the perfect day to play with my new software since the gloomy rain outside will hinder any chance at a perfect unedited photo. 

In the mean time, thanks again for your constructive criticism and happy stamping!
~Kristin

Monday, January 9, 2012

Playing around

Playing around with a new photo editing software I just downloaded called Photoscape... same card as earlier today.  What do you think?  Even managed to get a watermark on there.  I love the look of the gradiant frame, but is this too much?  Input??

Wherever You Go

Have you heard that the new Occasions Mini catalog is now available?!  That's right, and if I was truly a gung-ho business minded demonstrator (I'm a gung-ho stamper, does that count?) I would be showing you a card today made with all new goodies from this mini... however since I don't have them quite yet, instead I'm showing you a card that was entirely inspired by the first sample in the new Mini (p. 4).  The sample was just gorgeous and I couldn't stop looking at it so I finally sat down to use that to my advantage.  Besides, I'm just glad to be stamping!  {Ooh, I just remembered, the Wisteria Wonder twine IS from this mini!!}

My version uses an old retired set called Asian Artistry.  The colors I kept the same, which are Wisteria Wonder (a current In Color) and Soft Suede with Very Vanilla.  I also used many of the same elements like the Wisteria Wonder ruffled ribbon and twine, plus the scallop border punch, Lattice embossing folder and even a mini library clip.  I almost added a pearl or two on there then decided to leave well-enough alone. 

So go check out the Mini Catalog, let me know if something grabs your attention that you can't live without, and don't miss that gorgeous sample.  Then let me know what you think (about my card, the sample, your favorite product, whatever!) 

Thanks for visiting! 
~Kristin

SUO Supplies
Stamps:  Asian Artistry
Colors:  Wisteria Wonder, Soft Suede, Very Vanilla
Accessories:  Big Shot, Lattice embossing folder, Wisteria Wonder Ruffled Ribbon, Wisteria Wonder twine, Antique Brass mini library clip, scalloped border punch